Author Archives: Sudarshan V
Author Archives: Sudarshan V
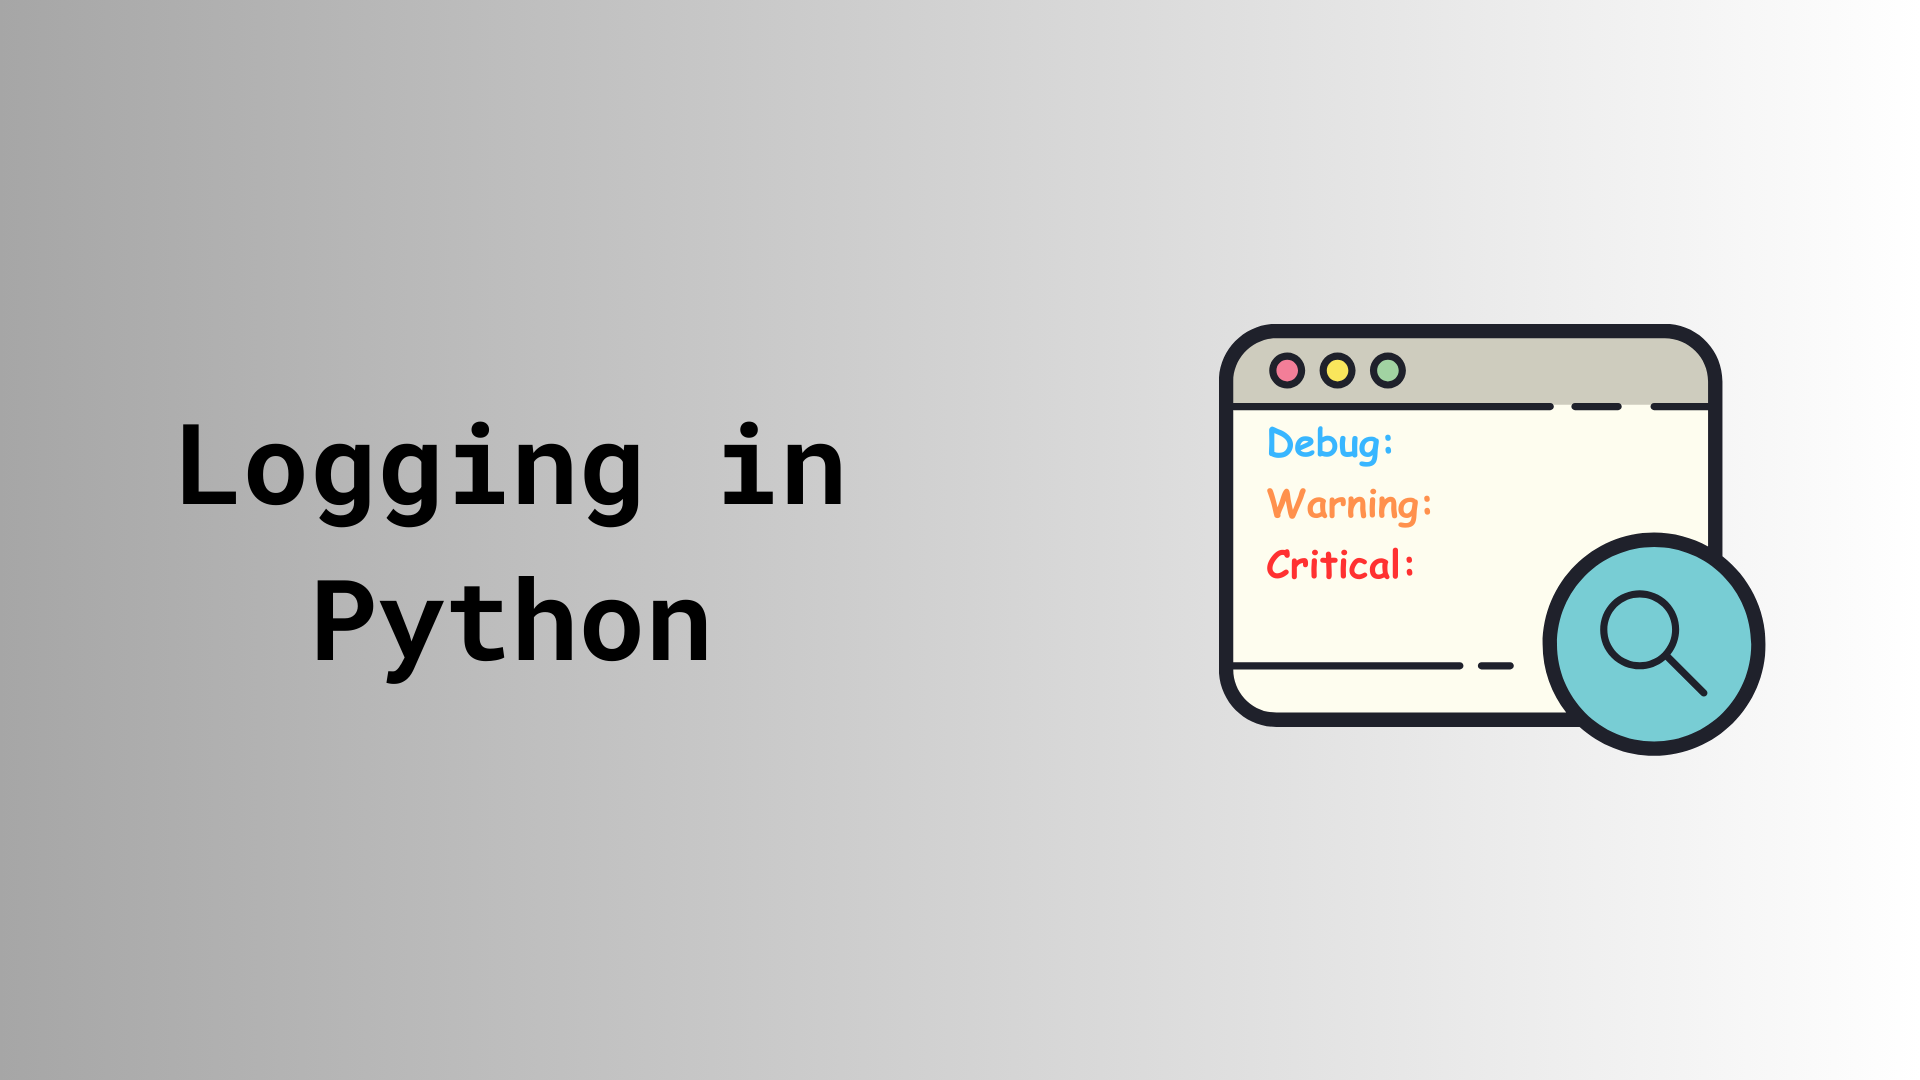
How many times have you found yourself staring at your screen, surrounded by a sea of hastily added print statements, thinking "There's got to be a better way"? If you're like me, the answer is probably "more times than I'd care to admit."
Sick of finding myself in this situation more often than I'd like, I decided to take action. Python's default logging module is powerful, but it just didn't cut it for my needs. I was looking for something more.
Before we dive in, let's look at why logging is crucial:
With these benefits in mind, I set out to build a custom logging class that would meet all my requirements. The result is PyLogger, a Python logging class that aims to make logging both powerful and user-friendly.
Below are some of the key features that make pylogger appealing:
In a previous blog post, I talked about how Terraform's native capabilities don't fully cover comprehensive IP address management, which can make network configurations a bit tricky.
In this post, I’m going to dive into a practical approach for handling IP addresses in Terraform. I'll show you how to leverage an external data source and use a Python script to process IP address operations, then integrate the results back into Terraform.
In Terraform, a data source allows you to retrieve information from external systems or services, which you can then use in your configurations. Unlike resources, which are used to manage the lifecycle of infrastructure components, data sources are read-only. They provide a way to fetch data that you might need when setting up or configuring your infrastructure. This is especially useful when you want to incorporate existing information without directly managing the components within your Terraform scripts.
A simple data source in Terraform looks like this:
data "external" "ip" {
  id = "ip"
}
Sample External Data Source
A lot of providers provide external data sources to interact with their systems and get configuration state. A data source in Terraform can range from a Continue reading

Welcome back to the final part of my Terraform for Network Engineers series! In this installment, we're diving into the often tricky territory of managing the state file in Terraform. I'll also walk you through the concept of remote state management and show you how it can streamline your infrastructure management. Let's get started!
The state file is the backbone of Terraform. It keeps a detailed record of the resources you've created and their current state. Terraform relies on this file to figure out what changes need to be made whenever you run terraform apply. By default, Terraform saves this file locally as terraform.tfstate.
While this works fine if you're the only one handling the infrastructure, it can quickly become a headache for a team. Multiple engineers working on the same setup can run into conflicts and inconsistencies. The solution? Store the state file remotely in a shared location that everyone on the team can access. This way, everyone stays on the same page, and your infrastructure management becomes much smoother.
Remote state management is all about storing the state file in a place that everyone on the team can access. This Continue reading

If you have not read the previous parts of this series, I recommend you start there.
Welcome back to our journey of exploring Terraform for Network Engineers. In the previous part, we left ourself with a few challenges network engineers face when diving into the world of Terraform. Let's quickly recap those challenges:
In this part, we'll tackle the first two challenges. We will explore how we can simplify the configuration file and abstract the complexity of the Terraform provider documentation.
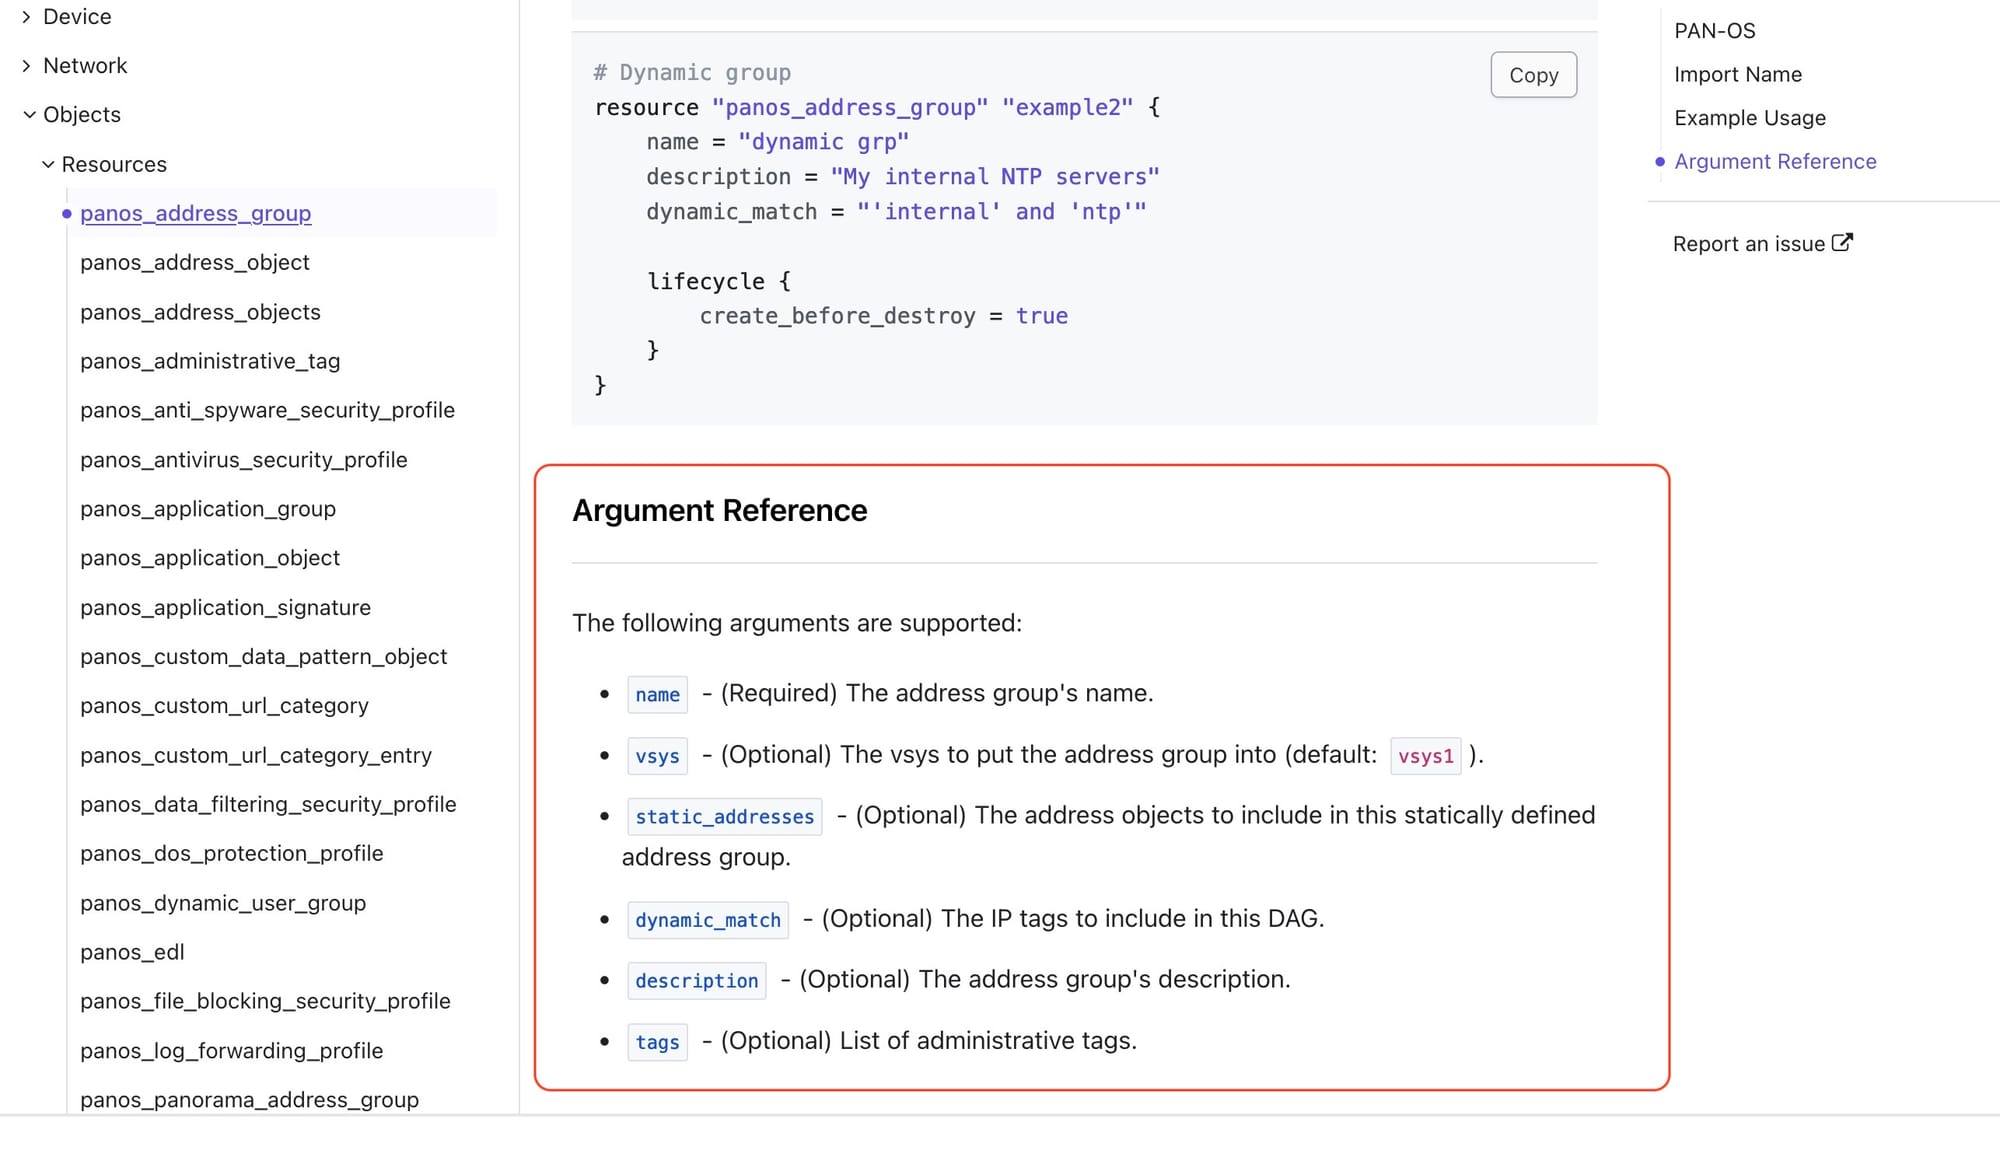
Before we dive in, lets decompose the components of a simple Palo Alto Networks security policy configuration. A simple policy is composed of the following components:
Before diving in, if you haven’t read the first part of this series, I highly recommend starting there. In the introductory post, we covered the basics of Terraform and explored how network engineers can leverage it.
In part two, we will:
All Terraform providers have their documentation available on the Terraform website, following a similar structure.The Panorama provider documentation can be found here.
Here are a couple of screenshots highlighting the key sections of the Panorama provider documentation.
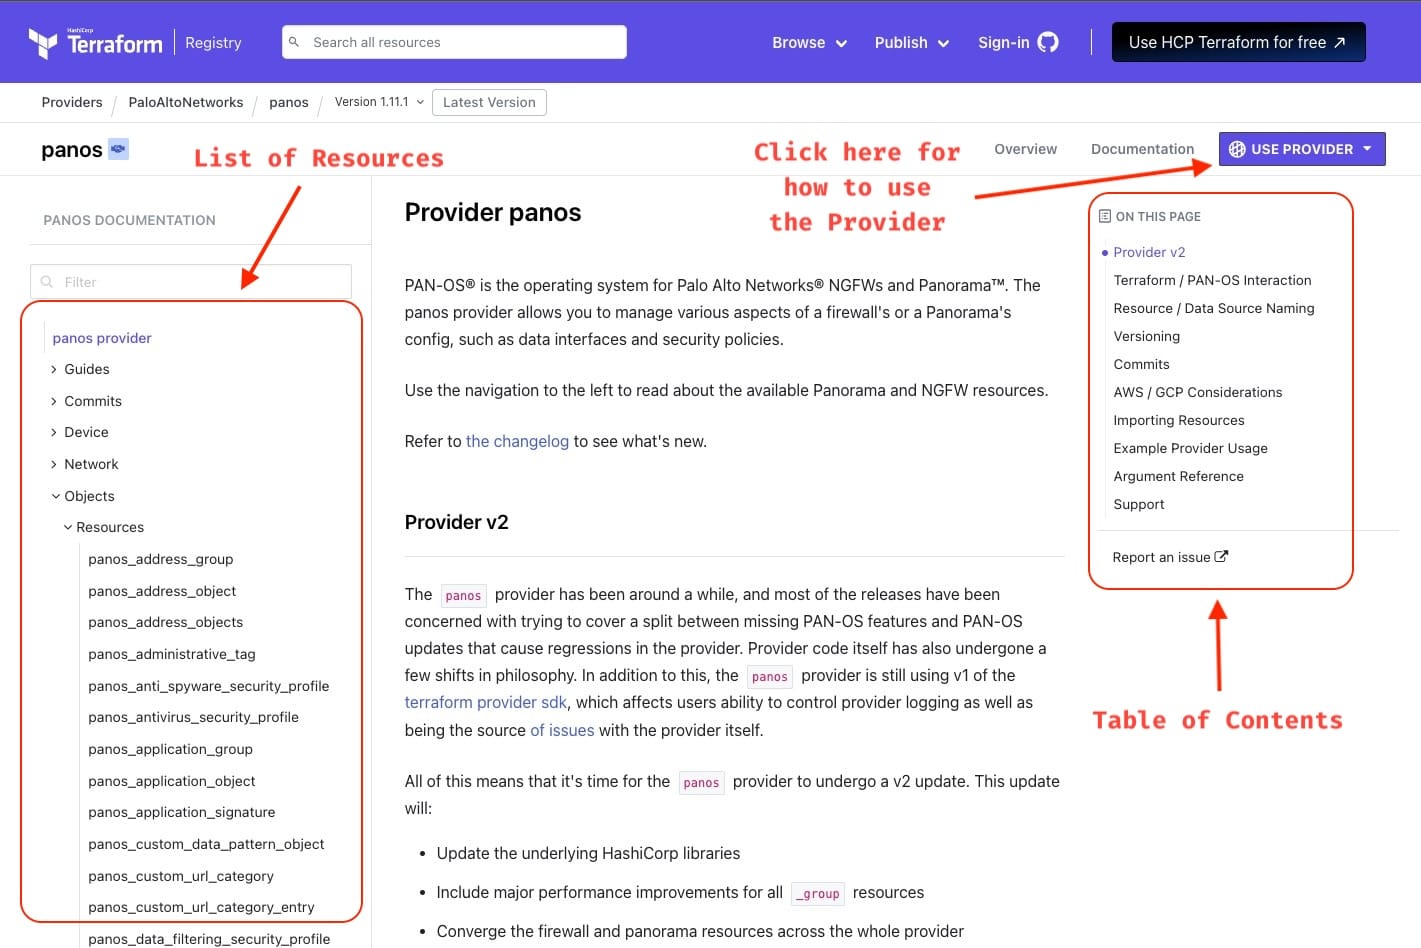
If you drill down into a Resource, you can find how the configuration block would look and what are the arguments you can pass to it.
We'll set up all the files and folders needed to create resources on Panorama using Terraform. I prefer to keep my Terraform projects organized. Below is the structure I typically follow for my projects.
mkdir tf-neteng
cd tf-neteng
touch  Continue reading
When I mention to my industry peers that I use Terraform to manage parts of my on-premise network infrastructure, I often get blank stares or a look of surprise. It's understandable — Terraform is usually associated with cloud infrastructure, not on-premise network devices. A quick Google search for "Terraform for Network Engineers" mostly brings up results about creating AWS VPCs, Azure VNETs, or deploying Palo Alto firewalls in AWS. There's not much out there about using Terraform for network devices like routers, switches, firewalls, and load balancers.
In this blog post series, I'll share my experience using Terraform to manage network devices and explain how it can benefit network engineers. While I'm not sure how many parts this series will have, I'll keep each post concise and informative, giving you the essentials to get started. If you have questions or need help, feel free to reach out.
Throughout the series, I'll use Palo Alto Network (Panorama) as the target, but the concepts can be applied to any network device that supports Terraform.
In Part One of this series, we'll cover the following topics:
In part 2 of this multipart series on network observability with SuzieQ, we looked at how to setup SuzieQ using docker compose. In this part, we will look at how to interact with the data collected by SuzieQ using the command line interface (CLI) and its REST API.
If you have not read Part One and Part Two yet, I recommend you read it first before proceeding with this part.
SuzieQ provides a command line interface to interact with the data it has collected. Like any Linux CLI, SuzieQ CLI providers command completion when options are available and also provides help for each command. All commands follow a common structure <table_name> <verb> <filters>. This will make more sense when we start looking at some examples.
Let us start by running the SuzieQ CLI. If you have been following along with the previous parts, you should have the SuzieQ docker container running and you can connect to the SuzieQ CLI by running the docker attach suzieq_cli command. Once you are connected, you will see a prompt like this suzieq>. This is the SuzieQ CLI prompt.
root@sudarshanv:/suzieq/suzieq# docker attach suzieq_cli
suzieq>
Connecting to SuzieQ CLI
From here you can get Continue reading
In part One of this multipart series, we covered the introduction to SuzieQ and some of the features of SuzieQ. In this part, we will cover how to set up SuzieQ using Docker Compose. If you have not read Part One yet, I recommend you read it first before proceeding with this part.
Setting up SuzieQ with Docker Compose simplifies deployment and management. Docker Compose is a tool for defining and running multi-container docker applications using a single YAML file. We’ll use a pre-built SuzieQ Docker image from Docker Hub, maintained and regularly updated by the SuzieQ team, to ensure you have the latest features and improvements.
Before we start, make sure you have the following installed on your machine:
We'll begin with creating necessary files and directories. This will include:
suzieq/: Directory to store configuration files for SuzieQparquet/: Directory to store the Parquet database Continue reading
Fresh out of attending Autocon1 (Network Automation Forum) in Amsterdam, I was excited to try out SuzieQ, a network observability tool that I heard a lot about. Though I had heard about SuzieQ before, and even tried it out in a lab environment before, I wanted to dive deeper into it and see how it could help me in my day-to-day work now that i was in a 100% network automation role.
In this multipart series, we will cover the following topics:
SuzieQ is a network observability tool that provides a snapshot of the network at a given point in time. It collects data from network devices and stores it in a database at specified intervals. This data can then be queried to get insights into the network. It allows for us to have a historical view of the network and help us answer questions like What changed in the network between 2 points in time? or What is the state of the network at a given Continue reading
Welcome to the world of Ansible magic! In this blog post, we're going to uncover the secrets of accessing host_vars and group_vars directly from Python scripts. These variables hold the keys to customizing your automation scripts, empowering you to unlock new levels of flexibility and efficiency in your infrastructure management.
Let’s dive in!
To do this, we’ll use the Ansible API. The Ansible API is a powerful tool that allows you to interact with Ansible programmatically. The documentation for the Ansible API can be found here.
My ansible project folder structure looks like this
.
├── ansible.cfg
├── ansible_pyapi.py
├── group_vars
│   ├── all.yaml
│   └── host1_2.yaml
├── host_vars
│   ├── host1.yml
│   ├── host2.yml
│   └── host3.yml
└── inventory.ini
folder structure
My inventory file looks like this:
host1
host2
host3

[host1_2]
host1
host2

[all:vars]
username= "username"
password= "password"
inventory.ini
Contents of host_vars and group_vars files are as follows:
host_vars_location: from host_vars/host1.ymlhost_vars/host1.yml
host_vars_location: from host_vars/host2.yml
host_vars/host2.yml
host_vars_location: from host_vars/host3.yml
host_vars/host3.yml
all_group_vars: from group_vars/all.yaml
group_vars/all.yml
group_vars_location: from group_vars/host1_2.yaml
group_vars/host1_2.yml
Lately, I was working on a Python script to help my team and me manage interface configurations on Cisco switches. One thing my team asked for was a way to see what changes the script was making to the configurations before and after it did its thing. My first thought was to use Python’s difflib module for this. It’s handy for comparing two sequences and showing the differences.
To give you an idea, here’s an example of what the output looked like using the difflib module.
import difflib

before = """
interface HundredGigE1/0/3
 description Dummy interface
 switchport mode access
 switchport access vlan 10
end
"""

after = """
interface HundredGigE1/0/3
 description Dummy interface
 switchport mode access
 switchport access vlan 20
end
"""

diff = difflib.ndiff(before.splitlines(), after.splitlines())
print("\n".join(diff))
The output of the above script is as below:
  interface HundredGigE1/0/3
   description Dummy interface
   switchport mode access
-  switchport access vlan 10
?                         ^

+  switchport access vlan 20
?                         ^

  end
The team wasn’t too thrilled with the output because it was kinda tricky to read. You really had to know what you were looking for to make sense of it.
While looking for a suitable solution, I came across Continue reading
Interacting with the F5 Programatically is an exciting yet challenging journey. During my experience, I faced timeouts that disrupted session stability and hindered effective API communication with F5 devices.
In this blog post, I'll share my journey of overcoming these obstacles while developing a script to generate backups of F5 configurations. Although I focus on timeout challenges in Go, the principles and solutions discussed apply to any programming language. By sharing my insights, I aim to empower you to handle timeouts and generate F5 backups effectively, regardless of your language preference.
In the code examples below, I use the Go and its SDK to interact with the F5 guest, which can be found here.
The first timeout issue I encountered was the session timeout. This happened while trying to create a UCS backup of the device's configuration. This task can be quite time-consuming, especially when dealing with large configuration files -my file was over 1GB. The challenge arose when the F5 session would time out before the backup process completed, forcing me to establish a new connection to continue interacting with the F5 device.
Below is the code snippet for reference:
package main

import (
	"log"

	 Continue reading
Have you ever found yourself drowning in a sea of JSON data, desperately trying to extract just the right information? I know I have. In my recent Python project, I encountered this exact scenario all too often. I'd be faced with massive JSON files, and extracting the specific data I needed became a headache, involving endless nested loops and conditional statements.
That's when I stumbled upon JMESPath, a lifesaver in the world of data extraction. JMESPath provides a simple and powerful way to query and manipulate JSON data. It's like having a magic wand that lets you effortlessly pluck out exactly what you need from even the most complex JSON structures.
In this post, I'll walk you through an example of how JMESPath came to my rescue and revolutionized the way I work with JSON data. So buckle up, because once you see what JMESPath can do, you'll wonder how you ever managed without it. Let's dive in!
JMESPath, a query language for JSON serves as your trusty companion in the realm of JSON data manipulation. With JMESPath, you can effortlessly filter, extract, and transform information from JSON datasets, making it an invaluable tool for anyone who Continue reading
Cloud Development Kit for Terrafrom or CDKTF as it is commonly referred to is a tool kit that allows you to leverage the advantages of Terrafrom from within a high-level programming language such as TypeScript, Python, Java, C#, or Go. CDKTF automatically extracts the schema from Terraform providers and modules to generate the necessary classes for your application. We can use CDKTF with every provider that is avaiable on the Terrafrom registry.
In this post, we will look at an example of using CDKTF with Python to provision resources on a Palo Alto Networks Panorama. I chose a Palo Alto Networks Panorama as the target here because I am from a network engineering background.
Hashicorp have well documented steps on how you can install CDKTF and can be found here.
Once we have successfully installed CDKTF and verified our installation, we begin by initialising a cdktf project with an appropriate template. Here, we are using Python as our template.
cdktf init --template=python --local --project-name cdktf-post --project-description A-simple-projectInitialise a new CDKTF project
Once the initialiation has been completed, you will notice that several new files and folders are created. The main.py file Continue reading
In the realm of automation, scripts often thrive on the variables they receive. These variables determine the actions the script will perform. However, if a script encounters a variable in a format or data type it doesn't expect, it might throw an error with a message that's about as clear as mud. This is where data validation comes into play.
Validating the data passed to a script is like giving it a road map to success. It ensures that the script knows what to expect and how to handle it. Whether the data is coming from another script or an end device, validation helps prevent those cryptic error messages and keeps your automation journey smooth sailing.
Data validation is like the gatekeeper of your data world—it's all about ensuring that the data you're dealing with is accurate, reliable, and fits the requirements of whatever you're trying to do with it. Think of it as quality control for your data before you start using it in your programs or analyses. There are various ways to validate data depending on what you need it for and what rules it needs to follow. And that's where pydantic swoops in Continue reading
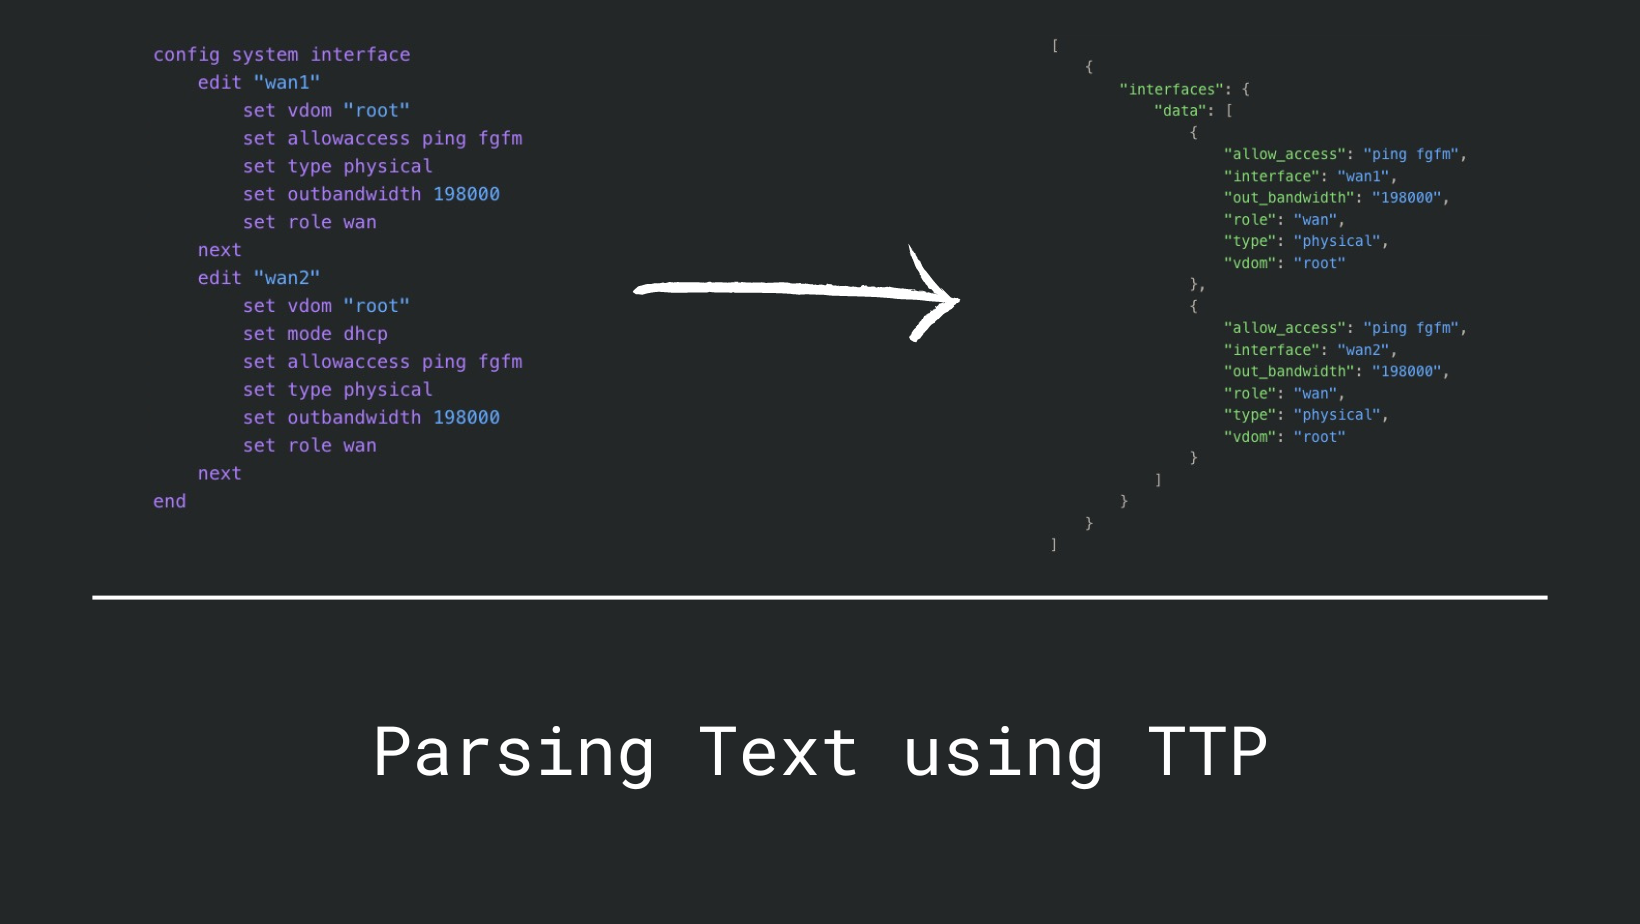
Before we dive into TTP (Template Text Parser), let us first address why we need a text scraping tool in the modern world of APIs and structured data. Here is my opinion:
You would be surprised to know that many commercial tools that do network observability use screen scraping under the hood. So, it is not a bad idea to learn how to do it yourself.
From a network engineer's perspective, there are two popular tools that can be used for screen scraping:
In the realm of data security, HashiCorp Vault emerges as a formidable tool for safeguarding sensitive information. Its primary role? To serve as a secure and encrypted repository for your most prized secrets. Whether you choose to manage it independently through the open-source option or opt for the convenience of HashiCorp Cloud Platform's SaaS solution, Vault stands as a reliable guardian of your data, ensuring confidentiality and integrity are upheld with every interaction.
The Vault HTTP API serves as a versatile gateway, granting comprehensive control over Vault's functionalities through simple HTTP requests. Whether you're delving into secrets management or tackling encryption tasks, this API opens the door to Vault's full potential. And for Python enthusiasts like myself, there's an added layer of convenience: a meticulously crafted Python SDK, complete with thorough documentation, streamlining interactions with Vault.
In this blog post, we'll embark on a journey to set up a self-managed instance of Vault, exploring how to seamlessly integrate Python for streamlined interaction with the platform.
We'll kick start our Vault journey by spinning up an instance using Docker. To achieve this, we'll craft a docker-compose.yml file to orchestrate the process:
version: "3.9"
services:
  hashicorp-vault:
    build: .
    ports:
       Continue reading