Hacking the Geberit Sigma 70 flush plate
My toilet is equipped with a Geberit Sigma 70 flush plate. The sales pitch for this hydraulic-assisted device praises the “ingenious mount that acts like a rocker switch.” In practice, the flush is very capricious and has a very high failure rate. Avoid this type of mechanism! Prefer a fully mechanical version like the Geberit Sigma 20.
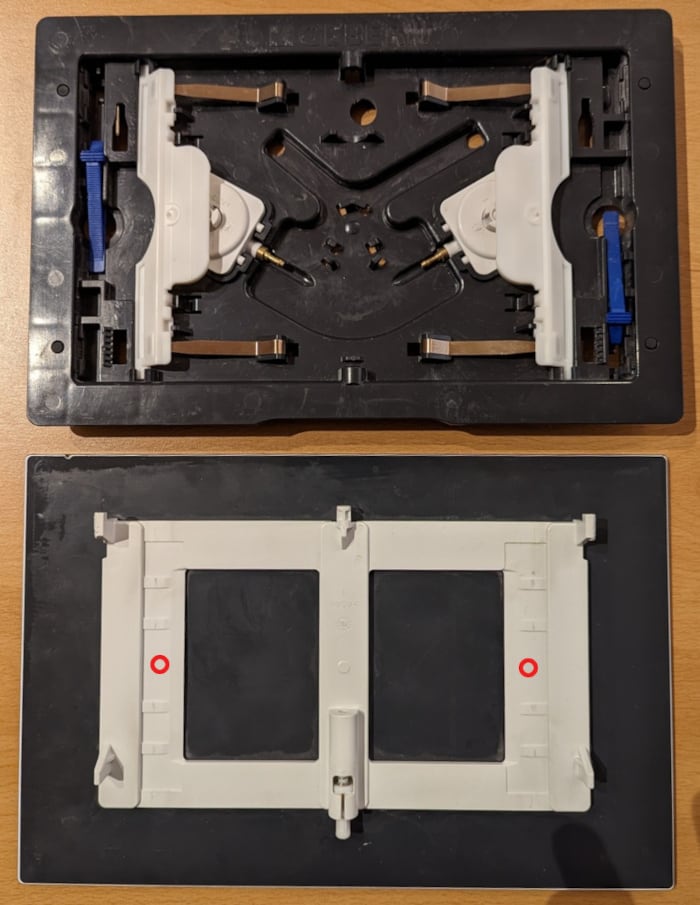
After several plumbers, exchanges with Geberit’s technical department, and the expensive replacement of the entire mechanism, I was still getting a failure rate of over 50% for the small flush. I finally managed to decrease this rate to 5% by applying two 8 mm silicone bumpers on the back of the plate. Their locations are indicated by red circles on the picture below:
Expect to pay about 5 € and as many minutes for this operation.
Fast and dynamic encoding of Protocol Buffers in Go
Protocol Buffers are a popular choice for serializing structured data due to their compact size, fast processing speed, language independence, and compatibility. There exist other alternatives, including Cap’n Proto, CBOR, and Avro.
Usually, data structures are described in a proto definition file
(.proto). The protoc compiler and a language-specific plugin convert it into
code:
$ head flow-4.proto
syntax = "proto3";
package decoder;
option go_package = "akvorado/inlet/flow/decoder";

message FlowMessagev4 {

  uint64 TimeReceived = 2;
  uint32 SequenceNum = 3;
  uint64 SamplingRate = 4;
  uint32 FlowDirection = 5;
$ protoc -I=. --plugin=protoc-gen-go --go_out=module=akvorado:. flow-4.proto
$ head inlet/flow/decoder/flow-4.pb.go
// Code generated by protoc-gen-go. DO NOT EDIT.
// versions:
//      protoc-gen-go v1.28.0
//      protoc        v3.21.12
// source: inlet/flow/data/schemas/flow-4.proto

package decoder

import (
        protoreflect "google.golang.org/protobuf/reflect/protoreflect"
Akvorado collects network flows using IPFIX or sFlow, decodes them with GoFlow2, encodes them to Protocol Buffers, and sends them to Kafka to be stored in a ClickHouse database. Collecting a new field, such as source and destination MAC addresses, requires modifications in multiple places, including the proto definition file and the ClickHouse migration code. Moreover, Continue reading
Managing infrastructure with Terraform, CDKTF, and NixOS
A few years ago, I downsized my personal infrastructure. Until 2018, there were a dozen containers running on a single Hetzner server.1 I migrated my emails to Fastmail and my DNS zones to Gandi. It left me with only my blog to self-host. As of today, my low-scale infrastructure is composed of 4 virtual machines running NixOS on Hetzner Cloud and Vultr, a handful of DNS zones on Gandi and Route 53, and a couple of Cloudfront distributions. It is managed by CDK for Terraform (CDKTF), while NixOS deployments are handled by NixOps.
In this article, I provide a brief introduction to Terraform, CDKTF, and the Nix ecosystem. I also explain how to use Nix to access these tools within your shell, so you can quickly start using them.
CDKTF: infrastructure as code
Terraform is an “infrastructure-as-code” tool. You can define your infrastructure by declaring resources with the HCL language. This language has some additional features like Continue reading
Akvorado: a flow collector, enricher, and visualizer
Earlier this year, we released Akvorado, a flow collector, enricher, and visualizer. It receives network flows from your routers using either NetFlow v9, IPFIX, or sFlow. Several pieces of information are added, like GeoIP and interface names. The flows are exported to Apache Kafka, a distributed queue, then stored inside ClickHouse, a column-oriented database. A web frontend is provided to run queries. A live version is available for you to play.

Several alternatives exist:
- Kentik, a popular cloud-based solution,
- ElastiFlow, a self-hosted proprietary solution, or
- your own assembly of open source solutions by picking a flow collector (pmacct, GoFlow2, or vFlow), a distributed queue1 (Apache Kafka or RabbitMQ), a database (ClickHouse, Elasticsearch, or Apache Pinot), and a web frontend (Grafana, Kibana, or Apache Superset).
Akvorado differentiates itself from these solutions because:
- it is open source (licensed under the AGPLv3 license), and
- it bundles flow collection, storage, and a web interface into a single “product.”
The proposed deployment solution relies on Docker Compose to set up Akvorado, Zookeeper, Kafka, and ClickHouse. Continue reading
Broken commit diff on Cisco IOS XR
TL;DR
Never trust show commit changes diff on Cisco IOS XR.
Cisco IOS XR is the operating system running for the Cisco ASR, NCS, and
8000 routers. Compared to Cisco IOS, it features a candidate
configuration and a running configuration. In configuration mode, you can
modify the first one and issue the commit command to apply it to the running
configuration.1 This is a common concept for many NOS.
Before committing the candidate configuration to the running configuration, you
may want to check the changes that have accumulated until now. That’s where the
show commit changes diff command2 comes up. Its goal is to show the
difference between the running configuration (show running-configuration) and
the candidate configuration (show configuration merge). How hard can it be?
Let’s put an interface down on IOS XR 7.6.2 (released in August 2022):
RP/0/RP0/CPU0:router(config)#int Hu0/1/0/1 shut
RP/0/RP0/CPU0:router(config)#show commit changes diff
Wed Nov 23 11:08:30.275 CET
Building configuration...
!! IOS XR Configuration 7.6.2
+  interface HundredGigE0/1/0/1
+   shutdown
   !
end
The + sign before interface HundredGigE0/1/0/1 makes it look like you did
create a new interface. Maybe there was a typo? No, the diff is just broken. If
you Continue reading
FRnOG #36: Akvorado
Here are the slides I presented for FRnOG #36 in September 2022. They are about Akvorado, a tool to collect network flows and visualize them. It was developped by Free. I didn’t get time to publish a blog post yet, but it should happen soon!
The presentation, in French, was recorded. I have added English subtitles.
ClickHouse SF Bay Area Meetup: Akvorado
Here are the slides I presented for a ClickHouse SF Bay Area Meetup in July 2022, hosted by Altinity. They are about Akvorado, a network flow collector and visualizer, and notably on how it relies on ClickHouse, a column-oriented database.
The meetup was recorded and available on YouTube. Here is the part relevant to my presentation, with subtitles:1
I got a few questions about how to get information from the higher layers, like HTTP. As my use case for Akvorado was at the network edge, my answers were mostly negative. However, as sFlow is extensible, when collecting flows from Linux servers instead, you could embed additional data and they could be exported as well.
I also got a question about doing aggregation in a single table.
ClickHouse can aggregate automatically data using TTL. My answer for
not doing that is partial. There is another reason: the retention
periods of the various tables may overlap. For example, the main table
keeps data for 15 days, but even in these 15 days, if I do a query on
a 12-hour window, it is faster to use the flows_1m0s aggregated
table, unless I request something about Continue reading
Custom screen saver with XSecureLock
i3lock is a popular X11 screen lock utility. As far as customization goes, it only allows one to set a background from a PNG file. This limitation is part of the design of i3lock: its primary goal is to keep the screen locked, something difficult enough with X11. Each additional feature would increase the attack surface and move away from this goal.1 Many are frustrated with these limitations and extend i3lock through simple wrapper scripts or by forking it.2 The first solution is usually safe, but the second goes against the spirit of i3lock.
XSecureLock is a less-known alternative to i3lock. One of the most attractive features of this locker is to delegate the screen saver feature to another process. This process can be anything as long it can attach to an existing window provided by XSecureLock, which won’t pass any input to it. It will also put a black window below it to ensure the screen stays locked in case of a crash.
XSecureLock is shipped with a few screen savers, notably one using mpv to display photos or videos, like the Apple TV aerial videos. I have written my own saver using Python and Continue reading
Automatic login with startx and systemd
If your workstation is using full-disk encryption, you may want to jump directly to your desktop environment after entering the passphrase to decrypt the disk. Many display managers like GDM and LightDM have an autologin feature. However, only GDM can run Xorg with standard user privileges.
Here is an alternative using startx and a systemd service:
[Unit]
Description=X11 session for bernat
After=graphical.target systemd-user-sessions.service

[Service]
User=bernat
WorkingDirectory=~

PAMName=login
Environment=XDG_SESSION_TYPE=x11
TTYPath=/dev/tty8
StandardInput=tty
UnsetEnvironment=TERM

UtmpIdentifier=tty8
UtmpMode=user

StandardOutput=journal
ExecStartPre=/usr/bin/chvt 8
ExecStart=/usr/bin/startx -- vt8 -keeptty -verbose 3 -logfile /dev/null
Restart=no

[Install]
WantedBy=graphical.target
Let me explain each block:
-
The unit starts after
systemd-user-sessions.service, which enables user logins after boot by removing the/run/nologinfile. -
With
User=bernat, the unit is started with the identity of the specified user. This implies thatXorgdoes not run with elevated privileges. -
With
PAMName=login, the executed process is registered as a PAM session for theloginservice, which includes pam_systemd. This module registers the session to the systemd login manager. To Continue reading
Git as a source of truth for network automation
The first step when automating a network is to build the source of truth. A source of truth is a repository of data that provides the intended state: the list of devices, the IP addresses, the network protocols settings, the time servers, etc. A popular choice is NetBox. Its documentation highlights its usage as a source of truth:
NetBox intends to represent the desired state of a network versus its operational state. As such, automated import of live network state is strongly discouraged. All data created in NetBox should first be vetted by a human to ensure its integrity. NetBox can then be used to populate monitoring and provisioning systems with a high degree of confidence.
When introducing Jerikan, a common feedback we got was: “you should use NetBox for this.” Indeed, Jerikan’s source of truth is a bunch of YAML files versioned with Git.
Why Git?
If we look at how things are done with servers and services, in a datacenter or in the cloud, we are likely to find users of Terraform, a tool turning declarative configuration files into infrastructure. Declarative configuration management tools like Salt, Puppet,1 or Ansible take Continue reading
How to rsync files between two remotes?
scp -3 can copy files between two remote hosts through localhost.
This comes in handy when the two servers cannot communicate
directly or if they are unable to authenticate one to the
other.1 Unfortunately, rsync does not support such a feature.
Here is a trick to emulate the behavior of scp -3 with SSH tunnels.
When syncing with a remote host, rsync invokes ssh to spawn a
remote rsync --server process. It interacts with it through its
standard input and output. The idea is to recreate the same setup
using SSH tunnels and socat, a versatile tool to establish
bidirectional data transfers.
The first step is to connect to the source server and ask rsync the
command-line to spawn the remote rsync --server process. The -e
flag overrides the command to use to get a remote shell: instead of
ssh, we use echo.
$ ssh web04
$ rsync -e 'sh -c ">&2 echo $@" echo' -aLv /data/. web05:/data/.
web05 rsync --server -vlogDtpre.iLsfxCIvu . /data/.
rsync: connection unexpectedly closed (0 bytes received so far) [sender]
rsync error: error in rsync protocol data stream (code 12) at io.c(228) [sender=3.2.3]
The second step is to connect to Continue reading
FRnOG #34: how we deployed a datacenter in one click
Here are the slides I presented for FRnOG #34 in October 2021. They are about automating the deployment of Blade’s datacenters using Jerikan and Ansible. For more information, have a look at “Jerikan+Ansible: a configuration management system for network.”
The presentation, in French, was recorded. I have added English subtitles.1
-
Good thing if you don’t understand French as my diction was poor with a lot of fillers. ↩︎
Short feedback on Cisco pyATS and Genie Parser
Cisco pyATS is a framework for network automation and testing. It includes, among other things, an open-source multi-vendor set of parsers and models, Genie Parser. It features 2700 parsers for various commands over many network OS. On the paper, this seems a great tool!
>>> from genie.conf.base import Device
>>> device = Device("router", os="iosxr")
>>> # Hack to parse outputs without connecting to a device
>>> device.custom.setdefault("abstraction", {})["order"] = ["os", "platform"]
>>> cmd = "show route ipv4 unicast"
>>> output = """
... Tue Oct 29 21:29:10.924 UTC
...
... O    10.13.110.0/24 [110/2] via 10.12.110.1, 5d23h, GigabitEthernet0/0/0/0.110
... """
>>> device.parse(cmd, output=output)
{'vrf': {'default': {'address_family': {'ipv4': {'routes': {'10.13.110.0/24': {'route': '10.13.110.0/24',
       'active': True,
       'route_preference': 110,
       'metric': 2,
       'source_protocol': 'ospf',
       'source_protocol_codes': 'O',
       'next_hop': {'next_hop_list': {1: {'index': 1,
          'next_hop': '10.12.110.1',
          'outgoing_interface': 'GigabitEthernet0/0/0/0.110',
          'updated': '5d23h'}}}}}}}}}}
First deception: pyATS is closed-source with some exceptions. This
is quite annoying if you run into some issues outside Genie Parser.
For example, although pyATS is using the ssh command, Continue reading
Switching to the i3 window manager
I have been using the awesome window manager for 10 years. It is a tiling window manager, configurable and extendable with the Lua language. Using a general-purpose programming language to configure every aspect is a double-edged sword. Due to laziness and the apparent difficulty of adapting my configuration—about 3000 lines—to newer releases, I was stuck with the 3.4 version, whose last release is from 2013.
It was time for a rewrite. Instead, I have switched to the i3 window manager, lured by the possibility to migrate to Wayland and Sway later with minimal pain. Using an embedded interpreter for configuration is not as important to me as it was in the past: it brings both complexity and brittleness.

The window manager is only one part of a desktop environment. There are several options for the other components. I am also introducing them in this post.
ThinkPad X1 Carbon (Gen 7): 2 years later
Two years ago, I replaced my ThinkPad X1 Carbon 2014 with the latest generation. The new configuration embeds an Intel Core i7-8565U, 16 Gib of RAM, a 1 Tib NVMe disk, and a WQHD display (2560×1440). I did not ask for a WWAN card. I think it is easier and more reliable to use the wifi hotspot feature of a phone instead: no unreliable firmware and unsupported drivers.1 Here is my opinion on this model.

While the second generation got a very odd keyboard, this one got a classic one with a full row of function keys. I don’t know if my model was defective, but the keyboard skips one keypress from time to time. I have got used to it, but the space key still has a hard time registering when hitting it with my right thumb. The travel course is also shorter and it is less comfortable to type on it than it was on the 2014 version. The trackpoint2 works well. The physical buttons are a welcome addition. I am only using the trackpad for scrolling with the two-finger gesture.

Upgrading my desktop PC
I built my current desktop PC in 2014. A second SSD was added in 2015. The motherboard and the power supply were replaced after a fault1 in 2016. The memory was upgraded in 2018. A discrete AMD GPU was installed in 2019 to drive two 4K screens. An NVMe disk was added earlier this year to further increase storage performance. This is a testament to the durability of a desktop PC compared to a laptop: it’s evolutive and you can keep it a long time.
While fine for most usage, the CPU started to become a bottleneck during video conferences.2 So, it was set for an upgrade. The table below summarizes the change. This update cost me about 800 €.
| Before | After | |
|---|---|---|
| CPU | Intel i5-4670K @ 3.4 GHz | AMD Ryzen 5 5600X @ 3.7 GHz |
| CPU fan | Zalman CNPS9900 | Noctua NH-U12S |
| Motherboard | Asus Z97-PRO Gamer | Asus TUF Gaming B550-PLUS |
| RAM | 2×8 GB + 2×4 GB DDR3 @ 1.6 GHz | 2×16 GB DDR4 @ 3.6 GHz |
| GPU | Asus Radeon PH RX 550 4G M7 | ← |
| Disks | 500 GB Crucial P2 NVMe 256 GB Samsung SSD 850 256 GB Samsung SSD 840 |
← |
| PSU | be quiet! Pure Power CM L8 @ 530 W | ← |
| Case | Antec P100 | ← |


According to some Continue reading
Serving WebP & AVIF images with Nginx
WebP and AVIF are two image formats for the web. They aim to produce smaller files than JPEG and PNG. They both support lossy and lossless compression, as well as alpha transparency. WebP was developed by Google and is a derivative of the VP8 video format.1 It is supported on most browsers. AVIF is using the newer AV1 video format to achieve better results. It is supported by Chromium-based browsers and has experimental support for Firefox.2
Your browser supports WebP and AVIF image formats. Your browser supports none of these image formats. Your browser only supports the WebP image format. Your browser only supports the AVIF image format.
Without JavaScript, I can’t tell what your browser supports.
Converting and optimizing images
For this blog, I am using the following shell snippets to convert and optimize JPEG and PNG images. Skip to the next section if you are only interested in the Nginx setup.
JPEG images
JPEG images are converted to WebP using cwebp.
find media/images -type f -name '*.jpg' -print0 \
  | xargs -0n1 -P$(nproc) -i \
      cwebp -q 84 -af '{}' -o '{}'.webp
They are converted to AVIF using avifenc Continue reading
Jerikan: a configuration management system for network teams
There are many resources for network automation with Ansible. Most of them only expose the first steps or limit themselves to a narrow scope. They give no clue on how to expand from that. Real network environments may be large, versatile, heterogeneous, and filled with exceptions. The lack of real-world examples for Ansible deployments, unlike Puppet and SaltStack, leads many teams to build brittle and incomplete automation solutions.
We have released under an open-source license our attempt to tackle this problem:
- Jerikan, a tool to build configuration files from a single source of truth and Jinja2 templates, along with its integration into the GitLab CI system,
- an Ansible playbook to deploy these configuration files on network devices, and
- a redacted version of the configuration data and the templates for our, now defunct, datacenters in San Francisco and South Korea, covering many vendors (Facebook Wedge 100, Dell S4048 and S6010, Juniper QFX 5110, Juniper QFX 10002, Cisco ASR 9001, Cisco Catalyst 2960, Opengear console servers, and Linux), and many functionalities (provisioning, BGP-to-the-host routing, edge routing, out-of-band network, DNS configuration, integration with NetBox and IRRs).
Here is a quick demo to configure a new peering:
This work is the collective effort of Continue reading
Transient prompt with Zsh
Powerlevel10k is a prompt for Zsh. It contains some powerful features, is astoundingly fast, and easy to customize. I am quite amazed at the skills of its main author. Be sure to also have a look at Zsh for Humans, a complete Zsh configuration including this theme.
One of the nice features of Powerlevel10k is transient prompts: past prompts are reduced to a more minimal configuration to save space by removing unneeded information.

When it comes to configuring my shell, I still prefer writing and understanding each line going into it. Therefore, I am still building my Zsh configuration from scratch. Here is how I have integrated the above transient feature into my prompt.
The first step is to configure the appearance of the prompt in its
compact form. Let’s assume we have a variable, $_vbe_prompt_compact
set to 1 when we want a compact prompt. We use the
following function to define the prompt Continue reading
Zero-Touch Provisioning for Juniper
Juniper’s official documentation on ZTP explains how to configure the ISC DHCP Server to automatically upgrade and configure on first boot a Juniper device. However, the proposed configuration could be a bit more elegant. This note explains how.
TL;DR
Do not redefine option 43. Instead, specify the vendor
option space to use to encode parameters with vendor-option-space.
When booting for the first time, a Juniper device requests its IP address through a DHCP discover message, then request additional parameters for autoconfiguration through a DHCP request message:
Dynamic Host Configuration Protocol (Request)
    Message type: Boot Request (1)
    Hardware type: Ethernet (0x01)
    Hardware address length: 6
    Hops: 0
    Transaction ID: 0x44e3a7c9
    Seconds elapsed: 0
    Bootp flags: 0x8000, Broadcast flag (Broadcast)
    Client IP address: 0.0.0.0
    Your (client) IP address: 0.0.0.0
    Next server IP address: 0.0.0.0
    Relay agent IP address: 0.0.0.0
    Client MAC address: 02:00:00:00:00:01 (02:00:00:00:00:01)
    Client hardware address padding: 00000000000000000000
    Server host name not given
    Boot file name not given
    Magic cookie: DHCP
    Option: (54) DHCP Server Identifier (10.0.2.2)
    Option: (55) Parameter Request List
        Length: 14
        Parameter Request List Item: (3) Router
        Parameter Request List Item: (51) IP  Continue reading