Simple Wireguard VPN Setup with wg-easy
WireGuard is a modern VPN protocol that is fast, lightweight, and much simpler to set up compared to other options like OpenVPN. It runs in the Linux kernel, uses modern cryptography, and the configuration is just a few lines, which makes it a great choice for personal use.
The problem is, even though WireGuard itself is simple, managing peers can get tedious. You have to generate key pairs, edit config files, hand out configs to each device, and keep track of who has access to what. If you have a few family members or friends who want to use your VPN, this quickly becomes a hassle.
This is where wg-easy can help. It is a simple open-source web UI that sits on top of WireGuard and takes care of all the boring bits for you. You can add or remove clients with a single click, generate QR codes for mobile devices, and see who is connected, all from a clean web interface.
In this post, I will walk you through how to set up wg-easy so you can have your own self-hosted VPN running in just a few minutes.
Lab Topology
Before we get into the setup, let me quickly Continue reading
I Vibe-Coded My CV Into a CLI

UPDATE - Since publishing this post, I have also added a Palo Alto style CV to the site. I will update the post with more details on that later.
If you do not have the patience to read the rest of this post, here is the site. Type enable and then run any of the usual commands like show version, show ip interface brief, or show ip route to browse through the CV. It is still early days, but I am hoping to make some improvements over time. If you like it, give me a clap on the right.

Overview
I have been thinking about doing this for a long time, but I always assumed it would be a difficult task. I was wrong. I think I had it up and running in about an hour. The idea is that a site that looks and feels like a CLI, where you can run the usual show commands and get output, except the output is my CV.
I have no web development experience, so I used Claude for the entire thing. I started by giving Claude a prompt explaining what I wanted, and asked it to generate Continue reading
Pytest for Automated Network Testing (I)

Pytest is a Python testing framework. It is primarily used by developers to test their code and make sure it behaves as expected. For example, if you write a function that adds two numbers, you can write a test to verify that the function returns the correct result. If it does, the test passes. If not, the test fails, and pytest tells you exactly where things went wrong.
That is the traditional use case, but pytest is not limited to testing code. You can use it to test anything that can be scripted in Python, and that includes testing your network.
In this series, we will use pytest to write tests that connect to network devices and verify their state. For example, we can write a test that connects to a router and checks whether BGP is up. If BGP is up, the test passes. If not, the test fails. We can also check things like interface states, routing table entries, OSPF neighbours, or really anything else you can pull from a device.
💡
Pytest is not the only testing framework available in Python. unittest is another popular option and is actually built into the Python standard library, so you Continue reading
Multicast PIM Bootstrap Router (BSR) (VI)

We are at the tail end of our multicast series. So far, we have covered multicast basics, IGMP, PIM Dense Mode, PIM Sparse Mode, and Auto-RP. In this post, we will look at Bootstrap Router, or BSR.
Multicast PIM Auto RP
AutoRP solves this problem by allowing routers to dynamically learn the RP address. Instead of manually configuring the RP on each router

Bootstrap Router (BSR) Overview
In the previous post, we looked at Auto-RP, which is Cisco's proprietary method for dynamically distributing RP information to all routers in the network. BSR solves the same problem but is defined in the PIM standards (RFC 5059), making it vendor-neutral and interoperable across different platforms. The core idea is the same. Instead of manually configuring the RP address on every router, BSR allows routers to learn RP information automatically. A router called the Bootstrap Router collects RP information from Candidate RPs and distributes it to all PIM routers in the network.
The key difference is in how this information flows. With Auto-RP, the Mapping Agent sends RP mappings to the specific multicast group 224.0.1.40. This creates the chicken-and-egg problem we discussed in the previous post Continue reading
UniFi UTR Initial Impressions, Setup and Review

Even though UniFi released the UTR (UniFi Travel Router) a while back, I've been researching it and trying to find a use case for myself. Fast forward to today, and even though I still don't have a clear use case for it, I bought it purely based on vibes.
It was out of stock pretty much all the time in the UK store, and even when it came back in stock, it would sell out within minutes. I happened to be checking their site one day and noticed it was available, so I ordered it right away. It costs £90 including delivery.

So, what is it?
The UTR is a small (like very tiny), portable router that you can take anywhere with you. It fits in your pocket. It supports both 2.4GHz and 5GHz bands and can connect to an upstream network via Wi-Fi or Ethernet. If you are into the UniFi ecosystem, in a nutshell, it can extend your home network wherever you go.
It is a small device, measuring 95.95 x 65 x 12.5 mm and weighing just 89g, so it genuinely fits in your pocket. It runs WiFi 5 with 2x2 MIMO Continue reading
Multicast PIM Auto RP (V)

In the previous posts in this series, we covered the basics of multicast, IGMP, PIM Dense Mode, and PIM Sparse Mode. In the Sparse Mode post, we manually configured the RP address on every router in the network. This works fine in a small lab, but in a larger network with many routers, it becomes difficult to manage. If the RP changes, you have to update the configuration on every single router.
Multicast PIM Sparse Mode
Sparse Mode only sends traffic to parts of the network that explicitly request it. Routers with interested receivers send Join messages toward

AutoRP solves this problem by allowing routers to dynamically learn the RP address. Instead of manually configuring the RP on each router, you configure one or more routers to announce themselves as Candidate RPs. A separate router (or the same as the Candidate RP router) called the Mapping Agent collects these announcements and distributes the RP information to all other routers in the network. This makes RP management much easier and also provides a way to implement RP redundancy.
There are two methods to dynamically learn the RP address, which are Auto-RP and Bootstrap Router (BSR). In this Continue reading
Multicast PIM Sparse Mode (IV)

In the previous post, we covered PIM Dense Mode and mentioned that it is not widely used in production because of its flood and prune behaviour. Every router in the network receives the multicast traffic first, and then routers without interested receivers have to send prune messages. This is inefficient, especially in large networks.
Multicast PIM Dense Mode
PIM Dense mode assumes that every subnet in the network has interested receivers, so it floods multicast traffic everywhere first. Routers that

In this post, we will look at PIM Sparse Mode, which takes the opposite approach. Instead of flooding traffic everywhere and pruning where it is not needed, Sparse Mode only sends traffic to parts of the network that explicitly request it. Routers with interested receivers send Join messages and only then does the multicast traffic start flowing. This makes Sparse Mode much more efficient and scalable, which is why it is the preferred mode in most production networks today.
PIM Spare Mode Overview
In Dense Mode, we saw two main problems. Multicast traffic is flooded everywhere, and every router has to maintain state for every multicast group, even if all its interfaces are pruned. Sparse Mode Continue reading
Multicast PIM Dense Mode (III)

In the previous posts, we covered the basics of multicast, including how sources send traffic to group addresses and how receivers use IGMP to signal their interest to the last hop router. We also looked at how IGMP snooping helps switches forward multicast traffic only to ports with interested receivers.
In this post, we will look at PIM, Protocol Independent Multicast. PIM is the protocol that routers use to build the multicast forwarding tree between the source and the receivers. There are different modes/flavours of PIM, and in this post, we will focus specifically on PIM Dense Mode.
Multicast Introduction
With multicast, the source sends only a single copy of the traffic into the network. As that traffic moves through the network, it is replicated

Multicast IGMP - Internet Group Management Protocol
IGMP is the protocol used by receivers to signal their interest in multicast traffic. When a host wants to receive a multicast stream, it sends

PIM Overview
PIM, Protocol Independent Multicast, is the protocol routers use to build a loop-free multicast distribution tree from the source to the receivers. It is called protocol-independent because it does not rely on any specific unicast Continue reading
Multicast IGMP – Internet Group Management Protocol (II)
In the previous post, we covered the basics of multicast. In this post, we will focus on IGMP, Internet Group Management Protocol.
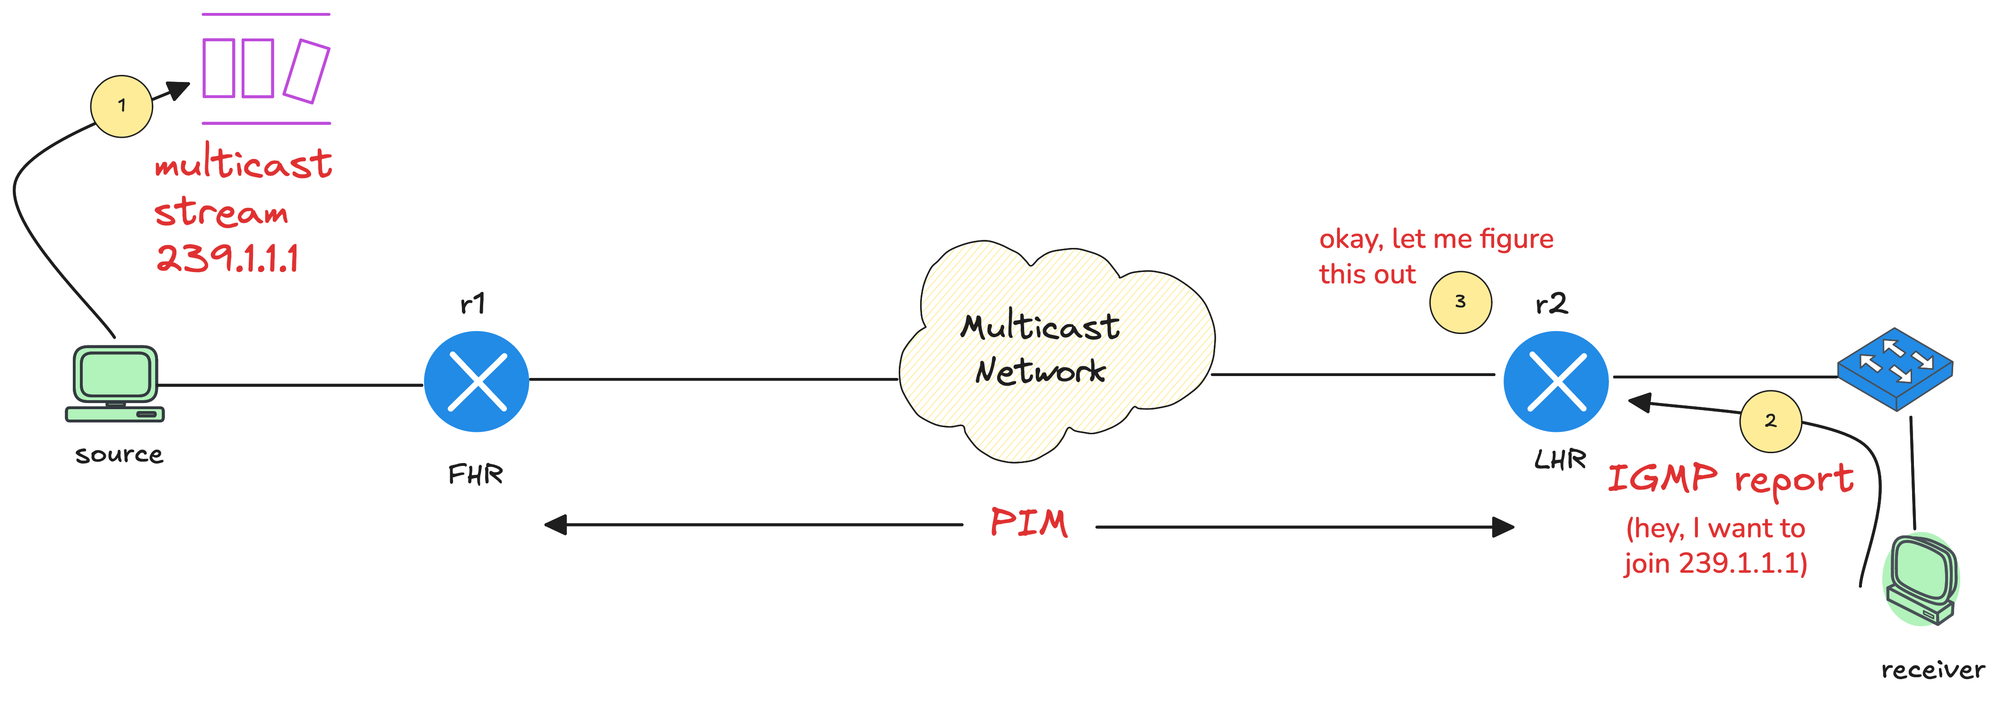
Just as a quick recap, in multicast, the source application (sender) sends multicast traffic to a multicast group address. Somewhere in the network, a receiver wants that traffic stream, so the receiver needs a way to signal that interest.
The router closest to the source is called the First Hop Router (FHR), and the router closest to the receiver is called the Last Hop Router (LHR). Between these two points, the multicast network, meaning all multicast-enabled routers, needs to build a loop-free tree that connects the sender to all interested receivers. IGMP plays a key role in making that happen.
Multicast Introduction (I)
With multicast, the source sends only a single copy of the traffic into the network. As that traffic moves through the network, it is replicated

IGMP Introduction
IGMP is the protocol used by receivers to signal their interest in multicast traffic. When a host wants to receive a multicast stream, it sends an IGMP Membership Report, also known as an IGMP join, to the multicast group address.
Multicast Introduction (I)
Multicast is one of those topics I have been meaning to learn properly for a long time. When I did my JNCIS-ENT about eight years ago, I studied multicast, but I honestly do not remember much of it now.
I recently started doing some revision and decided to write a series of blog posts as I go through it again. I want something I can come back to in the future without having to relearn everything from scratch. Hopefully, as a reader, you will also find it useful and easy to follow. If you want to learn multicast, I am going to assume you are already familiar with unicast and broadcast.
As always, if you find this post helpful, press the ‘clap’ button. It means a lot to me and helps me know you enjoy this type of content. If I get enough claps for this series, I’ll make sure to write more on this specific topic.
Unicast
Unicast is the most common method of IP communication. It is simply a one-to-one conversation between two devices. One device sends traffic, and one specific device receives it. Most of what we do on a network every day is unicast. Continue reading
What Is BGP Confederation?
By design, iBGP requires a full mesh of peerings between all routers so every router can learn routes from all other routers without loops. Prefixes learned from an iBGP peer are not advertised to another iBGP peer. This rule exists to prevent routing loops inside the autonomous system, and it is also the main reason why a full mesh is required. As the number of routers grows, maintaining this full mesh becomes complex and resource-heavy.
BGP confederations are one way to solve the scaling problems created by the BGP full mesh requirement. Another common approach is using Route Reflectors. BGP confederations break up a large autonomous system into smaller subautonomous systems (sub-ASs), reducing the number of iBGP peerings required.
BGP Route Reflectors, Originator ID and Cluster ID
This is where route reflectors come in. A route reflector reduces the need for full mesh by allowing certain routers to reflect routes to others.

Routers within the same sub-AS still need a full iBGP mesh, but the number of peerings is much smaller now. Connections to other confederations are made with standard eBGP, and peers outside the sub-AS are treated as external.
The confederation AS appears whole to other Continue reading
FortiGate Radius Administrator Login with Cisco ISE
Let’s assume a simple scenario. You have two different teams managing your FortiGate firewalls. One team is made up of network administrators who need full access to the firewalls. The other team only needs limited access and should not be able to make any configuration changes.
A common way to handle this is by using administrator profiles and a remote radius server. You can assign different admin profiles based on who is logging in, without creating local users on every firewall. In this post, we will look at how to achieve this using Cisco ISE and Radius. You do not have to use Cisco ISE, any Radius server can do the job, but this post focuses on Cisco ISE since it is commonly used in enterprise environments.
Arista Radius Administrator Login with Cisco ISE
Arista comes with two built-in roles called network-admin and network-operator. ISE then responds with either access-accept or access-reject
Overview
For this example, we will have two users, each belonging to a different group with different access requirements. In most environments, group membership is managed by something like Active Directory. For the sake of simplicity, I am going to use local identity groups on Continue reading
Arista Radius Administrator Login with Cisco ISE

Let’s assume a simple scenario. You have two different teams managing your Arista devices. One team is made up of network administrators who need full access to the devices. The other team only needs limited access and should not be able to make any configuration changes.
A common way to handle this is by using role-based access with Radius. You can assign different privilege levels based on who is logging in, without creating local users on every device. In this post, we will look at how to achieve this using Cisco ISE and Radius. You do not have to use Cisco ISE, any Radius server can do the job, but this post focuses on Cisco ISE since it is commonly used in enterprise environments.
Configuring AAA on Arista EOS Devices Using TACACS+ and ISE
In this blog post, let’s look at how to configure TACACS+ authentication on Arista EOS devices using Cisco ISE. When someone tries to log in to the device
Overview
For this example, we will have two users, each belonging to a different group with different access requirements.
- bob is part of the network-admin group and needs full access
- brad is part of the Continue reading
Build BGP Labs in Minutes, Not Hours with Netlab

What if I told you that all it takes to build a simple BGP lab with two eBGP peers (or even a hundred, for that matter) is a single YAML file? No need to add nodes on a GUI, connect links, or configure interface IPs manually. You just define the lab in a YAML file as shown below, and in about two minutes, you’ll have two routers of your choice fully configured with BGP and an established eBGP session.
provider: clab
defaults.device: eos
defaults.devices.eos.clab.image: ceos:4.34.2

addressing:
  mgmt:
    ipv4: 192.168.200.0/24

nodes:
  - name: r1
    module: [ bgp ]
  - name: r2
    module: [ bgp ]

bgp:
  as_list:
    100:
      members: [ r1]
    200:
      members: [ r2 ]

links:
  - r1-r2
r1#show ip bgp summary
BGP summary information for VRF default
Router identifier 10.0.0.1, local AS number 100
Neighbor Status Codes: m - Under maintenance
Description Neighbor V AS MsgRcvd MsgSent InQ OutQ Up/Down State PfxRcd PfxAcc PfxAdv
r2 10.1.0.2 4 200 5 5 0 0 00:00:15 Estab 1 1 1r2#show ip bgp summary
BGP summary information for VRF default
Router identifier 10.0.0.2, Continue readingNetwork Labs on a Budget

"Can you suggest some specs for a server for my network labs?" is probably the question I get asked the most. People reach out all the time asking for recommendations. The thing is, I never really know their exact situation or what they’re trying to do in their lab. So, I usually just share what I have and what worked best for me, and let them decide what fits their setup.
In this post, I’ll go over the cheapest way to build your own network lab without spending too much.
💡
Disclaimer - This post is based on my personal experience and is meant to be general advice only. Everyone’s situation is different, so please do your own research before buying anything. I’m not responsible if you end up purchasing something that doesn’t suit your needs or expectations.
What We Will Cover?
- Buying a used mini PC
- Proxmox as the hypervisor (optional)
- Linux as a VM
- Containerlab/Netlab, EVE-NG, Cisco CML
- Proxmox Backup Server (optional)
- Simplest Option for Absolute Beginners
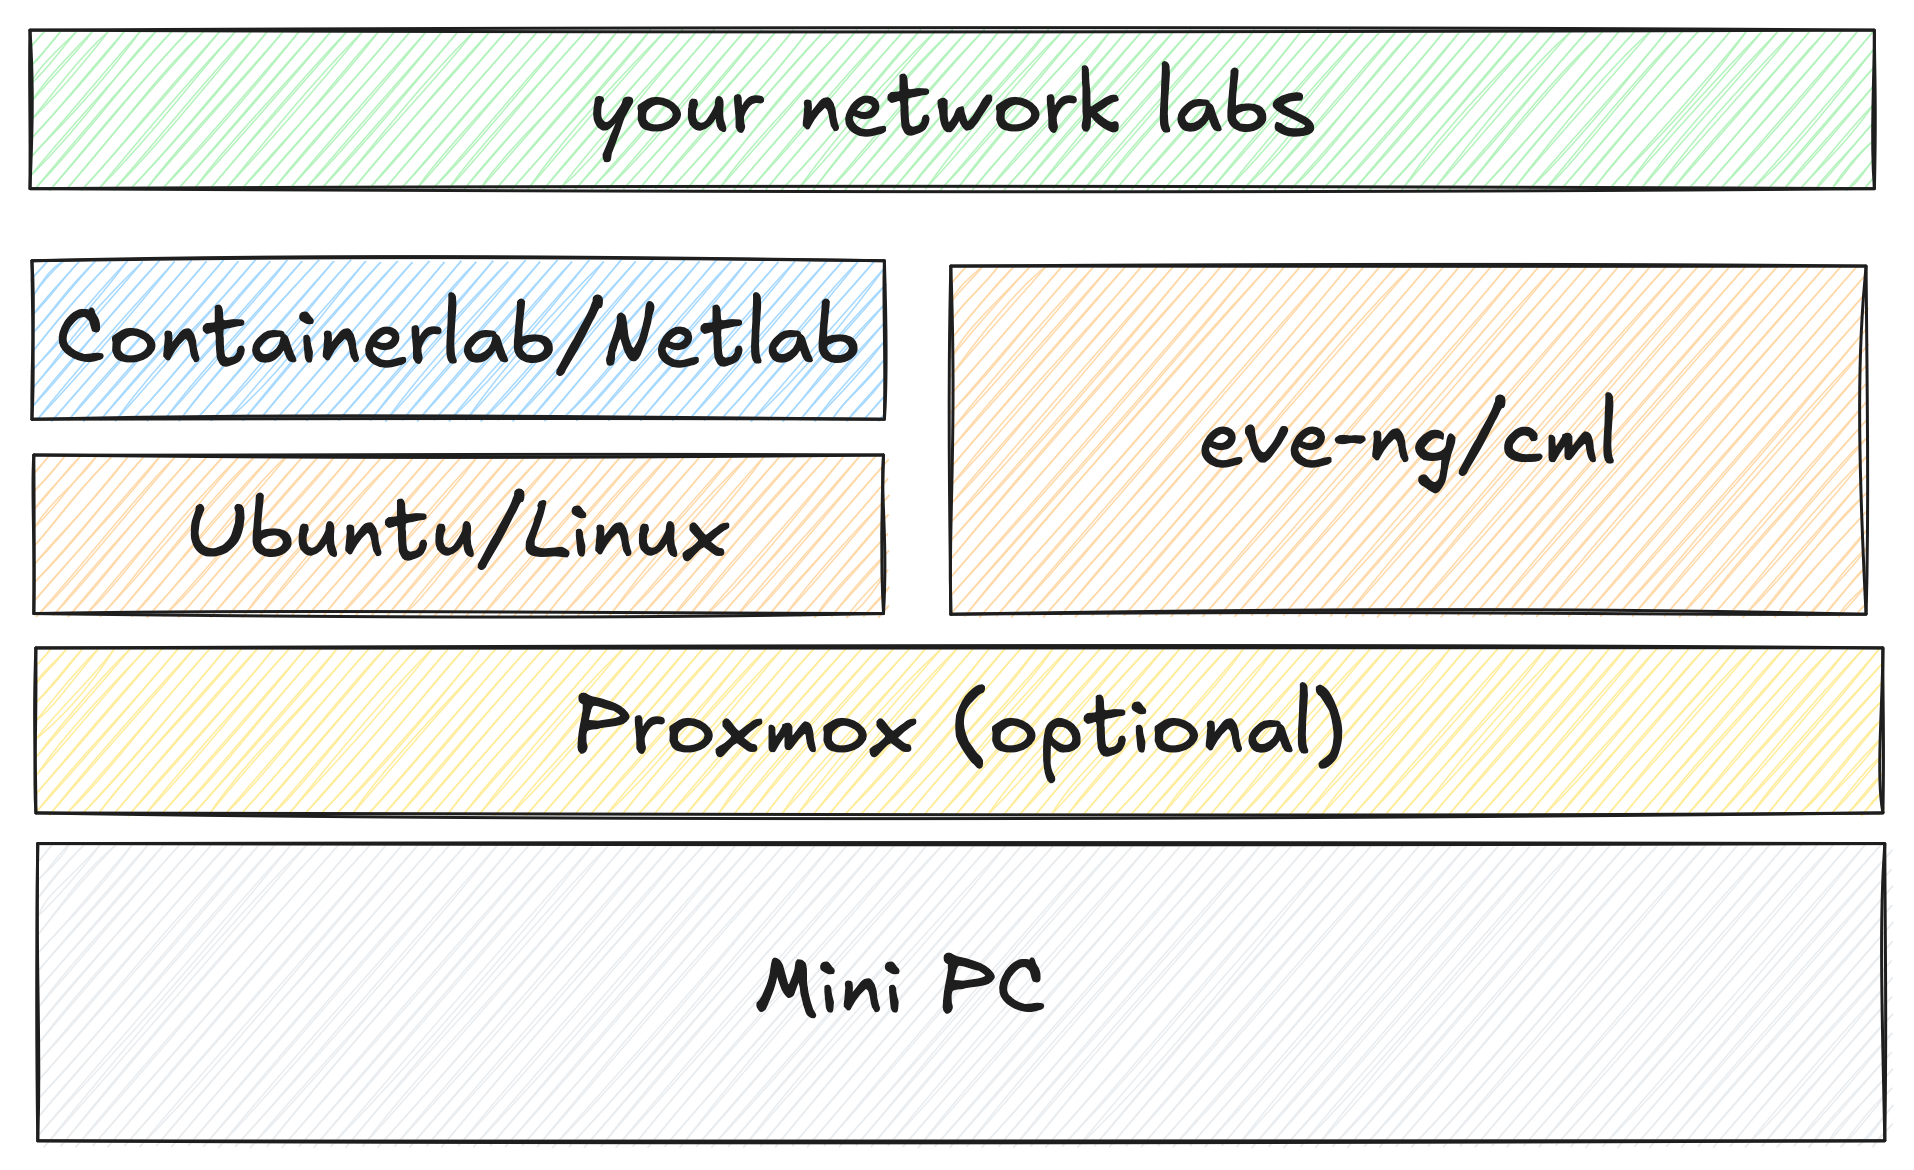
TL;DR
You don’t need expensive hardware to build a solid network lab. A used mini PC with decent specs is more than enough to run tools like Proxmox, Continue reading
Netpicker NetBox Plugin and Automation

Netpicker brings together configuration backups, security and compliance checks, and automation in one place. It supports over 150 network vendors, including Cisco, Juniper, Arista, Palo Alto, Fortinet and many more. It also integrates well with other tools like Netbox, Nautobot, and Infrahub for inventory management, and Slurp’it for network discovery. All of these features, including backups, integrations, and automation, are available in the free version. The paid version adds features such as RBAC, approvals, detailed logging, support, and workflows for teams that need more control.
In our previous introductory post, we looked at what Netpicker is, how to set it up, and how it can back up configurations across multiple vendors. In this post, we'll focus on Netpicker Automation and how to use the Netpicker plugin with Netbox, so let's get to it.
SPONSORED
Netpicker has partnered with me for this post, and they also support my blog as a sponsor.
Prerequisites
This post assumes you already have a functioning Netpicker and NetBox instances. If you're completely new to Netpicker, check out the introductory post first, where we covered the basics like installation and initial setup. For this example, we’re using NetBox Community version 4.3. Continue reading
How to Take Packet Captures in ContainerLab/Netlab?
If you follow my blog, you probably know that I’m a big advocate for using Containerlab and Netlab to spin up network labs. I’ve already covered both tools in detail, so I won’t go over the basics again here. You can check the links below if you’re new to them or want a quick refresher. In this post, we’ll look at how to take packet captures in Containerlab labs. So, let’s get started.
Containerlab - Creating Network Labs Can’t be Any Easier
What if I tell you that all you need is just a YAML file with just a bunch of lines to create a Network Lab that can run easily on your laptop? I’ll walk you through what Containerlab is
Netlab - The Fastest Way to Build Network Labs
Netlab then takes care of creating the topology, assigning IP addresses, configuring routing protocols, and even pushing custom configs.
How do I run Containerlab?
I know everyone has their own way of running Containerlab, so I thought I’d share how I set up and run my labs. My daily driver is a MacBook, but I run Containerlab on a server that’s set up as Continue reading
BGP Route Reflectors, Originator ID and Cluster ID

In iBGP, all routers in the same AS must be fully meshed, meaning every router forms an iBGP session with every other router. This is required because iBGP by default does not advertise routes learned from one iBGP peer to another. The full mesh ensures that every router can learn all the routes.
The problem is that in a large network with many iBGP routers, a full mesh quickly becomes unmanageable. The number of sessions grows rapidly, and you could end up with hundreds of iBGP sessions. If you have 10 iBGP routers and try to build a full mesh, you would need 45 sessions. For n routers, the number of sessions is n × (n – 1) / 2. So with 10 routers, that’s 10 × 9 / 2 = 45.
This is where route reflectors come in. A route reflector reduces the need for full mesh by allowing certain routers to reflect routes to others. With this design, you only need a few sessions instead of a full mesh, making the iBGP setup much more scalable. If you have the same 10 routers, with RR, you only need 9 sessions.
BGP Training Course for Beginners
BGP solves this Continue reading
Getting Started With Infrahub MCP Server
In this post, we’ll be looking at how to use the Infrahub MCP server. But, before we get there, we’ll go through some background on the Model Context Protocol (MCP) itself, show a simple example to explain how it works, and then connect it back to Infrahub. This will give us the basics before moving on to the Infrahub-specific setup. Here’s what we’ll cover:
- A quick background on what MCP is and why it’s needed
- A simple example of an MCP server to show how it works
- How to connect an MCP server to host applications like Claude Desktop and Cursor
- Setting up and using the Infrahub MCP server
- Example use cases where the Infrahub MCP server can help in real workflows
SPONSORED
Disclaimer – OpsMill has partnered with me for this post, and they also support my blog as a sponsor. The post is originally published under https://opsmill.com/blog/getting-started-infrahub-mcp-server/
What is Model Context Protocol (MCP)?
If you're doing anything with AI (and honestly, who isn’t these days), you’ve probably heard of Model Context Protocol, or MCP. Anthropic introduced MCP in November 2024, which means it hasn’t been around for long and is still evolving quickly.
MCP is a communication Continue reading
Configuring Palo Alto Administrator Authentication with Cisco ISE (Radius)

Let’s assume a simple scenario. You have two different teams managing your Palo Alto firewalls. One team is made up of network administrators who need full access to the firewalls. The other team only needs limited access and should not be able to make any configuration changes.
A common way to handle this is by using Admin Roles and a remote Radius server. You can assign different admin roles based on who is logging in, without creating local users on every firewall. In this post, we will look at how to achieve this using Cisco ISE and Radius. You do not have to use Cisco ISE, any Radius server can do the job, but this post focuses on Cisco ISE since it is commonly used in enterprise environments.
FortiGate Radius Administrator Login with Cisco ISE
You can assign different admin profiles based on who is logging in, without creating local users on every firewall. In this post, we will look at

Overview
For this example, we will have two users, each belonging to a different group with different access requirements. In most environments, group membership is managed by something like Active Directory. For the sake of simplicity, Continue reading