Immich Setup with Docker & External Library (NFS)

Recently, I started self-hosting most of the apps I use, like Memos for note-taking and Paperless-NGX for document management. The next one on the list was Immich. Immich is a self-hosted photo and video backup solution that supports features like facial recognition and automatic uploads.
Memos - Amazing Open Source, Self-hosted Notes App
That being said, I recently stumbled upon another great self-hosted note-taking app called ‘Memos’ I just couldn’t believe that I didn’t know about this until very recently.
Paperless-ngx - Self-Hosted Document Manager
I came across a great self-hosted document manager called ‘Paperless-NGX’. It not only helps with organising documents but also includes OCR functionality
In this post, we’ll look at how to set up Immich as a Docker container and also how to add an NFS share as an external library.
But, Why?
I have a lot of pictures on my NAS that I’ve collected over the years. This includes photos of friends, family, and ones from my older phones. I wanted a way to manage and organise them from one place. I also didn’t want to upload all of them to Google or Apple, which would cost quite a bit. Continue reading
Integration Testing in Infrahub – Validate Your Automation in Real Environments
Testing individual components is a good start, but what happens when you need to validate how everything works together? In this post, we’ll show you how to run integration tests in Infrahub that verify your schema, data, and Git workflows in a real, running environment.
You’ll learn how to spin up isolated Infrahub instances on the fly using Docker and Testcontainers, automate schema and data loading, and catch issues before they reach production.
SPONSORED
OpsMill has partnered with me for this post, and they also support my blog as a sponsor. The post is originally published under https://opsmill.com/blog/integration-testing-infrahub/
You don’t need to be a Python expert to follow along. We’ll walk through everything step by step, with example code and tooling recommendations. You can also follow this guide in video form on the Cisco DevNet YouTube channel:
- Building a Production-Grade Automation Platform With Infrahub – Part 1
- Building a Production-Grade Automation Platform With Infrahub – Part 2
All the sample data and code used here are available on the OpsMill GitHub repo, so you can set up your own test environment and try it yourself.
Quick recap
Previously, we covered how to write smoke and unit tests using the Continue reading
AWS Transit Gateway Peering Attachments (VIII)

Hi all, welcome back to the AWS networking series. This is actually part 3 of just Transit Gateway. I know some of you might be thinking, why are we still talking about Transit Gateway? But please bear with me. TGW is such an important concept, and it shows up in almost every architecture you come across.
So far, we've covered what a Transit Gateway is, how to create one, how route tables work, and how to manage associations and propagations. We also looked at how to create a VPN and attach it to the TGW, and we went through the process of sharing a TGW with other AWS accounts using AWS Resource Access Manager (RAM). In this post, we'll look at how to peer a Transit Gateway with another TGW, even when they are in different regions. So let's get to it.
If you're completely new to Transit Gateway, I highly recommend checking out the earlier introductory posts listed below.
AWS Transit Gateway Introduction
This complexity (when you have many VPCs) is why, in this post, we will look at AWS Transit Gateway (TGW). A Transit Gateway is an incredibly important networking resource in AWS that solves these scaling challenges.
AWS Transit Gateway VPN Attachment and Resource Access Manager (VII)

In the previous post, we covered the basics of Transit Gateway, what it is, what problem it solves, and we also looked at how to create one. We walked through attaching two VPCs to the TGW and establishing connectivity between them. We also covered the important concepts of TGW attachments, associations, and propagations.
AWS Transit Gateway Introduction
This complexity (when you have many VPCs) is why, in this post, we will look at AWS Transit Gateway (TGW). A Transit Gateway is an incredibly important networking resource in AWS that solves these scaling challenges.
In this post, we will build on that knowledge and look at
- Creating and attaching a Site-to-Site VPN to the Transit Gateway.
- We will also cover sharing a single Transit Gateway across different AWS accounts using Resource Access Manager.
As always, if you find this post helpful, press the ‘clap’ button. It means a lot to me and helps me know you enjoy this type of content. If I get enough claps for this series, I’ll make sure to write more on this specific topic.
Transit Gateway AWS Site-to-Site VPN Attachment
We have already seen how to create a Site-to-Site Continue reading
AWS Transit Gateway Introduction (VI)

In the previous post, we covered VPC Peering, which is a quick and easy way to create a connection between two VPCs. We also discussed its limitations, primarily that it is non-transitive. This means if VPC 'A' is peered with VPC 'B', and VPC 'B' is peered with VPC 'C', VPC 'A' cannot communicate with VPC 'C' through VPC 'B'. Because of this, to connect multiple VPCs together, you need to create a full mesh, where every VPC has a direct peering connection to every other VPC.
AWS VPC Peering
In this post, we will continue to expand on VPC connectivity by looking at what AWS VPC Peering is and how to configure one.
This complexity (when you have many VPCs) is why, in this post, we will look at AWS Transit Gateway (TGW). A Transit Gateway is an incredibly important networking resource in AWS that solves these scaling challenges. You will see the TGW featured in many modern AWS architecture diagrams because of the flexibility and simplicity it provides.
As always, if you find this post helpful, press the ‘clap’ button. It means a lot to me and helps me know you enjoy Continue reading
AWS VPC Peering (V)

Welcome back to the AWS Networking series. So far, we have covered a wide range of foundational topics. We started with the basics of building a VPC, creating subnets, configuring route tables, and providing Internet access with an Internet Gateway and a NAT Gateway. We then looked at the difference between stateful Security Groups attached to an instance's ENI and stateless Network ACLs applied at the subnet level. Most recently, we covered how to build a hybrid network using a Site-to-Site VPN.
In this post, we will continue to expand on VPC connectivity by looking at what AWS VPC Peering is and how to configure one.
If you are completely new to AWS networking, I highly recommend checking out our introductory posts linked below. However, if you are already familiar with the basics, you can carry on with this post.
AWS Networking Fundamentals
If you’re brand new to AWS, don’t worry. This post focuses on the basics of AWS networking. General networking knowledge is helpful but not required - I’ll try to explain things clearly so everyone can follow along.

As always, if you find this post helpful, press the ‘clap’ button. Continue reading
AWS Site-to-Site VPN (IV)
So far in the AWS Networking series, we have covered VPCs, subnets, route tables, Internet Gateways, NAT Gateways, EC2 instances, Security Groups, Network ACLs, and Elastic Network Interfaces. In this post, we will look at using a Site-to-Site VPN in AWS so you can securely connect your on-premise workloads to and from your AWS environment. This is a very important aspect of AWS networking, and this is a service you will use almost always.
If you have been following the series, you can easily follow along with this post. If you just stumbled upon this post, you can still continue, assuming you are already familiar with AWS networking basics. However, if you are completely new to AWS, I highly recommend checking out the previous posts linked below.
AWS Networking Fundamentals
If you’re brand new to AWS, don’t worry. This post focuses on the basics of AWS networking. General networking knowledge is helpful but not required - I’ll try to explain things clearly so everyone can follow along.

Why Do We Need a VPN to AWS?
When we launch an instance in a public subnet with a public IP address, we have seen that we can connect to Continue reading
Palo Alto Upgrade from 10.2 to 11.2 (PA-440)
I have PA-440 in my home lab and was happily running PAN-OS 10.2.10-h9. But with the recent announcement that PAN-OS 10.2 will enter limited support from 26th August 2025, I decided it was time to upgrade. I was deciding between 11.1 and 11.2 for a while, but after reading through a few forums and discussions, I ended up choosing 11.2, specifically PAN-OS 11.2.4-h7.
Since I was already on 10.2, I could upgrade directly to 11.2 without going through any intermediate versions. As per the upgrade guide, all I had to do was download the 11.2.0 base image, then download and install 11.2.4-h7.

💡
Just to clarify, you only need to download the 11.2.0 base image, there’s no need to install it.

After downloading both the base image and the target image, just click 'Install' on the target image. As usual, make sure to take a backup before starting. If you’re running in HA, you can upgrade the firewalls one at a time without any downtime.


The whole process took about 10 to 15 minutes, and now I'm running 11.2.4-h7. If I come across any issues, I'll be sure to update this post.

Site-to-site VPN between AWS and Palo Alto (Static & BGP)
In this blog post, we'll look at how to create a site-to-site VPN between AWS and a Palo Alto firewall. We'll go through both static routing and BGP options. This post assumes you're already somewhat familiar with AWS and Palo Alto, so we won't cover the basics like creating a VPC in AWS or setting up zones and policies on the firewall.
AWS Networking Fundamentals
If you’re brand new to AWS, don’t worry. This post focuses on the basics of AWS networking. General networking knowledge is helpful but not required - I’ll try to explain things clearly so everyone can follow along.

Overview
To create a VPN connection, you first need a compatible IPsec VPN device, like a firewall or router, at your on-premise location. In AWS, the resource you create to represent this device is called a Customer Gateway. In our example, the customer gateway is the Palo Alto firewall.
To send traffic from your VPC to your on-premise network, you route it to a Virtual Private Gateway (VGW). The VGW is a logical, redundant resource on the AWS side of the connection that you attach to your VPC. It serves as the target in your Continue reading
AWS Security Groups, NACL and ENI
This is the third blog post in the AWS Networking series. If you have been following along, you can continue with the lab we have built so far. For anyone who has just landed on this page, you can still follow along as long as you are already familiar with the basics of AWS networking. If you are completely new, however, I highly recommend checking out the introductory posts linked below to get up to speed.
In this blog post, we will look at AWS Security Groups, Network ACL (NACL) and Elastic Network Interfaces (ENI).
AWS Networking Fundamentals
If you’re brand new to AWS, don’t worry. This post focuses on the basics of AWS networking. General networking knowledge is helpful but not required - I’ll try to explain things clearly so everyone can follow along.

AWS NAT Gateway and Private/Public Subnets
When working with AWS networking, you will often hear the terms ‘public subnet’ and ‘private subnet’. However, if you go into the AWS console to create a subnet, you won’t find any option to explicitly make it one or the other.

AWS Security Groups
So far, we have briefly touched on Security Continue reading
AWS NAT Gateway and Private/Public Subnets
When working with AWS networking, you will often hear the terms 'public subnet' and 'private subnet'. However, if you go into the AWS console to create a subnet, you won't find any option to explicitly make it one or the other. So, what exactly makes a subnet public or private?
In this blog post, we will look at the differences between public and private subnets, see how they are defined by their routing, and understand how the AWS NAT Gateway fits into this architecture.
If you are completely new to AWS networking and want to learn the basics of setting up a VPC, feel free to check out my previous post linked below.
AWS Networking Fundamentals
If you’re brand new to AWS, don’t worry. This post focuses on the basics of AWS networking. General networking knowledge is helpful but not required - I’ll try to explain things clearly so everyone can follow along.
Public vs Private Subnets
The key difference between a 'public' and a 'private' subnet is simply its route to the Internet. It is not an inherent setting of the subnet itself, but a behaviour defined by the route table associated Continue reading
Palo Alto Create Bulk Address Objects using Pan-OS Python SDK

In this blog post, we'll see how to configure bulk Address-Objects at once and then add them to an Address-Group using the pan-os-python Library. If you haven't used the pan-os-python library before, have a look at my other blog post to learn more.
Palo Alto PAN-OS SDK for Python
Let’s start learning the pan-os-python library with a simple script. This script will be our foundation, and it’s as straightforward as it gets, creating a basic firewall rule on a Palo Alto firewall.
 Suresh Vina
Methods we will use
Here is the official guide for the useful methods
- add() - This method is used to add an object as a child of another object. In our scenario, it's for adding an Address Object to the firewall or panorama object.
- extend() - This method allows you to add a list of objects as children. In our context, it means adding a 'list' of Address objects to the firewall or panorama object.
- create() - Once you've defined an object in the script, the
create()method is used to push this object to the live device, making the configuration active. - create_similar() - This method pushes objects of the same type to the live Continue reading
Getting Started with the Pytest Plugin for Infrahub
We all write code, but how do we know the changes we make in the future won’t break something that used to work? That’s where testing becomes important.
The idea is to catch problems early, ideally before they reach production. In the Python world, one of the most common ways to do this is with a tool called pytest. It lets you write tests to check that your code behaves the way you expect and helps you catch issues before they become a bigger problem.
Originally published under - https://www.opsmill.com/pytest-plugin-infrahub/
When working with Infrahub, testing is just as important. You might want to make sure your GraphQL queries are valid, your Jinja2 templates render correctly, or your transformations behave as expected.
Infrahub simplifies this by offering a pytest plugin that doesn’t require Python code; you define tests using plain YAML. This makes testing more accessible to teams across roles and speeds up the feedback loop during development.
These kinds of unit tests aren’t just about convenience, they help establish a production-ready automation system. With automated checks built into your process, every change is validated consistently, reducing the chance of something breaking unexpectedly. That consistency builds trust when your Continue reading
UGreen NASync DXP2800 Review and First Impressions
TL;DR - For anyone who doesn’t want to go through the full post, here’s the short version. I bought the UGreen NASync DXP2800 (2 bay) from Amazon for £249 and paired it with two Seagate Ironwolf 8TB HDDs, around £180 each.
The unit comes with an Intel N100 CPU, 8GB of RAM (upgradeable to 16GB, but there’s only one RAM slot), and a 2.5Gb/s LAN port. It has a solid build, was easy to set up, and I actually like the UI. Sure, it lacks a lot of features compared to Synology or QNAP, but since I’m mainly using it for file storage, I’m happy with the purchase.
Setting up Proxmox Backup Server
In this post, we’ll go through the process of setting up Proxmox Backup Server and backing up all the VMs from my Proxmox server to this backup server. So, let’s get to it.

But Why UGreen NAS?
The short answer is, this is the best bang for the buck. For £249, I’m getting a 2-bay NAS with an N100 CPU, 8GB of RAM, a 2.5Gb/s LAN port, and two NVMe slots.
I’ve been wanting to buy a NAS for over Continue reading
Juniper vJunos-router in Containerlab

If you follow me or read my blog, you probably know I'm a big advocate of Containerlab. I've been using it for over two years now and I absolutely love it. Why? Because it's open source, it has an amazing community behind it (thank you again, Roman), and labs are defined using simple YAML files that are easy to share and reuse.
So far, I've used Cisco IOL, Arista EOS, and Palo Alto VM in Containerlab. And finally, the time came to try Juniper. I decided to test the Juniper vJunos-router, which is a virtualized MX router. It's a single-VM version of vMX that doesn't require any feature licenses and is meant for lab or testing purposes. You can even download the image directly from Juniper's website without needing an account. Thank you, Juniper and Cisco, please take note. In this post, I'll show you how to run Juniper vJunos-router in Containerlab.
Prerequisites
This post assumes you're somewhat familiar with Containerlab and already have it installed. If you're new, feel free to check out my introductory blog below. Containerlab also has great documentation on how to use vJunos-router, so be sure to check that out as well.
Containerlab - Creating Continue reading
My Experience at AutoCon3

This is my second time attending the AutoCon event. The first one I went to was last year in Amsterdam (AutoCon1), and it was absolutely amazing. I decided to attend again this year, and AutoCon3 took place from the 26th to the 30th of May. The first two days were dedicated to workshops, and the conference itself ran from the 28th to the 30th. I only attended the conference. I heard there were around 650 attendees at this event, which is great to see.
Network Automation Forum (NAF)
In case you’ve never heard of AutoCon, it’s a community-driven conference focused on network automation, organized by the Network Automation Forum (NAF). NAF brings together people from across the industry to share ideas, tools, and best practices around automation, orchestration, and observability in networking.
They typically hold two conferences each year, one in Europe and one in the USA, or at least that’s how it’s been so far. The European event is usually around the end of May, and the US one takes place around November. Tickets are released in tiers, with early bird pricing being cheaper. I grabbed the early bird ticket for 299 euros as soon as it was announced.
Continue reading
Configuring VLANs on UniFi Switches
I’ve worked with Cisco, Arista, and Juniper switches most of my life, but when I first started using UniFi switches in my homelab, I found myself a bit confused. The way VLANs are configured on UniFi switches is slightly different from what I was used to. In this post, I’ll go through how to configure VLANs on UniFi switches, specifically focusing on the USW-Pro-Max-16 and USW-Lite-8 models.
Quick Recap on VLANs
VLAN stands for Virtual LAN, and it's a way to logically segment a network, even if all devices are connected to the same physical switch. Different vendors use slightly different terms when it comes to VLAN port types. For example, Cisco calls them access and trunk ports, while others might refer to them as untagged and tagged ports.
An untagged (or access) port is typically used to connect end devices like PCs or printers. These devices have no awareness of VLANs, they just send regular Ethernet frames. When the switch receives a frame on an access port, it tags it with the VLAN configured for that port before forwarding it internally or out via a trunk port.
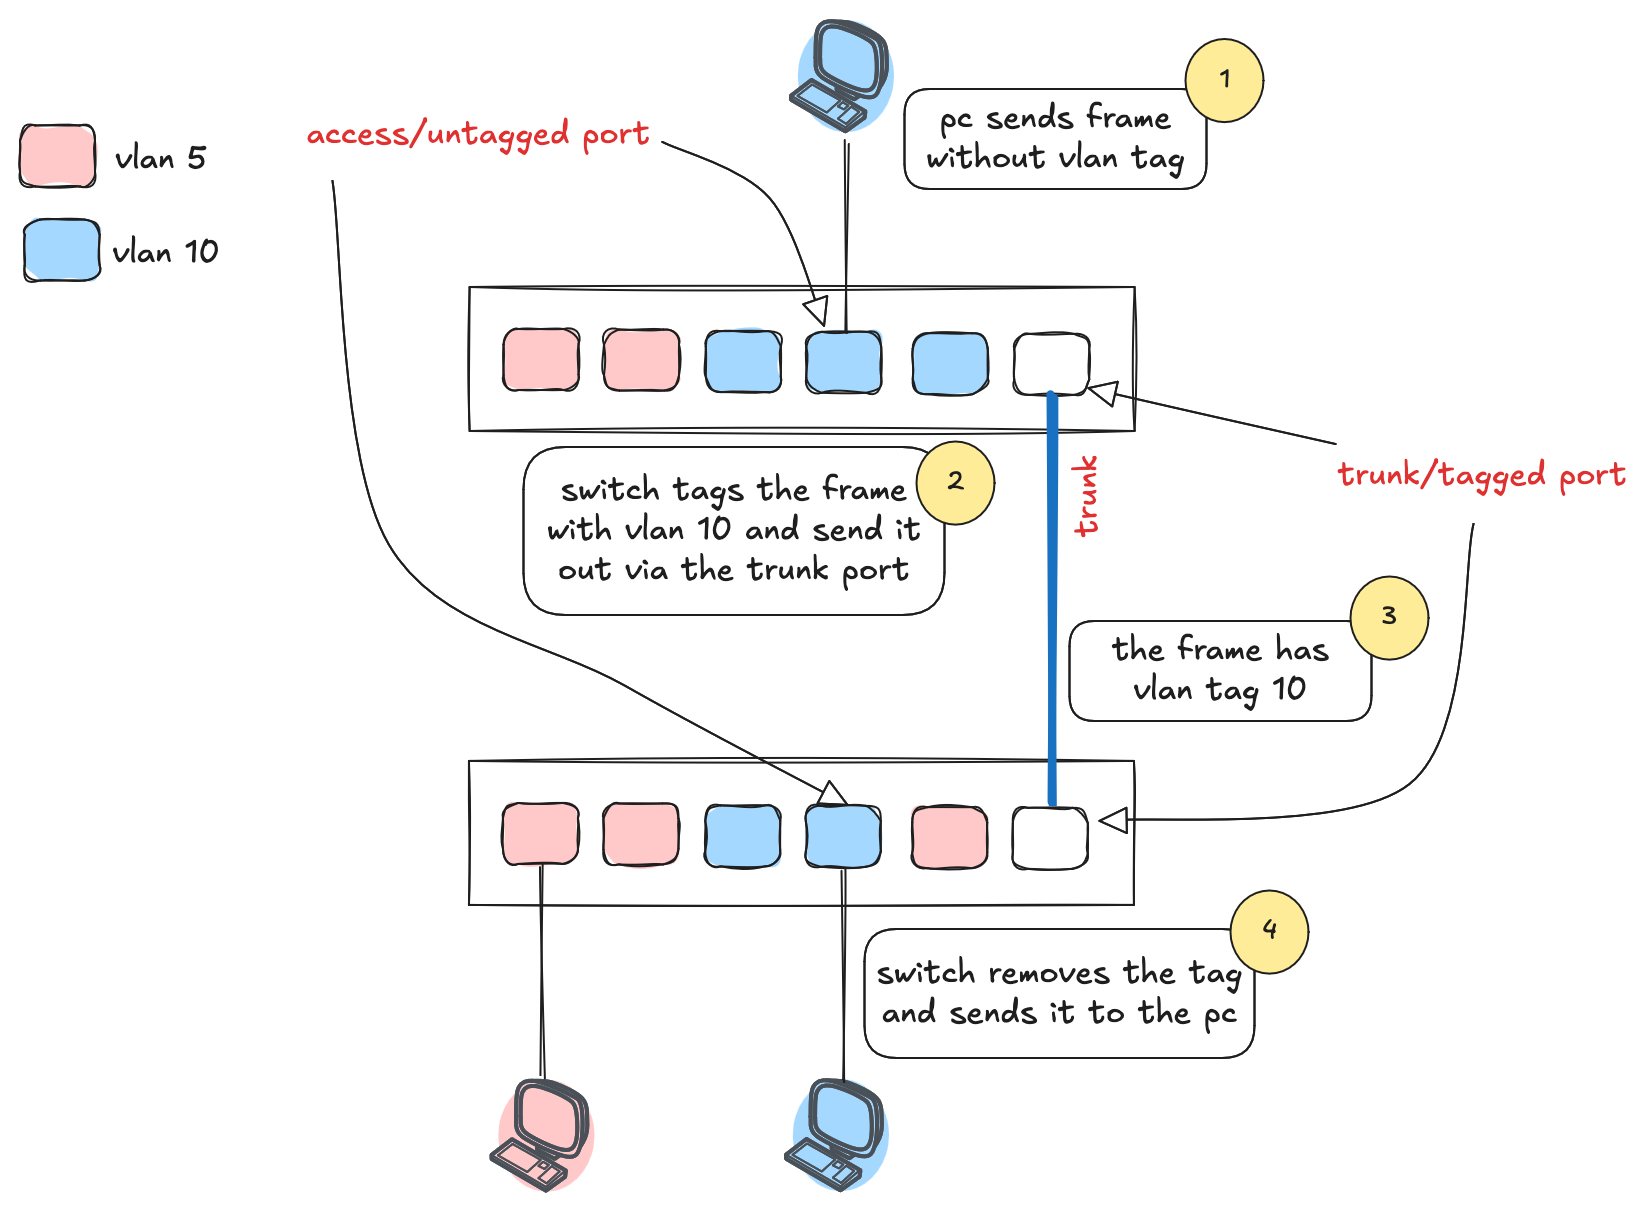
Tagged (or trunk) ports are used between switches or to other Continue reading
Creating, Modifying, and Deleting Data in Infrahub Using the Python SDK

The Infrahub Python SDK allows you to interact with Infrahub programmatically and can be used to query, create, modify, and delete data. In a previous blog post, we looked at how to query data using the Python SDK and explored various examples, including filters, relationships, and how to retrieve related data.
Originally published under - https://www.opsmill.com/infrahub-python-sdk-create-modify-delete/
In this post, we’ll focus on how to create, modify, delete and upsert data using the SDK. We’ll walk through practical examples that show how to add new resources, update existing ones, and delete data from Infrahub.
Throughout this post, we’ll be using the Infrahub sandbox, which is freely available. The sandbox already has some data in it, so if you’d like to follow along or try this yourself, you can use it without needing to set up anything.
Initial Setup
In the previous post, we covered the basics of using the Python SDK, including how to install it and set up the client object. If you’re new to the SDK, I recommend going back to that first article to start from the install.
To get started today, I’ve generated an API token on the Infrahub demo instance Continue reading
Querying Data in Infrahub via the Python SDK

Infrahub provides multiple ways to interact with your infrastructure data, including the Web GUI, GraphQL queries, and the Python SDK. These can be used to query, modify, create, or delete data in Infrahub. In this post, we’ll focus on using the Python SDK to query data from Infrahub.
This post assumes you are familiar with basic Python and Infrahub. If you’re new to these topics, don’t worry, you can still follow along.
Throughout this post, we’ll be using the Always-On Infrahub demo instance, which is available for anyone to access via this link. The demo instance already has some data in it, so if you’d like to follow along or try this yourself, you can use it without needing to set up anything.
Originally published under - https://www.opsmill.com/querying-data-in-infrahub-via-the-python-sdk/
Introduction
The Python SDK supports both synchronous and asynchronous Python. However, in this post, we’ll focus on using synchronous Python, which I hope most of us are comfortable with. We’ll cover async in a future blog post.
Interacting with Infrahub through the Python SDK is done using a client object, which defines the Infrahub instance you’ll be working with. This client acts as the connection point, allowing you to Continue reading
Tailscale VPN – A Network Engineer’s Perspective
Before we get into what Tailscale is or how it compares to a traditional remote access VPN, let’s take a quick look at Tailscale in action. The main problem Tailscale solves is remote access to your internal workloads.
In my homelab, I have a server running Linux. When I’m on my home network, I can access it directly without any issues. But if I step outside and want to access the same server over the Internet, Tailscale makes that much easier and you can have it up and running in about 10 minutes for free.
Typically, you would set up some kind of a VPN, either running on a server or a dedicated firewall. Then, you’d install a VPN client on the devices and point them to the public IP of your VPN server or firewall. That’s exactly what I have at the moment.
Tailscale takes a completely different approach, and you don’t need any of that. I’m not saying one is better than the other, I’m just pointing this out for comparison. I’ve shared my thoughts on the pros and cons of each solution at the end of this post.
Tailscale Installation and Setup
Head over to the Tailscale Continue reading