Author Archives: DataPlumber
Author Archives: DataPlumber
I’m currently using Ansible to template a large and growing number of devices for an ISP that I’m working for. The last part of the process is to use Netbox as a source of truth to write the configs using Jinja2 templates. The work is done as part of a CI/CD pipeline, and runs on a specific Gitlab Runner instance – finally the config is pre-staged onto the device’s filesystem to be checked by a engineer before deployment.
I’ve been finding the growing list of hosts a bit hard work, and, seemingly undocumented in the Netbox docs is how to put a site-specific limit on the playbook run. This is easily done in regular Ansible by using .ini-style host file groups like this:
[siteA]
sitea-router001
sitea-router002

[siteB]
siteb-router001
siteb-router002
You can then do ‘ansible-playbook -l siteB’ to restrict what gets generated. How you do this when Netbox is the source of inventory is less clear.
It turns out that sites are pre-pended in Netbox with the string ‘sites_’. So, in your dynamic inventory file (in my case, called nb-inventory.yml) you need to tell it to group hosts by site by including the sites keyword under the group_by section:
plugin: Continue readingAWX is now deployed on Kubernetes (since AWX release 18), which is great – the only thing is, what do you do if this is the only application you need Kubernetes for? It is a bit of a hassle setting up the K8s master and worker nodes just for a single application.
The documentation suggests you use Minikube for this, but that seems to be designed for local / testing use only. There’s no middle ground between these two options, so I decided to work it out on MicroK8s.
MicroK8s is Canonical’s minimal production Kubernetes environment. It installs on one host, but can be set up for high availability and even run on a Raspberry Pi!
Here are the instructions if you want to do the same.
Install an Ubuntu 20 host on a t2.medium or higher instance in AWS.
Give it 20Gb of general purpose SSD disk.
Create a security group that permits TCP/443 through from your location – only TCP/22 is permitted by default.
Install Microk8s on a new Ubuntu host in AWS:
ubuntu@ip-172-31-0-208:~$ sudo snap install microk8s --classic
microk8s (1.20/stable) v1.20.5 from Canonical✓ installed
ubuntu@ip-172-31-0-208:~$
Add the ‘ubuntu’ user you are logged in Continue reading
I’m working on a project to push out configuration files to Fortigates using the ‘configuration restore’ capability in FortiOS. The configs are generated using Jinja2 templates and then restored to the remote device via SCP. This post is to collect together a few of the pitfalls and things I learned in the process. Hopefully it will help someone else out of a hole.
I had every intention of using the FortiOS Ansible modules for this process, specifically fortinet.fortios.fortios_system_config_backup_restore. The issue with doing so is that it operates over the REST API. To use the API, you have to go on to the box and generate an API token. The issue here is that you only see the token in cleartext at the point of creation, after which it is stored cryptographically in the config. This means that on the script host you need to keep a vault with both versions – cleartext to push to the API, and cryptotext to insert into the config file you are pushing.
Instead, it is easier to enable SCP on the devices, put an admin PKI user’s public key in every config and restore over Continue reading
To save having to enter usernames and passwords for your devices, it is a lot more convenient to use public/private key authentication. When SSHing to the device, you simply specify the username and authentication using the keys is automatic.
Windows users can use puttygen to make key pairs, and PuTTY as an SSH client to connect to devices. This process is quite well described here: https://www.ssh.com/ssh/putty/windows/puttygen
By default, keys (on a Linux or Macos host) are in your home directory, under the ~.ssh/ directory. A keypair is generated using ssh-keygen like so:
andrew@host % ssh-keygen
Generating public/private rsa key pair.
Enter file in which to save the key (/Users/andrew/.ssh/id_rsa): andrew_test
Enter passphrase (empty for no passphrase):
Enter same passphrase again:
Your identification has been saved in andrew_test.
Your public key has been saved in andrew_test.pub.
The key fingerprint is:
SHA256:nx4REDACTEDGN69tY andrew@host
The key's randomart image is:
+---[RSA 3072]----+
|  1.           o+|
| o o&           o|
| * o..-        =.|
| ..              |
| S. =B xx      . |
|             .+. |
| . +.=.     o. +E|
| o o+*          .|
+----[SHA256]-----+
andrew@host %
In the example above, I created it as ‘andrew_test’ – this will Continue reading
Does anyone use the cable test feature on EX switches? Did you even know you could do this kind of thing?
In case you didn’t, here is a bit of background and an example.
The Time Domain Reflectometer (TDR) test has been available on the EX switches for some time, but not a lot of people seem to know about it. What is TDR, I hear you ask?
A futuristic-sounding thing, what a TDR does is send a signal down a cable and measure how much (if any) is reflected by the far end. If the cable is damaged a little way along its length, the TDR test will tell you that distance to a fair level of accuracy.
In an ethernet cable, there are four pairs of conductors – eight wires in total. The operative ones are 1 & 2, and 3 & 6. The other conductors are unused but their presence in the Cat5 or Cat6 cable helps prevent cross-talk and signal attenuation. In a lab, usually cables are fairly short and easily replaced, but in a working environment, cables in floor-boxes under desks, or the structured wiring under the raised floor in an office often suffers quite Continue reading
If you are getting this message appearing repeatedly on a Juniper switch (e.g. an EX4300), check you don’t have an IRB interface that is not attached to a VLAN. Alternatively, check your IRBs all have IP addresses.
Having just shot myself in the foot by deleting docker and losing a container I had been working on, here is the command to restore data to netbox-docker’s Postgres database:
sudo docker exec -i netbox-docker_postgres_1 psql --username netbox netbox < /path/to/backup/file.sql
Phew…
After deploying some new Juniper EX4600 core switches, my customer complained that he was experiencing about 45 seconds of delay in getting an IP address on a Surface Pro connected to a dock. The second time of connecting, it took about 8 seconds which was more acceptable. The 45 second delay came back every time they moved the Surface Pro to a new dock.
After ruling out a few things like Spanning Tree and LLDP, we isolated it down to the core switch. An older core switch elsewhere was configured for BootP Helper rather than DHCP relay, and clients connected to that did not have the problem.
Other devices didn’t exhibit the problem either – a Macbook was given an IP in the region of 4 seconds after connecting. The Surface Pro took 8 seconds consistently to connect when using a USB dongle. So the issue seemed to centre around the dock.
If you haven’t seen one of these before, they look like this – a black brick with some ports on it, supplied with power by another black brick:

The wire to the right of the image above ends in an edge connector that is plugged on to the Continue reading
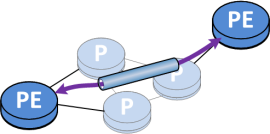
MPLS core networks that use Label Distribution Protocol (LDP) are common in SP core networks and have served us well. So, the thought of pulling the guts out of the core is pretty daunting and invites the question why you would want to perform open-heart surgery on such critical infrastructure. This article attempts to explain the benefits that would accrue from such a move and gives a high-level view of a migration strategy.

Ansible, ansible, ansible seems to be all we hear these days. There are lots of resources out there all trying to convince us this is the new way get stuff done. The reality is quite different – adoption of tools like this is slow in the networking world, and making the move is hard for command-line devotees.
Here are the three main problems I encountered in my adoption of Ansible as a modern way to manage devices:
Ansible is derived from the systems world, and is only latterly coming to be used for managing network devices. It is often said that Ansible is agentless, but when managing a Linux host (for example) the control machine pushes the Ansible playbook to that host and executes it there. In effect, *Python* is the agent.
Most network devices don’t have on-box Python, so when using Ansible against a router or a switch you have to have ‘connection: local’ in your playbook:
---
 name: Get info
 hosts: all
 roles:
 Juniper.junos          # Invokes the Junos Ansible module
 connection: local        # Tells it to run locally
 gather_facts: no
What this does is run the playbook using the local Continue reading
We’re using Cisco NSO in our lab at the moment to provision L3VPNs across multi-vendor environments as part of a demo. Just noting down a few things here for future reference:
You can use the curl (command-line URL) utility to query NSO’s API and retrieve the configuration of a device it knows about. You probably know that NSO syncs a device’s config locally, so this will be a way to retrieve the device config that NSO knows about – if the device is out of sync, of course this won’t quite be the latest:
curl -u username:password -H "Accept: application/vnd.yang.data+json" http://192.168.8.172:8080/api/config/devices/device/CPE-3/config | json2yaml
I’ll break this down:
curl -u username:password – provides the username and password of your NSO installation
-H “Accept: application/vnd.yang.data+json” – specifies an HTTP header to send in the request. In this instance, we are saying that we are expecting a JSON response. Alternatively you could specify ‘vnd.yang.data+xml’ to receive an XML response.
http://192.168.8.172:8080/api/config/devices/device/CPE-3/config – this is the API request we are making. CPE-3 is the device we are requesting the configuration of.
| json2yaml – this pipes the JSON response through a python module Continue reading
In some testing I am doing, I need to prove that BFD can be used with iBGP to tell the BGP protocol when there is an interruption. This will enable BGP to be brought down much faster than if regular BGP timers are used.
To make this easier to do, I used a firewall filter on one of the two routers to filter out BFD but accept all other packets:
Single-hop BFD (i.e. across a link) uses UDP 3784, while multi-hop BFD uses 4784. Since my BFD sessions are configured between loopbacks, it is this latter type I need to filter.
In the example below, CORE1 is a BGP client of CORE2, which is the route-reflector.
The following was configured on the routers to bring up the BFD session (I am only showing one side – you can figure out the mirror of this yourself I think):
[edit protocols bgp group CORE neighbor 10.0.0.6]
      bfd-liveness-detection {
          minimum-receive-interval 300;
          multiplier 3;
          transmit-interval {
              minimum-interval 100;
          }
      }
When the remote side was done, the session came up:
axians@CORE1> show bfd session
Dec 28 17:17:10
                               Detect Transmit
Address       State Interface  Time   Interval  Multiplier
10.0. Continue reading
I’ve been experimenting with getting RADIUS to deploy switching filters to Juniper switches recently, as part of a reference architecture demo. The concept is called REACH2020 and combines network virtualisation with the ability to identify network users and devices so that categories of user can be put into different virtual networks. This leaves the firewall that connects the virtual networks together as a convenient single point of control.
Anyway, back to the matter in hand. It turns out there’s a limit to the length of switching filter you can send a Juniper EX.
In this case, I am using Aruba Clearpass 6.6 to send some RADIUS attributes to a Juniper EX4300 switch using Junos 17.4. What I need to do is send a web portal address that a connecting client will be redirected to, and a switching filter so that they can’t go anywhere other than the portal. The switching filter is required as far as I can tell – if you just send the portal address, Junos ignores the RADIUS attribute.
An alternative way of achieving this is to configure your centralised web authentication (CWA) web portal on every edge switch, but since RADIUS Continue reading
In certain situations, I need to connect to a remote network via a bastion host but only have SSH available to me. To get around installing some kind of VPN gateway, the easiest thing to do is to create an SSH tunnel.
In this situation, what happens is that you set up local port-forwarding. Local port numbers are forwarded to the remote host via an SSH tunnel to the intermediate host.
The command format to do this on OSX is:
ssh -C -L <LOCAL-PORT>:<REMOTE-IP>:<REMOTE-PORT> <USERNAME>@<BASTION-HOST>
So for example, I can forward local port 1000 on my Mac to the remote device’s port 23 using this command (sudo has to be used for local ports lower than 1024):
sudo ssh -C -L 1000:10.200.0.1:23 [email protected]
Once authenticated, I can open another terminal window and type:
telnet localhost 1000
and hey-presto, I get connected to a remote router via telnet through an encrypted SSH tunnel! The -C parameter is for compression and isn’t actually necessary.
If you need to create a number of local port-forwards, this can be done in a config file instead. By default SSH reads /etc/ssh/sshd_config for system-wide parameters, and also Continue reading
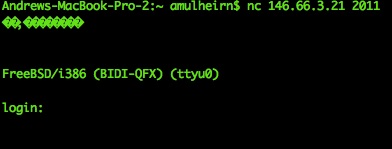
For those of us that often have to use console servers to connect over IP to serial ports of devices, the removal of telnet from High Sierra is a bit of a pain in the bum. Here are two things you can do:
Use the ‘nc’ command to connect in exactly the same way as you used to do at the command-line with telnet. For example: nc <IP address> <Port Number>
SFTP is good and I use it wherever I can, but sometimes you come across some old kit that can’t support SSH or SFTP, so you just need those old tools. An alternative is to do this:

There don’t seem to be many operational commands in Junos to tell you what’s going on with regard to Storm Control. Here’s all I could find – let me know if you know of more:
In the lab, I configured this storm control profile:
{master:1}
user@VCF> show configuration forwarding-options
storm-control-profiles TAT-StormControl {
     all {
         bandwidth-level 1000;
     }
     action-shutdown;
}
This was then configured on ae2, which is a trunk interface towards the Ixia tester:
{master:1}
user@VCF> show configuration interfaces ae2 unit 0
 family ethernet-switching {
     interface-mode trunk;
     storm-control TAT-StormControl;
 }
Unfortunately there’s no ‘show forwarding-options storm-control’ type command to see what interfaces have storm control configured. I can’t find any other command that shows this info either.
So I generate 3Mbps of traffic to ff:ff:ff:ff:ff:ff from my Ixia into the VCF and the port goes disabled immediately according to the logs:
Dec 15 12:57:23 VCF l2ald[3261]: L2ALD_ST_CTL_IN_EFFECT: ae2.0: storm control in effect on the port
Dec 15 12:57:23 VCF l2ald[3261]: L2ALD_ST_CTL_DISABLED: ae2.0: storm control disabled port
Dec 15 12:57:23 VCF l2cpd[1814]: Root bridge in routing-instance 'default' changed from 4096:b0:a8:6e:0a:bd:41 to 32768:dc:38:e1:5f:c4:02
Dec 15 12:57:23 VCF mib2d[3271]: SNMP_TRAP_LINK_DOWN: ifIndex 526, ifAdminStatus up(1), ifOperStatus down(2), ifName ae2
In order to mix EX switches and QFX switches in the same VCF, you need to enable mixed-mode. This requires all members of the VCF to reboot unfortunately:
{master:1}
imtech@sw0-24c> request virtual-chassis mode fabric mixed
fpc0:
--------------------------------------------------------------------------
Mode set to 'Fabric with mixed devices'. (Reboot required)

fpc2:
--------------------------------------------------------------------------
Mode set to 'Fabric with mixed devices'. (Reboot required)

fpc3:
--------------------------------------------------------------------------
Mode set to 'Fabric with mixed devices'. (Reboot required)

fpc1:
--------------------------------------------------------------------------
WARNING, Virtual Chassis Fabric mode enabled without a valid software license.
 Please contact Juniper Networks to obtain a valid Virtual Chassis Fabric License.

Mode set to 'Fabric with mixed devices'. (Reboot required)

{master:1}
imtech@sw0-24c>
Once you’ve cabled up your QSFP ports between the EX4300 you are adding and the QFX spines, you need to do the following:
Enable the VCF port on the QFX spine:
request virtual-chassis vc-port set pic-slot 0 port 48

Trying to install OpenDaylight Nitrogen needs JDK 1.8 or later.
Needless to say, I’ve not go the right version on my Ubuntu 16.04 server – it reports 1.7. Also needless to say, installing it isn’t a simple matter of adding the software through apt-get because the repository appears to be broken or empty (at the time of writing). I was hoping to get away with doing this:
sudo add-apt-repository ppa:webupd8team/java
sudo apt-get update
sudo apt-get install oracle-java9-installer
Anyway, the last part failed with:
Connecting to download.oracle.com (download.oracle.com)|104.86.110.251|:80... connected.
HTTP request sent, awaiting response... 404 Not Found
2017-10-20 14:05:08 ERROR 404: Not Found.download failed
Oracle JDK 9 is NOT installed.
dpkg: error processing package oracle-java9-installer (--configure):
 subprocess installed post-installation script returned error exit status 1
E: Sub-process /usr/bin/dpkg returned an error code (1)
So instead I downloaded it from here: http://www.oracle.com/technetwork/java/javase/downloads/jdk9-downloads-3848520.html
Unpacked the tarball with this:
cd /opt
tar -xvzf jdk-9.0.1_linux-x64_bin.tar.gz
Finally updated my environment variables to tell it where the JDK is:
 export JAVA_HOME=/opt/jdk-9.0.1/
  Continue reading
Axians Professional Services normally recommends using RADIUS authentication to our customers, but one of our customers uses TACACS. We did some type-approval testing of new Junos release for them recently and had to set up a TACACS+ daemon in the lab to make sure authentication still worked following the upgrade.
Shrubbery.net very helpfully provide a TACACS+ implementation that you can download to a Linux host for this purpose, but the documentation is a bit light on their website, and what you find using Google is naturally somewhat Cisco-specific. So here are some notes on getting a basic setup going with Shrubbery’s tac_plus daemon and Junos. Maybe this will help someone else.
First, you need to set up the Junos side of things. You need to do three things:
axians@MX104-1-re0> show configuration system tacplus-server | display set

set system tacplus-server 192.168.3.237 port 49
set system tacplus-server 192.168.3.237 secret testing123
set system tacplus-server 192.168.3. Continue reading
The upgrade from Space platform 15.2 to 16.1 is one of the worst procedures I’ve seen in quite a while. It is complicated because the underlying CentOS is being upgraded at the same time, so I guess that’s part of the reason, but still, it could be a lot slicker and better tested.
In summary, you have to apply a couple of patches, the second of which backs your 15.2 data up somewhere else – ideally over SCP to a remote server. You then shut down your 15.2 VM, install a fresh 16.1 VM with the same IP addresses, and restore the data to it.
Sounds easy, but the 16.1 installation part can generally only be done by the customer’s VMware admin because it needs console access. So you’ve got to rely on them following lots of instructions quite well.
Recently a customer experienced some kind of failure in the restoration part, leaving me with a fresh installed 16.1, but no data. I SSHed on to the VM and could see the standard menu, but wasn’t offered any option to attempt another restore. After digging around for a while, I found Continue reading
