Author Archives: Steven King
Author Archives: Steven King
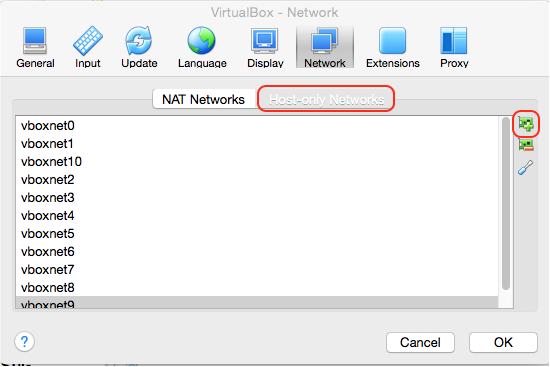
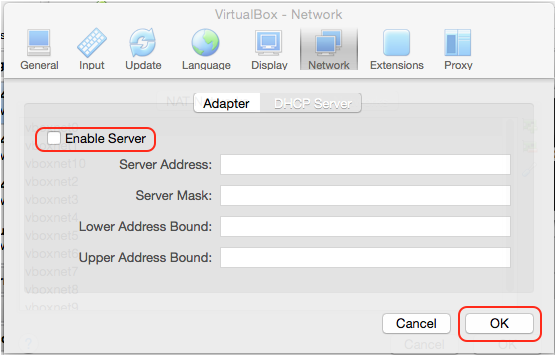
NOTE Notice that we did not connect the Management1 interface of either vEOS instance to anything inside of GNS3. If you remember when we created the VMs, their first interface is a host-only adapter connected to the vboxnet in VirtualBox, so it’s automatically connected and there’s nothing additional we need to do there, but GNS3 doesn’t know that so it considers the interface disconnected, and that’s OK. That saves us from having to add our management server(s) to the topology and cluttering it up (Just imagine trying to have a nice clean-looking topology in GNS3 if you had to have a connection from every vEOS instance to the management server(s) ), which is distracting and ugly - we’re better than that. |


This was actually spurned from a comment I received on another one of my blog posts that you can find here. Seeing that comment, I white boarded it and realized that I may have been completely wrong in regards to how Root Guard could “break a network”.
Let’s say we have the following topology:

Let’s work through the spanning tree topologies.
Core 1 – Root bridge for VLAN 10. All ports designated.
Core 2 – Port 1 will be a root port Continue reading
Ever curious regarding how two routers configured for OSPF become fully adjacent? The following diagram of the process was modeled directly from RFC 2328, and the steps described gleaned from the Routing TCP/IP Vol I book. Since we can see mention of a DR, this example must be based on a multi-access network.

For a table describing the different LSA types, check out the first post of this series.
In the first part of the series, we looked at LSA Types 1, 2, and 3 – Router, Network, and Network Summary, respectively. To move on to the next two LSA types, we need to bring in another Autonomous System (AS). In the diagram below, we’ve added R5 which has an interface in EIGRP AS 1, and is redistributing that into OSPF Area 4. The fact that R5 has an interface inside of the OSPF AS, as well as the EIGRP AS, makes R5 an Autonomous System Boundary Router (ASBR).

The EIGRP-oriented subnet that is being redistributed is considered an external route to the OSPF domain, so a Type 5 LSA, or ASBR External, is flooded into OSPF Area 4 containing a LSID and netmask of the subnet, plus the External Type. This important because it tells other routers whether or not to add the internal link costs within the OSPF domain to the metric to reach that subnet. A type 2 external route specifies that only the external cost is taken into consideration.

When R2 catches wind of Continue reading
The following network is configured with OSPF with all interfaces in area 0. Since this is a multi-access network, a Designated Router (DR) is elected which improves OSPF performance by reducing the amount of LSA flooding. R3 is the current DR, with R2 as the BDR. R4’s interface to SW1 has been configured as a passive interface to prevent an adjacency from forming and simulate R4 being a “new” router on the network. Wireshark is monitoring the link between R4 and SW1.

I won’t go into all the details regarding Wireshark output and the OSPF process. If you want a more detailed analysis, take a look at my previous blog article here. In this article, we’ll only be taking a closer look at what happens specifically in a multi-access environment.
Upon re-enabling R4’s interface for OSPF, we see R4 sends a Hello packet to the All OSPF Routers multicast address (224.0.0.5) and that no DR or BDR is listed. R4 is “new” to the network as far as OSPF is concerned, so it has no idea about the current topology.

R1, R2, and R3 all send Hello packets with the Continue reading
If every router in an enterprise environment was in a single OSPF area, at some point you’re going to encounter scalability issues due to any changes in the environment causing an SPF recalculation in all routers in that single area.
LSAs and their use within areas provide a mechanism for maximizing performance in OSPF by logically segmenting groups of contiguous links so that every router in the entire autonomous system does not have to have exact copies of the Link State Database (LSDB) and to reduce the amount of LSA flooding. SPF calculations are also isolated to each individual area rather than the entire environment. Different LSAs are used in different situations, and are treated differently depending on the type of OSPF area involved.
The following table represents the different LSA types, and was taken from the CCIE R&S OCG.
| TYPE | NAME | DESCRIPTION |
| 1 | Router | One per router containing its RID and all interface IP addresses; also represents stub networks. |
| 2 | Network | One per transit network. Created by the DR and represents the subnet and router interfaces connected in the subnet. |
| 3 | Network Summary | Created by Area Border Routers (ABRs) to represent one area’s type 1 and Continue reading |

A basic network is setup and OSPF is configured. R1 is then prevented from forming an OSPF adjacency with R2 due to R1’s serial interface being configured as a passive interface.
Only Hello packets are seen from R2.

From this Wireshark output we can see:
I was watching a movie the other night with my wife and decided to hop on memegenerator.net and play around with memes. Thought I’d share my creations.


Policers and shapers identify traffic violations in an identical manner, but treat them differently. Policers perform instantaneous checks and immediately take action when a violation occurs. Actions can include marking, dropping, and even just transmitting the packet. Shapers on the other hand are traffic-smoothing tools. Its objective is to send all traffic out a given interface, but to smooth it out so that it never exceeds a given rate – usually in order to meet SLAs. Excess traffic is buffered and delayed until the traffic once again dips below the defined maximum rate.
| Policer | Shaper |
| Causes TCP resends as traffic is dropped | Delays traffic; involves less TCP resends |
| Inflexible; makes instant drop decisions | Adapts to network congestion by queuing excess traffic |
| Ingress or egress interface tool | Typically egress only |
| Rate limiting – no buffering | Rate limiting with buffering |
While policing and shaping tools are not employed to directly provide QoS for real-time traffic, they do regulate/stabilize traffic flows so that unexpected bursts in data traffic do not induce jitter and latency that adversely affects real-time traffic.
Policers determine whether each packet conforms, exceeds, or violates the policies configured for traffic, and takes the prescribed action Continue reading
EtherChannel allows you to aggregate several switch links into a single, fast, fault-tolerant, logical interface. 16 links can be defined for an EtherChannel, however, a maximum of 8 will be active at any one time. The other links are placed on standby.
While having multiple links between two switches can possibly create bridging loops, EtherChannel avoids this by bundling the links into a single logical interface. This logical interface can be configured as an access or trunk interface.
For ports to be members of the same EtherChannel, there are some restrictions. Ports must:
The full duplex maximum bandwidth for 8 links is as follows:
EtherChannel load balancing across the links can occur in a number Continue reading
The other day I was at work doing an interoperability test with Cisco and Brocade multilayer switches, and we ran into a strange issue that really highlighted my “tunnel view” to the Cisco world.
We were setting up basic OSPF stuff using md5 authentication and we couldn’t get the Cisco and Brocade to form an adjacency. A debug ip ospf adjacency command on the Cisco switch revealed that the Cisco was using “type 2” authentication, and the Brocade was using “type 0”.
Here’s a quick breakdown of the authentication types:
| Type 0 | No authentication |
| Type 1 | Clear text authentication |
| Type 2 | md5 authentication |
I set up a SPAN on the Cisco switch and sure enough, we were getting the OSPF Hello packets from the Brocade with no authentication.
After some digging, it turns out the Brocade has an Auth-Change-Wait-Time command in interface configuration mode. This is set to 300 seconds (5 minutes) by default. While I don’t quite understand it, the description states it allows for graceful authentication implementation. So after you enable md5 on the interface, it waits 300 seconds before actually sending OSPF Hellos with authentication. We toyed around with it Continue reading
Vulnerability Details
OSPF LSA Manipulation Vulnerability in Multiple Cisco Products
· Summary
Multiple Cisco products are affected by a vulnerability involving the Open Shortest Path First (OSPF) Routing Protocol Link State Advertisement (LSA) database. This vulnerability could allow an unauthenticated attacker to take full control of the OSPF Autonomous System (AS) domain routing table, blackhole traffic, and intercept traffic.
The attacker could trigger this vulnerability by injecting crafted OSPF packets. Successful exploitation could cause flushing of the routing table on a targeted router, as well as propagation of the crafted OSPF LSA type 1 update throughout the OSPF AS domain.
To exploit this vulnerability, an attacker must accurately determine certain parameters within the LSA database on the target router. This vulnerability can only be triggered by sending crafted unicast or multicast LSA type 1 packets. No other LSA type packets can trigger this vulnerability.
OSPFv3 is not affected by this vulnerability. Fabric Shortest Path First (FSPF) protocol is not affected by this vulnerability.
· Affected Products
Cisco devices that are running Cisco IOS Software and configured for OSPF are vulnerable. Devices that do not have OSPF enabled are not affected by this vulnerability.
Cisco devices that are running Cisco IOS Continue reading
Congestion-avoidance tools are complementary to, and dependent upon, queuing algorithms. Queuing/scheduling algorithms manage the front of a queue, while congestion-avoidance mechanisms manage the tail of a queue.
Congestion-avoidance tools are designed for TCP traffic, because TCP has built-in flow-control mechanisms that operate by gradually increasing traffic flows until packet loss has occurred. Once packet loss has occurred, the transmission rate is reduced before slowly ramping up again. This means that if no mechanism is in place to control TCP, any particular flow has the ability to eat up all available bandwidth.
When there are no congestion-avoidance tools in place, and queues fill, tail drop occurs, which means all traffic is dropped.
In a constricted channel without congestion-avoidance tools, TCP connections eventually synchronize with each other – they ramp up together, lose packets together, and back off together. This is called global synchronization and basically results in “waves” of TCP traffic.
Congestion-avoidance tools has no real benefit or use for UDP traffic, because UDP traffic does not have any retry logic.
RED combats global synchronization by preemptively and randomly dropping packets before queues fill. Instead of waiting for the queues to fill, Continue reading
Of all the tools within the QoS toolset, congestion management tools, also known as queuing tools, provide the biggest impact on application service levels. Whenever packets enter a device faster than can exit it, congestion exists and this is where queuing tools come into play. Queuing tools are only engaged when congestion exists, otherwise packets are sent as soon as they arrive. When congestion does exist, packets must be buffered, or queued, to mitigate dropping.
Packet markings, or lack thereof, affect queuing policies, so queuing policies are complementary and have a dependence on classification and marking policies.
These two terms are often incorrectly used interchangeably – they are two different things. Scheduling determines how a frame or packet exits a device. Whenever packets enter a device faster than they can exit it, as is the case with speed mismatches (ex. Gigabit Ethernet traffic heading to a WAN interface), congestion can occur. Devices have buffers that allow the temporary storing and subsequent scheduling of these backed-up packets, and this process is called queuing.
Inbound traffic > Queuing (During congestion) > Scheduling > Outbound traffic
The first part of building a QoS policy is to identify the traffic that you need to treat preferentially (give better priority), or differentially. This is accomplished via classification and marking.
These tools can examine a number of criteria within layers 1, 2, 3, 4, and 7.
Unfortunately the equipment I was using didn’t support PVST+ (Sup2Ts in 6503 Catalyst Switches), so I skipped testing UplinkFast and BackboneFast as these are incorporated in 802.1w (RSTP) and 802.1s (MSTP, which is basically an extension of RSTP).

For this test, SwitchD will be treated as a Rogue Switch being attached to the network. Initially, SwitchC’s port 2/1 is configured as an access port with only PortFast enabled.
*Jul 5 22:02:06.023: %SPANTREE-2-BLOCK_BPDUGUARD: Received BPDU on port GigabitEthernet2/1 with BPDU Guard enabled. Disabling Continue reading