Openswitch OPX Appliances
OpenSwitch OPX Base is an innovative operating system for network systems. It uses an unmodified Linux kernel and standard distribution to take advantage of rich ecosystem, and also provide flexibility in customizing your system according to your network needs.
Note: Openswitch OPX images are customized with my after install script and they are ready for use in GNS3.
Openswitch OPX 2.3.2
https://drive.google.com/file/d/1Vdpjoz53R7Rx1HYi8KcEuRuNvQnMMn0f/view?usp=sharing
https://sourceforge.net/projects/gns-3/files/VirtualBox%20Appliances/OpenswitchOPX-2.3.2.zip
https://www.4shared.com/s/fQu2DUd9dca
16 Blockchain Disruptions
I am more than happy to publish the new infographic "16 Blockchain Disruptions" with the help of my friends from bitfortune.net. As we know, blockchain enables decentralized transactions across a P2P network. The infographic lists 16 different industries that benefits from using the blockchain technology. Enjoy reading.
Are Chatbots a Security Risk?
Chatbots – ingenious little bits of programming that have been making it possible for companies to automate the handling of queries, sales, and basic customer support. These bots are deployed through a number of different messaging platforms like Facebook Messenger, WhatsApp, etc.
And they have proven very popular. But, how secure is the tech? Lately, especially, there have been a lot of concerns raised. Say, for example, that I head out and use the Nordstrom app. I find the perfect pair of discounted sport shoes and want to buy them.
How safe am I entering my credit card details over the system? Or, more importantly, can chatbots be hacked?
Let's take a step back here for a second. Certainly, a chatbot is essentially just a program, and so, it makes sense that it could be hacked. But the danger is not likely to be any more than your local bank being hacked.
The same HTTPS protocols and metadata techniques used to provide security for the bank's site and messaging services can also secure the information transmitted via chatbots. The tech underlying the chatbot is similar, in fact, to your standard app, so it is not new.
The main difference here, Continue reading
Wireless ESSID as ROT13 Ciphertext
Recently, I have scanned nearby wireless networks with airodump. I have discovered five networks transmitting on channel 3. MAC addresses of access points (BSSIDs) transmitting on channel 3 differ only in last two hexa digits and a signal level (PWR) reported by my WiFi card is almost same for all BSSIDs.
$ sudo airodump-ng wlp3s0

Picture 1 - Wireless Networks of Caffe Geo Guru
The following three ESSIDs have caught my attention.
1) Heslo do siete caffe.geo.guru
2) zistis rozlustenim sifry
3) qnw fv qboer cvib
In fact, the ESSIDs represent a cryptography challenge created for customers of caffe.geo.guru. Once the challenge is successfully solved a customer gains a password for connection to the wireless network with ESSID caffe.geo.guru.
Note: The first two ESSID are written in Slovak. Their English version is below.
1) Password to network caffe.geo.guru
2) can be gained by decoding words
3) qnw fv qboer cvib
The third ESSID represents an encoded password. Obviously, letters are substituted in ciphertext which let us to the assumption that ROT cipher is used. Using ROT13 cipher on the encoded text 'qnw fv qboer cvib' gives us a required plain-text password Continue reading
Chatbots Gone Wild
I am pleased to publish an infographic called "Conquering The World - Chatbots Gone Wild". This infographic contains statistics that highlight the impact of Artificial Inteligence (AI) chatbots on business and other sectors. In online business they interact with customers and boost sales by saving time and cost. They become more and more useful as the customers are getting more comfortable with technology through voice commands. According to the graphic, the business trust in chatbots is going to grow as the 80% of businesses claimed they already used or plan to use chatbots by 2020.
I am glad to thank BestVPNs for kind permission to republish the original infographic on my blog.
Note: Click image to enlarge.

Chatbots Gone Wild
I am pleased to publish a link to infographic called "Conquering The World - Chatbots Gone Wild". This infographic contains statistics that highlight the impact of Artificial Inteligence (AI) chatbots on business and other sectors. In online business they interact with customers and boost sales by saving time and cost. They become more and more useful as the customers are getting more comfortable with technology through voice commands. According to the graphic, the business trust in chatbots is going to grow as the 80% of businesses claimed they already used or plan to use chatbots by 2020.
The link below is published with the kind permission of 16best.net.
Enterprise Network on GNS3 – Part 7 – DMZ
This is the last article from the series of the articles discussing configuration of the enterprise network. The article explains the configuration of Demilitarized Zone (DMZ). Our DMZ consists of three devices - ASAv-DMZ-I, a multilayer switch vIOS-DMZ-I and Serv-DMZ-I. All the devices in DMZ are run by Qemu hypervisor. The ASAv_DMZ-I device is Cisco Adaptive Security Appliance Software version 9.6.1 and it has assigned 2048 MB RAM by GNS3. The device vIOS-DMZ-I is Cisco vIOS-L2 version 15.2 and it has assigned 512 MB RAM by GNS3. And finally, the device Serv-DMZ-I is Linux Ubuntu 16.04.3 LTS with 1024 MB RAM assigned by GNS3. The server Serv-DMZ-I provides DNS, NTP, Syslog services for devices in DMZ and a public web service for all hosts in the Internet.
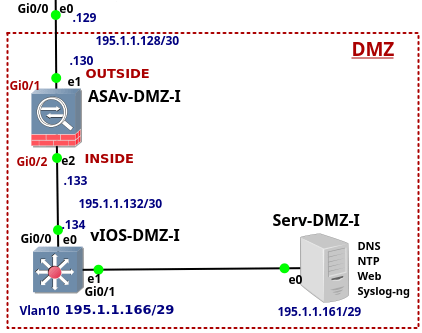
Picture 1 - Demilitarized Zone - DMZ
All devices located in DMZ have their IP addresses assigned from the subnet 195.1.1.128/25. The subnet 195.1.1.128/27 is further divided with /30 mask, creating 8 subnets suitable for point-to-point link configuration . Servers located in DMZ are assigned to different VLANs. Currently, there is only server Serv-DMZ-I deployed in DMZ and configured with the IP addresses Continue reading
77 Facts About Cyber Crimes One Should Know In 2018
I am pleased to publish an infographic called "77 Facts About Cyber Crimes One Should Know In 2018." The infographic includes the top 10 biggest data breaches of the 21st century, top cyber crimes, stats of cyber attacks, fun facts and a ton more interesting info.
I am glad to thank BestVPNs for kind permission to republish the original article on my blog.
Note: Click image to enlarge.

Enterprise Network on GNS3 – Part 6 – Edge Router and ISPs
This is the sixth article from the series of the articles discussing the configuration of an entire enterprise network. The article explains the configuration of the edge router vIOS-EDGE-I and configuration of ISP routers. Now let's say few words about the router vIOS-EDGE-I. The router is Cisco IOSv Qemu appliance, version 15.6(2)T. It has assigned 512MB RAM by GNS3. The router connects all three parts of the company network to the Internet. These parts are the the campus network, data center and DMZ.
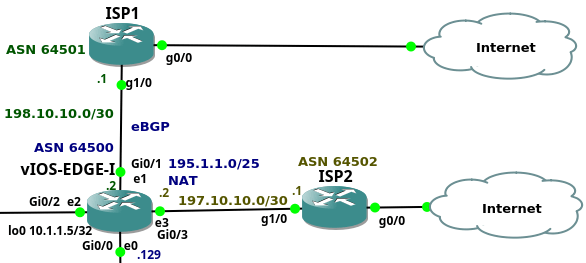
Picture 1 - Company Connection to the Internet via vIOS-EDGE-I
The company has assigned the prefix 195.1.1.0/24. Devices located in DMZ have assigned the prefix 195.1.1.128/25. The prefix 195.1.1.0/25 is assigned for devices hidden behind NAT. NAT is configured on vIOS-EDGE-I router, translating campus and data center subnets to the subnet 195.1.1.128/25. The router is connected to the upstream providers via their Ethernet ports Gi0/1 and Gi0/3. This is a single multi homed topology when a company is connected to two upstream providers with a single edge router. The entire prefix 195.1.1.0/24 is advertised to the both ISPs via BGP routing protocol. Continue reading
Enterprise Network on GNS3 – Part 5 – Data Center
The article is the fifth of the series of the articles discussing the enterprise network configuration. The article focus on the Data Center (DC) configuration. DC consists of the two devices - Server1 and the switch vIOS-Ser-I. Of course, the DC network with a single switch and the server is far away from any known DC network design. Typically, modern horizontally scaled large-size Layer 3 DCs consist of thousands of servers connected to the Top of Rack (ToR) l3 switches and they follow leaf and spine design. The DC of this size can be hardly emulated on a single PC. For this reason I only share the configuration of the Cisco L3 switch that is located in our DC. The switch is running Cisco vIOS-L2, version 15.2 and it has assigned 768MB RAM by GNS3.
The switch vIOS-Ser-I connects Ubuntu Linux Server to DC network. The configuration of the services such as bonding, NTP, DHCP, Syslog-ng, DNS and RADIUS running on the server is explained in more details later.
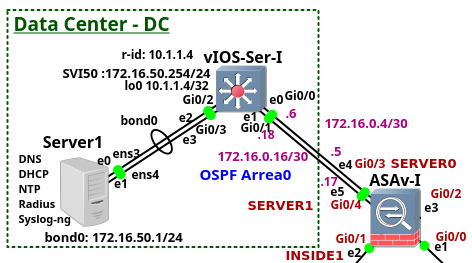
Picture 1 - Data Center
Note: The configuration file of the device vIOS-Serv-I is attached here.
1. Switch vIOS-Ser-I Configuration
Rather than explaining every line of the configuration, we Continue reading
Digital DVB-T on Raspbian
Recently, I have been asked to get working Digital Video Broadcasting - Terrestria (DVB-T) tunner on Raspberry PI 3. The tunner is Cinergy DVB-T stick from Terratec. Below are my notes describing installation of the stick on Raspbian Linux 9.1 Stretch. I hope someone find them useful.
1. Copy Raspbian to SD CARD (on Ubuntu)
First, we need to copy Raspbian installation image to SD card. Below is the example using dd command on Linux.
$ sudo dd bs=4M if=2017-09-07-raspbian-stretch.img of=/dev/mmcblk0 status=progress conv=fsync
Insert SD card to Raspberry and power on the box. The default user is pi with the password raspberry. Enable SSH and VNC server for remote box administration. Navigate to Menu-> Preferences-> Raspberry PI Configuration.
2. Install Firmware
Inspect kernel for any error message connected with DVB-T tunner.
$ dmesg

Picture 1 - Missing firmware isdbt_rio.imp
Download firmware file isdbt_rio.imp (md5 - 9b762c1808fd8da81bbec3e24ddb04a3) from here. I have also uploaded it to Google disk. You can download and copy the file to the directory /lib/firmware with the command below.
$ sudo wget https://drive.google.com/uc?id=1MwDGSG4ZEm3eeJuf0gS686Be-ngx4rKR -O /lib/firmware/isdbt_rio.inp
Reboot PI and check kernel for any other kernel error messages.

Picture 2 - Continue reading
Raspberry Pi3 WIFI Router Based on Linux piCore

Recently I have bought a Christmas present for myself from GearBest, costing only $49,21 USD. It includes Raspberry Pi 3 single board computer along with 2.5A power supply, case and several heat sinks. Pi3 is the latest and the most powerful Raspberry model, equipped with 1.2GZ 64-bit ARM processor, 1GB RAM and integrated 10/100 Ethernet port and Wifi 802.11n. Although I can simply use it as a cheap desktop computer, I have different goal in my mind.
Six years ago, I built my own SOHO router/switch base on Intel Pentium III - 733Mhz. It was working great but to save electricity consumption I have never used it in production. However, I have never completely given up idea to build and use my own router. It comes true thanks to Raspberry Pi3 computer as it consumes maximum 1.34 A or 6.7 W under stress when peripherals and WiFi are connected.
Picture1 - Raspberry Pi 3 Model B
Source: http://fosssig.com/tinkerers/1-raspberry-pi-and-kodi/
To shorten the story, I have built a wifi router that runs piCore 9.0.3 on Raspberry PI3. The clients are connected via wireless network to the router that runs hostapd. The hostapd is configured Continue reading
Linux PiCore on Raspberry Pi – First Steps
![]()
The blog post contains notes about the installation of piCore Linux on Raspberry Pi 3 computer. The related topic is well known, discussed by many similar posts however the article represents my own copy & paste reference for later usage.
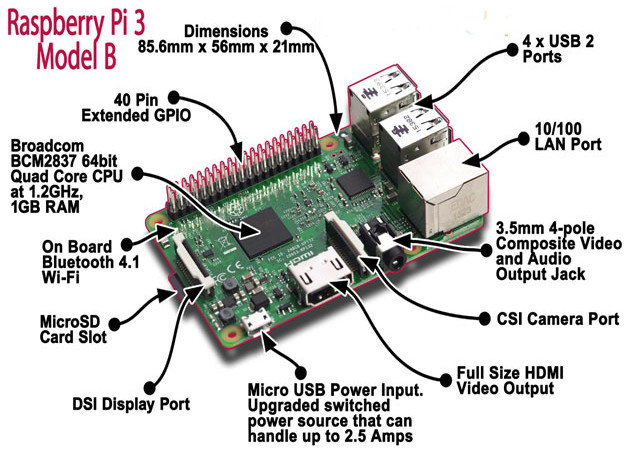
The first generation of Raspberry Pi 1 has been with us since February 2012. Recently in version 3B, the Pi3 is equipped with 1.2 GHz 64-bit quad-core ARM Cortex-A53 processor, 1 GB of RAM and it has integrated 2.4 GHz WiFi 802.11n (150 Mbit/s), Bluetooth 4.1 (24 Mbit/s) on Broadcom BCM43438 chip. It also provides the integrated 10/100 Ethernet port. These factors along with the cheap price (~ 35 US), small size (~ 85.60mm x 56mm x 21mm), low weight (~ 45g) and low power consumption (maximum 1.34 A or 6.7 W under stress when peripherals and WiFi are connected) makes this single-board computer ideal candidate for use in the recent Internet of Things (IoT) world.
Raspberry Pi can run several OSs built for ARM architecture such as Windows 10 IoT Core, Raspbian (based on Debian), Ubuntu Mate and many others. The Linux distributions offer either full desktop environment or they are released Continue reading
Enterprise Network on GNS3 – Part 4 – Cisco ASAv-I
This is the fourth from the series of the articles that discuss configuration of the enterprise network. The article explains configuration of the device ASAv-I. The device is a Cisco Adaptive Security Virtual Appliance (ASAv) version 9.6(1) installed on qcow2 Qemu disk. The ASAv-I provides traffic filtering and inspection services for the campus network and Data Center (DC). It also connects the campus network and DC to the vIOS-EDGE-I edge router.

Picture 1 - ASAv-I, Campus, DC and Edge Connection
Note: The recommended RAM size for ASAv instance is 2048 MB. In order to lower memory consumption, GNS3 is configured to assign 1536 MB to the ASAv.
Note: The interface eth0 on the ASAv-I is referred as the interface Management0/0 in ASAv configuration. The interface eth0 is not connected as we use the inside interfaces for management instead. The first connected interface is then the interface eth1 that is referred as the interface GigabitEthernet0/0 in ASAv CLI. Similarly, the second connected interface eth2 is referred as the GigabitEthernet0/1 and so on.
Note: Here is the configuration file of vASA-I.
ASAv-I Configuration
Once we start ASAv, the Qemu window is launched. However we want to use GNS3 Continue reading