VyOS 1.1.8 Released
![]()
More than one year after publishing a previous VyOS version, the new VyOS 1.1.8 is finally released. VyOS is an open source network operating system that can be installed on physical hardware or as a virtual machine. It is based on GNU/Linux and joins multiple applications such as Quagga, ISC DHCPD, OpenVPN, StrongS/WAN and others under a single management interface. VyOS is a cheap and effective solution for those who want to learn Junos like CLI.
Linux user can use my installation scripts for zero-touch VyOS deployment. Scripts download the newest stable VyOS x86-64 Live ISO image from web, create VMware VMDK disk and install VyOS from ISO on the disk. The scripts are available here (part 1.1).
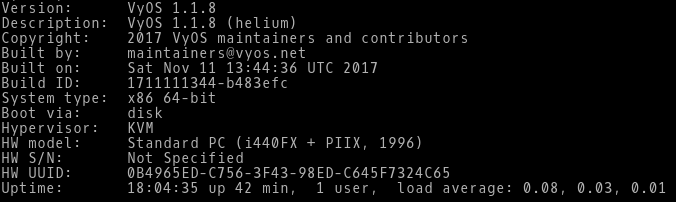
Picture 1 - VyOS Version 1.1.8
Note: The scripts are tested on Linux with installed Qemu, KVM and Expect. First, run the Bash script deploy vyos.sh. The script downloads the latest VyOS ISO image. Then run the Expect script install vyos.exp that install on VyOS Live CD.
FRRouting Software with EIGRP Support
In September 2016 I wrote the article about EIGRP support in Quagga network routing suite. More than one year later, I am going to check the progress of development EIGRP in Linux again. To do so, I have installed a fork of Quagga - FRRouting (FRR) with EIGRP support on Linux Core. EIGRP routing daemon included inside FRR benefits from active development brought by Cumulus employees. For the purpose of FRR testing, I have created a minimalistic Linux Core Pure64 virtual machine with FRR suite compiled as frr extension. Meanwhile, I have submitted FRR extension so it will be available in the next few days in Tinycore repository.
Content of Disk - CorePure64-frr_3-1.vmdk:
- Linux Core Pure 64 version 8.2,kernel 4.8.17
- FRRouting 3.1dev
- OpenSSL 1.0.2l 25 May 2017
- OpenSSH_7.2p2
- GNU bash, 4.4.0(1)
- iproute2-ss140411
- iptables v1.4.21
- tcpdump 4.7.4
- Nmap 7.12
- mtr 0.86
- hping 3.0.0-alpha-1
- iperf 3.1b3
- D-ITG 2.8.1 (r1023)
Software:
- Host OS - Ubuntu 16.04.3 LTS x64
- GNS3 2.0.3
- QEMU x64 emulator version 2.8.0
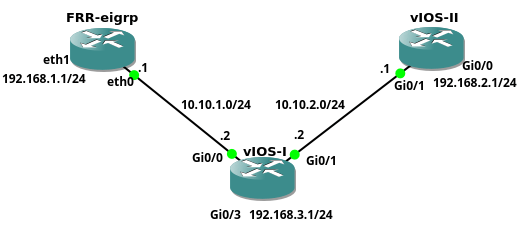 Picture 1 - Network Topology
The FRR EIGRP instance with attached CorePure64-frr_3-1.vmdk Continue reading
Enterprise Network on GNS3 – Part 3 – Distribution and Core Layers
This is the third from the series of the articles that discuss configuration of the entire enterprise network. The article focuses on the configuration of the distribution and core switches. The distribution layer consists of two multilayer switches vEOS-DIS-I and vEOS-DIS-II. The switches are Arista vEOS version 4.17.2F Qemu appliances installed on VMware disks. Each appliance has assigned 1536 MB RAM.
The distribution switches route traffic between end user VLANs and they connect the lower layer network to a Core layer. The layer 3 (routed) interfaces connect both distribution switches to each other and to the Core switches. The interfaces toward the Access layer are layer 2 (switchports). The OSPF routing protocol is running on the distribution switches so there is only l3 connectivity between distribution and core layer.

Picture 1 - Distribution and Core Layers of Enterprise Campus Network
Note: The configuration files of the distribution switches are: vEOS-DIS-I and vEOS-DIS-II.
The core layer consists of the switches vIOS-Core-I and vIOS-Core-II. These are the Cisco vIOS-l2 Qemu appliances on qcow2 disks, version 15.2. Each switch has assigned 768 MB RAM by GNS3. The core layer is completely layer3. It si connected to the lower Continue reading
Enterprise Network on GNS3 – Part 2 – Access Layer
This is the second from the series of the articles that discuss a complete configuration of the enterprise network. Our enterprise campus network consists of the core, distribution and access layer. This network infrastructure design is called a three-tier network model. Each layer has specific function. The access layer provides access for end users to the network . They are two access switches located inside the access layer. The access switches OpenSwitch-Acc-I and OpenSwitch-Acc-II are OpenSwitch Qemu appliances installed on VMware VMDK disks. The switches run OpenSwitch network OS version 0.4.0 and they have assigned 1024 MB memory by GNS3. More details about building OpenSwitch appliance prior to version 2.0 can be found here.
The ports Ethernet 3 a and 4 on both switches are configured as access ports and they connect PC1 and PC4 to the campus network. The ports Ethernet 1 and Ethernet 2 are uplinks that connect access switches to the distribution switches. They are configured as trunk ports, carrying traffic from multiple VLANs. Thanks to redundant uplink connection, the access switches remain connected to the upper layer, even in case of the failure one of the distribution switches.

Picture 1 - Access Switches Connected Continue reading
Enterprise Network on GNS3 – Part 1 – Introduction
Several months ago I had created a simple GNS3 network topology for practicing my networking skills. What had firstly begun as a simple lab, later grew in to a real world enterprise network consisting of a campus, data center, DMZ network blocks and ISPs. During the next several weeks I added new devices into the topology, struggling with no time due to complicated family circumstances. In March 2017 I completely stopped working on this project. Luckily, I was done with the configuration of all devices and I wrote several articles describing my progress. Now, almost a half of the year later, I am ready to share my experience with the blog readers and publish the articles. Below is the list of the articles. I hope you find them useful.
Enterprise Network on GNS3 - Part 1 - Introduction
Enterprise Network on GNS3 - Part 2 - Access Layer
Enterprise Network on GNS3 - Part 3 - Distribution and Core Layers
Enterprise Network on GNS3 - Part 4 - Cisco ASAv-I
Enterprise Network on GNS3 - Part 5 - Data Center
Enterprise Network on GNS3 - Part 6 - Edge Router and ISPs
Enterprise Network on GNS3 - Part 7 - Continue reading
Downloading YouTube Videos From Links Saved In Google Chrome Bookmarks
The Bash script youtube-bookmarks-mp3.sh is using Python youtube-dl script along with ffmpeg in order to download videos from YouTube service. It also enables youtube-dl to convert videos to mp3 audio format. The script exports YouTube links from Bookmarks and copy them into the file bookmarks.txt. Multiple videos are downloaded and converted simultaneously in the background by the script.
Note: According to YouTube Terms of Service, you shall not copy, reproduce, distribute, transmit, broadcast, display, sell, license, or otherwise exploit any Content for any other purposes without the prior written consent of YouTube or the respective licensors of the Content.
OpenSwitch Network Operating System
![]()
The Open Network Install Environment (ONIE) is an open source install environment that gives a switch user a choice to download ONIE compliant Network Operation System (NOS) to bare metal network switches. The OpenSwitch is community based, open source NOS that runs on hardware based on ONIE.
The goal of this article is to show how to build OpenSwitch Virtual Machine appliance, describe its capabilities and to introduce three methods for managing OpenSwitch. The OpenSwitch VM appliance was created by OpenSwitch project for training and testing purpose. It uses software data plane to forward the packets but it is not intended to be used as a virtual switch for connecting virtual machines. OpenSwitch supports many L2, L3 protocols such as STP, LACP, LLDP, OSPF, BGP, DHCP, TFTP, NTP, SSH, SNMP and others. These protocols run as separate daemons and they were integrated from another open-source projects.
For instance Quagga project provides L3 functionality to Openswitch. Quagga modules ops-ospf and ops-bgp update active routes in OpenvSwitch database (OVSDB). The module ops-zebra reads routes from OVSDB and install them to the kernel. Static routes are also stored in OVSDB, read by ops-zebra module and installed to the kernel. In order to use Continue reading
Syslog-ng Configuration For Newbies
Some time ago I was asked by my friend to recommend a cost-free solution that he could use for storing logs of his security device over network. The Linux OS with installed syslog-ng is perfectly suitable for this job because it can collect logs from any source, process them in near real-time and deliver them to a wide variety of destinations. However it was challenge to explain all the steps in an easy manner as he was a total newbie in a Linux world. For this reason I wrote a basic installation and configuration manual for him which I share with you. The manual helps you to setup syslog-ng on Ubuntu server and troubleshoot the possible issues.
1. Install Ubuntu 16.04 Server Edition
During Ubuntu installation you are asked to provide the username/password and IP settings. Once an installation process finishes, the system is rebooted. when you get your console again, login and install updates with the command:
$ sudo su
# apt-get update
# apt-get upgrade
2. Install and Configure Syslog-ng
# apt-get install syslog-ng
First, you need to download a simple configuration file that I created for you.
# cd /etc/syslog-ng/conf.d
# wget http://brezular.com/wp-content/uploads/2016/12/firewals.conf_.txt -O firewals.conf
# Continue reading
Reverese Shell on Linux
Reverse shell is technique when a client connects to a server and the client provides its shell to the server. Clients is typically a host hidden behind the NAT or a firewall having an access to the server but not vice versa. Thanks to a reverse shell the server controls a client's shell having an access to the client's network even the client is hidden behind the NAT. They are several methods how to create a reverse shell used depending on software available on the client. I will show how to create a reverse shell using SSH, Ncat and Bash.
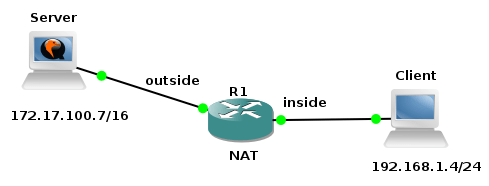
Picture 1 - Network Topology
Picture 1 shows our testing topology. The client (Ubuntu Server 16.04) is located behind the NAT with the IP address 192.168.1.4/24. The server (Kubuntu 16.04) has assigned the IP address 172.17.100.7/16.
1. Reverse Shell Using SSH Reverse Tunnel
This method is based on the fact that the client has knowledge of the server SSH login credentials and vice versa. SSH server must be running on both the server and client. Client must be allowed to access server through firewall.
Client:
$ ssh -R 10000:127.0.0.1:22 [email protected]. Continue reading
Bash Script for Converting Video To MP3 Audio
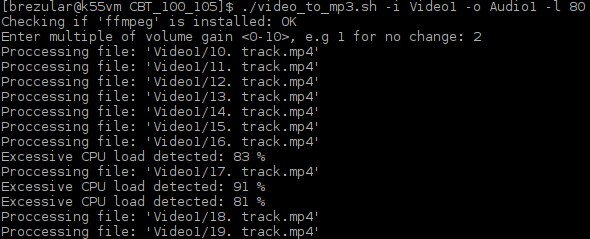
I like listening to video training on my smartphone while walking to work. To save the space on the memory card I convert videos to MP3 audio in advance. For this purpose I wrote a Bash script video_to_mp3.sh which helps me to manage a conversion job. The script uses ffmpeg for conversion and it creates parallel conversion tasks to speed up the conversion process. The script checks the CPU load and it creates a new background process only if the CPU load is under a particular limit entered by a user.
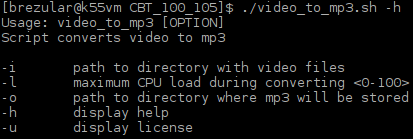
Picture 1 - Script Usage
Below is the output from the conversion process.
Picture 2 - Output From Conversion Process
The script creates a log file displaying info about the result of all conversion tasks. If the conversion fails for a particular video file, the script displays a return value of ffmpeg utility and the name of the file which is not successfully converted.
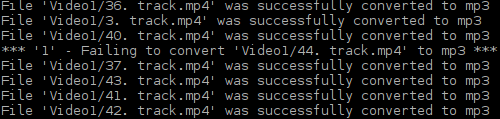
Picture 2 - Output from Log File
End.
GRE over IPSec Tunnel and NAT Between Cisco and VyOS
The goal of this tutorial is to provide a configuration for Cisco and VyOS network devices with configured PAT (Port Address Translation) that connect two remote sides A and B through point-to-point GRE tunnel encapsulated into a IPsec tunnel. In a previous tutorial we proved that GRE tunnels in conjunction with IPsec tunnels transmit multicast traffic while data integrity, authentication and confidentiality was in place. I also provided a simple configuration of GRE, IPsec tunnel and OSPF routing protocol on the Cisco and VyOS routers. In this tutorial I will go further and provide full configuration of the all network devices including PAT and access-lists. 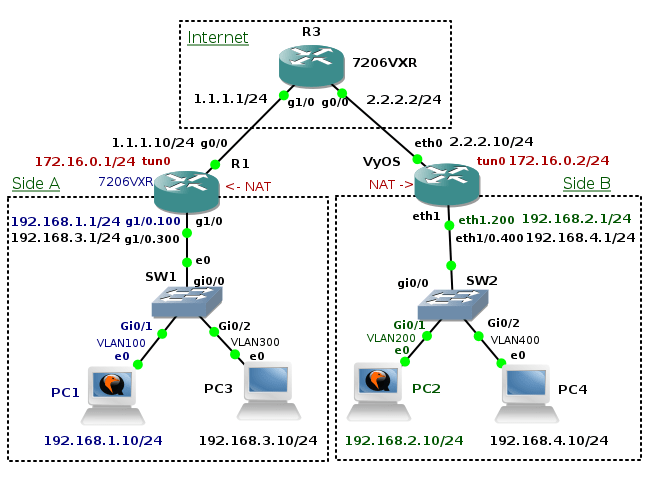
Picture 1 - Network Topology
Topology Description - Side A
Each side has a Layer 2 Cisco switch located in a LAN network. A switch connects hosts to its switchports. Each switchport is assigned to a particular VLAN. For instance, a host PC1 is connected to the switch SW1 and the switchport is assigned to a VLAN 100. Hosts in VLAN 100 (subnet 192.168.1.0/24) have guaranteed access to a remote subnet 192.168.2.0/24 via GRE/IPsec tunnel. A NAT access-list configured on a router R1 ensures that IP address of the host in VLAN 100 is not translated by PAT when a destination address is Continue reading
Scripts
This article contains a list of scripts that I created and that are somehow useful for me. You are free to download and modify them according to your needs. I do not take any responsibility for improper use or any damage caused by using them.
1. Networking & Servers
1.1 Automatic Deployment VyOS ISO on VMware VM
A Bash script deploy vyos.sh downloads the latest VyOS ISO image and an Expect script install vyos.exp installs VyOS ISO on VMware vmdk disk.
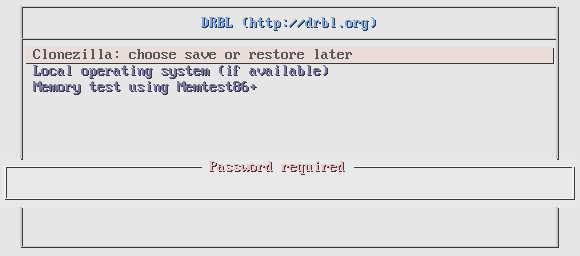
1.2 Automatic Deployment of DRBL (Clonezilla) Server
The script deploy drbl.sh installs and configure DRBL server on Ubuntu with a single Ethernet card. You have to provide the name of Ethernet interface as an argument. The script creates a virtual interface for you based on a physical interface. It also downloads a DRBL project public key, download and install drbl package from repository.
1.3 Secure Copy with Rsync from SSH server
The script copy.sh keeps copying files with rsync command while a return value of the rsync command is not zero. Just edit script and set server IP address and bothe remote and local directory.
1.4 Collecting MAC and IP addresses Continue reading
Hacking DRBL Client PXE Boot Password
In a previous tutorial I showed installation of Clonezilla Server Edition on Ubuntu using my own Bash script. We configured PXE (Pre eXecution Environment)) password for clients so when the clients booted a password had to be entered to startup. This tutorial explains two different ways how to get and crack the PXE boot password.
Picture 1 - Client Requires to Enter PXE Password During Startup
First, we should mention some facts. The PXE client password is stored in plain text in a configuration file /etc/drbl/drblpush.conf. The password is secretpassword and it can be found in a dictionary rockyout.txt.
![]()
Picture 2 - Plain Text PXE Client Boot Password
The same PXE client password is stored as a hash in a file /tftpboot/nbi_img/prelinux.cfg/default.
![]()
Picture 3 - PXE Client Boot SHA-1 Base64 Encoded Salted Hash
The hash is created by utility /usr/sbin/sha1pass on DRBL server. It is a Perl script which takes two arguments from STDIN - a password and salt and it creates SHA-1 base64 salted hash.
![]()
Picture 4 - Perl Script fo Generating Hash from Password and Salt
Explanation:
- $4$ - SHA-1 base64 encoded salted hash
- 2mNryVVj - salt
- WIWlkNc6cA9+eQqcf9xU0d5IvVQ - hash
They are several methods how to obtain PXE boot Continue reading
Clonezilla Server Edition Installation on Ubuntu
![]()
The tutorial describes installation steps for Clonezilla Server Edition (SE) on Ubuntu 16.04.1 LTS using a Bash script. Clonezilla is OpenSource Cloning System (OCS) and it is a partition and disk imaging/cloning program . It helps you to do system deployment, bare metal backup and recovery. Two types of Clonezilla are available, Clonezilla live and Clonezilla SE (server edition).
Clonezilla live is suitable for single machine backup and restore. Clonezilla SE is for massive deployment because it can clone many computers simultaneously. Clonezilla saves and restores only used blocks in the hard disk. It decreases time and saves the hard disk space and increases the clone efficiency.
Clonezilla is a part of DRBL (Diskless Remote Boot in Linux) which provides a diskless environment for client machines. Therefore we need to install and configure DRBL server first. I created DRBL deployment script deploy_drbl.sh that helps you to install DRBL and configure server on Ubuntu with a single Ethernet card. You have to provide only the name of Ethernet interface and the script creates virtual interface for you based on your physical interface. It also downloads a DRBL project public key, download and install drbl package from repository. The script starts interactive Bash and Perl scripts that come with Continue reading
Using Rsync to Copy Files From SSH Server
Recently I have come through an interesting problem. I needed to download a raw copy of the HDD image located on a remote server (about 180GB) connected via 1 Mbps link. Network connection dropped frequently so the requirement was to reestablish connection automatically, without my intervention.
Definition of Terms
Server - a remote computer with an IP address 172.17.100.5/16 which contains a raw copy of the HDD image - a file /root/ubuntu.iso.
Client - a local computer that copies a raw copy of the HDD image from the server.
Below is my how-to which helped me to fulfill a task. I hope it might be useful to you.
1. Create Multiple Archive Files
The idea is to create a compressed archive file and to split it to multiple sequential chunks in order to make transfer of files less depended on network outages due to an unreliable link.
$ tar cvf - ubuntu.iso | gzip -9 - | split -b 10M -d - ./disk/ubuntu.tar.gz.
The command tar creates a tar archive from a file ubuntu.iso and send it to a standard output instead to the file. The command gzip compress everything from a standard input using the best compression ratio (parameter -9) and send Continue reading
Quagga Routing Software with EIGRP Support
In May 2013, Cisco opened its proprietary EIGRP protocol and released an informational RFC 7868 - Cisco's Enhanced Interior Gateway Routing Protocol (EIGRP). It gives other vendors an opportunity to implement EIGRP protocol into their devices. A group students led by an assistant professor and Cisco CCIE Peter Paluch who is an instructor trainer at the Faculty of Management Science and Informatics, University of Zilina, Slovakia implemented EIGRP support into Quagga routing software.
The goal of this tutorial is to provide a VMware vmdk disk with installed Linux Core and Quagga which supports Cisco EIGRP protocol. The image can be used to test compatibility between EIGRP configured on native Cisco devices and an implementation of EIGRP daemon in Quagga . I also share my findings about issues that I have noticed during my tests.
Here you can download Linux Core vmdk disk with installed Quagga 0.99.24-rc1 which supports EIGRP.
How did I create Quagga Qemu Image with EIGRP Support
I installed Linux Core 7.2 to Qemu virtual machine and remastered Core for sending output to a serial port according to this tutorial. I download Quagga version which supports EIGRP from github and I installed it from source. Afterwards I created Linux Core Quagga extension. I did not submit Continue reading
Forensics Challenge for CSIRT Team – Part 2 Solution
The goal of the tutorial is to provide a solution to the forensic challenge game that I created for testing forensic skills of CSIRT team. Please be careful and run a suspicious binary file located inside a provided virtual machine only in a secured environment in order to avoid unwanted damage or loss.
As you can notice, some files are being encrypted right after boot of a virtual machine. All these files have suffix .enc001. You can easily located them with the command:
$ find / -name "*.enc001" -type f 2>/dev/null
There is also a file named encryption_warning.txt located in a home directory of an actual user and it contains a following warning message.
*** Your files have been encrypted! ***
*** To decrypt them, run '/usr/local/bin/ls %1a%your_decryption_key ***
Without any doubts a utility ls is not a cryptography tool so it is a good place where we can start our investigation. The command /usr/local/bin/ls -la shows files in a actual directory.
ubuntu@ubuntu:~$ /usr/local/bin/ls -la
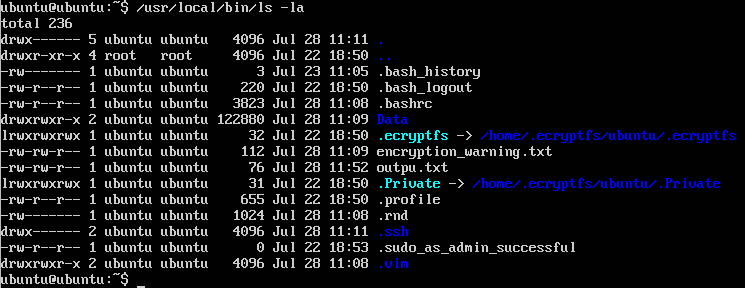
Picture 1 - Content of Actual Directory
The output looks good. But what does happen if we display a non-existing file kdkdkdkdk?
ubuntu@ubuntu:~$ /usr/local/bin/ls kdkdkdkdk

Picture 2 - Two Error Messages
They are two interesting facts shown in the output of the command /usr/local/bin/ls . Firstly, two Continue reading
Forensics Challenge for CSIRT Team – Part 1 Assignment
I have created a virtual machine that you can use to test your forensics analysis skills. Please, download the VM, solve an assignment below and share solutions with us.
1. Assignment
Your are a member of elite CSIRT team which is responsible for dealing with computer security incidents in your jurisdiction. You are asked to investigate a server that was previously administered by disgruntled administrator Mr. Abdullah Khan who was fired up. Although login credentials for server were changed after Khan's sacking from the company, it is believed he might insert malicious software into server before change of credentials. Your task is to ensure that a sever does not contain any malicious software and user data stored on the server are not compromised. You also need to prove your professional forensic skills and analyze a suspicious file in case you find it on the server. Based on your investigation you should find out how malware work and create detailed report for your boss.
The server is running Ubuntu 16.04.1 and it is primary used as a file server with configured SSH access. Unfortunately the backup of user files is damaged and cannot be used in case of data are lost during your investigation. The login/password is Continue reading
Forensic Lab Game Zero – Level 2 Results
Below are my solutions to the level 2 of the forensics lab game zero. The solutions to the level 1 of the game are posted here.
1. Find way to reset root's account password and retrieve flag from /root/flag.txt
Reboot the VM and press 'e ' edit inside the Grub menu screen. Add command init=/bin/bash at the end of the line starting with linux and press F10. Thne mount file system as read-write.
root@(none):/# mount -n -o remount,rw /
Change password for user root.
root@(none):/# passwd
root@(none):/# cat /root/flag.txt
8d55761dfafe912daa2fa6c38e05435093f7f636
root@(none):/# echo -n '8d55761dfafe912daa2fa6c38e05435093f7f636' | sha1sum
0166bc38c1165d0ba783ea722b84ed3a0d2547f8
Restart the virtual machine and switch to the root account.
2. There is a memory dump of the windows machine is stored in file /root/memdump.mem. Find the flag among commands executed on that machine
Find info about our memory dump with imageinfo plugin.
root@debian1989:/home/kassad# python /opt/tools/volatility-2.4/vol.py imageinfo -f /root/memdump.mem | grep Profile
Volatility Foundation Volatility Framework 2.4
Suggested Profile(s) : Win7SP0x86, Win7SP1x86
To avoid typing chosen profile --profile=Win7SP1x86 every time vol.py is called, export the profile.
root@debian1989:/home/kassad# export VOLATILITY_PROFILE=Win7SP1x86
To avoid typing path to memory dump file, export memory dump location so you do not need to add argument -f Continue reading
Forensic Lab Game Zero – Level 1 Results
The goal of the post is to provide solutions for the first level of the game for "hackers" created by forensic lab of CESNET association. With this game CESNET introduces a work of forensic analysts and test your knowledge of Linux OS. They are several assignments and practical tasks included inside Debian image which is available for download here. The question / answer sheet is located inside the home directory of user kassad.
Picture 1 - Answer Sheet
1. In the Linux image, which username is logged in automatically on boot?
Check the desktop environment.
kassad@debian1989:~$ echo $DESKOP_SESSION
gnome-fallback
Check if automated login is enabled for Gnome desktop.
kassad@debian1989:~$ grep 'AutomaticLogin' /etc/gdm3/daemon.conf
AutomaticLoginEnable = true
AutomaticLogin = kassad
The automated login is enabled for the user kassad. Now we need to compute the sha1 hash for the result.
kassad@debian1989:~$ echo -n 'kassad' | sha1sum
fb1216c760d6c0996991108886d1797d8bd4ca27
2. On the provided Linux image, what is the “ls” command aliased to for user from question 1 ?
kassad@debian1989:~$ type ls
ls is aliased to `ls --color=auto'
We can get the result also by checking the content of the file /home/kassad/.bashrc.
kassad@debian1989:~$ grep 'alias ls' /home/kassad/.bashrc
alias ls='ls --color=auto'
kassad@debian1989:~$ echo -n 'ls --color=auto' Continue reading