How to properly remove LuCi from OpenWrt
Overview
LuCi is a very popular OpenWrt web interface. For an average user, LuCi is probably one of the main deciding factors between giving OpenWrt a try in the first place, or moving on to another user friendlier firmware like DD-WRT.
If you’re an advanced user however, most of the times you may find yourself adjusting settings either through UCI or by editing the config files manually. In fact at one point you may realize you’re not using LuCi at all and it’s just sitting there idle. Basically a component that’s not only using resources, but also providing an extra attack surface.
Now, one could just disable uHTTPd to address some of these concerns, but LuCi installs too many dependencies, and cluttering a router with things that you’ll hardly ever use, is not the best use of the very limited storage space available in most routers.
Another method that some use to “remove” LuCi, is by issuing:
opkg --autoremove remove luci
This may seem to work, but in reality LuCi packages are not really removed this way and the related files will only be masked by OverlayFS. This is because the packages are built into the firmware itself.
While OpenWrt Continue reading
How to compile OpenWrt and still use the official repository
Overview
We all know what OpenWrt is. The amazing Linux distro built specifically for embedded devices.
What you can achieve with a rather cheap router running OpenWrt, is mind-boggling.
OpenWrt also gives you a great control over its build system. For normal cases, you probably don’t need to build OpenWrt from source yourself. That has been done for you already and all you need to do, is to just download the appropriate compiled firmware image and then upload it to your router1.
But for more advanced usages, you may find yourself needing to build OpenWrt images yourself. This could be due wanting to make some changes to the code, add some device specific options, etc.
Building OpenWrt from source is easy, well-documented, and works great. That is, until you start using opkg to install some new packages.
opkg will by default fetch new packages from the official repository (as one might expect), but depending on the package, the installation may or may not fail.
If you only want to add/remove some packages from a firmware, building OpenWrt from scratch is an overkill. You want to use OpenWrt Image Builder instead. OpenWrt Image Builder also does not suffer from Continue reading
Setting up an encrypted SOCKS proxy using Dante and stunnel
Overview
Why Dante?
In the previous post, I talked about why we might need a SOCKS proxy at all, and how we can properly setup a secure one using only stunnel.
That approach is fine and all, but it still suffers from some limitations. The most important of which are:
- UDP relaying is not supported.
- Advanced SOCKS options like
BINDorUDPASSOCIATEis not available. - Only suited for personal use and should not be shared with untrusted clients.
Comparing to the stunnel limited SOCKS functionality, Dante (which is one of the most popular SOCKS server available), comes with pretty much every functionality one can imagine out of a SOCKS server.
From advanced authentication and access control, to server chaining, traffic monitoring and even bandwidth control1, Dante has got them all.
Dante and SOCKS encryption
While it might be okay to use a non-encrypted SOCKS proxy in you local network, it is definitely not a good idea to do so over the internet.
For this, RFC 1961 added GSS-API authentication protocol for SOCKS Version 5. GSS-API provides integrity, authentication and confidentiality. Dante of course completely supports GSS-API authentication and encryption.
But GSS-API (which is typically used with Kerberos Continue reading
How to setup an encrypted SOCKS proxy using stunnel
Why using SOCKS
There are times in which setting up a complete VPN tunnel might be an overkill (or not be an option at all).
For example, assume the followings:
- You don’t want to tunnel all the traffic, just want to do so for your browsers.
- Your OS is running under a limited account and doesn’t allow creation of tun interfaces.
- Your provider does not allow setting up a tun device.
- You want to securely surf the web on your old android device that doesn’t support tunneling.
stunnel can be used on your Android phone. SOCKS functionality could then be directly used in your phone for apps that support it: Firefox, Telegram, etc.
To see how to install and setup stunnel on android, take a look at:
These are just couple of examples. In such cases, setting up a SOCKS proxy might just do the trick.
Another interesting aspect of SOCKS proxy, is that after the initial per each connection handshake, it doesn’t add much overhead to the underlying traffic.
Overhead might not look like a big deal at first, but it adds up. This is specially true when you have a Continue reading
How to install and configure stunnel on Ubuntu
Overview
We all know how awesome stunnel is, but setting it up properly on Ubuntu (and on most other distros, really), can be a little tricky.
This post is dedicated to show you how to properly install and configure this magnificent piece of software on Ubuntu.
For this, I’ll be using Ubuntu 18.04 Server. There is a good chance however that the same procedure (maybe with slight adjustments), could work on other Ubuntu versions (or even other distros) as well. Please share your results with me so I can update this post.
Installing stunnel
This part should be simple enough. We’ll be using Ubuntu’s own repository:
sudo sh -c 'apt-get update && apt-get install stunnel4'
The installation process also comes with its own stunnel4 user, init script, and logrotate config (which we’ll take advantage of soon).
Moreover, couple of scripts are included in the package to deal with the ppp connections (to handle ppp status changes gracefully by restarting the stunnel process).
stunnel – manual mode
stunnel can be manually called with the config file as its argument and it will work.
For example, assuming the file is located at /etc/stunnel/stunnel.conf, the following command would run it: Continue reading
How to run stunnel on your Android device
Overview
In this post we’re going to talk about how to run the amazing stunnel program on your Android device, and do so properly!
Later, this would allow us to setup a lot of cool things like:
- Wrapping OpenVPN traffic with it
- Using it as a SOCKS VPN
- Adding proper IMAPS/SMTPS support to our old email apps
- …
For this, we’re not going to use the old and very limited SSLDroid. It’s a bad idea, I don’t know why different sites still keep pushing it. It almost certainly has unpatched vulnerabilities. Please don’t use it.
Instead, we are going to use the official stunnel program, with the help of a proper wrapper.
stunnel Android binary
stunnel already supports Android devices and even the compiled version of it is available in it’s download page.
This file is compiled for ARM architecture. Even though most Android devices run on ARM, this is particularly important to note for those devices that are not (e.g, Android-x86).
Since we’ll be using the compiled binary, you may need to compile stunnel yourself for your specific Android architecture before continuing1. Chances are though, that your device is running on ARM and you are ready Continue reading
How I lost my data trying to back it up
My data, my precious data… is gone.
Overview
This is a story about how I lost my data when trying to prevent it by backing it up.
Even though there were numerous other factors in play, I take full responsibility for what happened.
I have written this article hoping that it could save someone else from the same situation. No one should ever experience the loss of his/her data.
7 days and 10 hours ago:
Alrighty, It’s time for the offline backup routine again.
When it comes to backing up the full OS, I don’t believe in online backup solutions. This is specially true when I’m dealing with Windows servers. These kinda backups should serve as a disaster recovery solution and I’m not taking any chances.
So I always take them offline, outside of the OS, using a third party program to boot up the servers.
For years I have been using Paragon Software. Their products are great, reliable and I have nothing bad to say about them.
This time however, I thought maybe it’s time to ditch commercial softwares and use the solid ntfs-3g suite instead. Back when I started using Paragon, I didn’t even know what Linux was, Continue reading
obfs4proxy-openvpn: Obfuscating OpenVPN traffic using obfs4proxy
This post provides a more in-depth look at the obfs4proxy-openvpn script. You don’t need to fully read it to make use of the script, but it will help you to get the most out of it.
Overview
After my initial post about obfs4 on how to hide any TCP traffic and an example for hiding SSH traffic, it’s now time to do so for OpenVPN.
For this, I have written a Bash script to do the job. It’s called obfs4proxy-openvpn and is freely available under MIT license.
Supported transports
obfs4
The main goal of the script is to provide obfs4 transport to OpenVPN. This is also the main interest of this article.
This transport requires out-of-band CERT exchange between client and server and because of that, can provide some advanced functionalities which are missing in older transports.
obfs3
obfs3 transport is supported but should generally be avoided in favor of obfs4.
obfs2
obfs2, the oldest transport is supported as well (mainly because its supported by obfs4proxy). You really shouldn’t use it…
Architecture
Before going into detail, its good to have a basic idea on how different parts of the script work together to provide obfs4 functionality to Continue reading
How to hide (obfuscate) SSH traffic using obfs4
Overview
In the previous post, I talked about pt-spec-v1 and obfs4 and explained how obfs4proxy can be setup and used outside of Tor. You are advised to read it to get the most out of this post.
In this post I’m going to give you a real example of obfs4proxy being used to obfuscate SSH traffic.
For this, I’ll be using two Ubuntu 18.04 Servers. But with a little to no adjustment, any other decent distro should work.
Assumptions
- Both server and client are running Ubuntu 18.04 Server
- Server IP address is 10.0.0.1
- Client can access the obfs4proxy server port (2222 in our example)
Common configurations
These are configurations that needed on both sides:
Installing obfs4proxy
You can either compile it from source or use your distro’s repository:
sudo sh -c 'apt-get update && apt-get install obfs4proxy'
Setting up the user and pt_state
There should be no reason to run obfs4proxy as root. So we create a dedicated user/group for it:
sudo adduser \
  --system \
  --home "/var/lib/obfs4proxy-ssh/" \
  --shell "/usr/sbin/nologin" \
  --group \
  --gecos "obfs4proxy for ssh" \
  obfs4-ssh
Note that in the process, we also made a home directory with the Continue reading
How to hide (obfuscate) any traffic using obfs4
Overview
In this post, I’m going to give you the information necessary to be able to use obfs4 protocol not just for wrapping Tor traffic, but for virtually any other TCP traffic as well.
Doing so for the previous Pluggable Transports of this kind (namely obfs2,obfs3 and ScrambleSuit) was rather simple. obfsproxy program written python, already supports being run in standalone (or so called unmanaged) mode and there are dozens of guides available on how to do so.
However, obfs4proxy which implements obfs4 protocol in Go, is primarily designed to work in conjunction with Tor (managed mode). This is not a protocol limitation but rather an implementation one.
If you ever try running obfs4proxy by itself, you’d get an error like this:
[ERROR]: obfs4proxy – must be run as a managed transport
But Hey! It is not the end of the world. There are still couple of ways to make use of obfs4 outside of Tor:
Adding unmanaged mode of operation to obfs4proxy
This is probably the best way, but I’m not a Go programmer so I’ll leave that to those who are.Using external wrappers
PTProxy and ptadapter in Python, along with Shapeshifter in Continue reading
How to find the correct MTU and MRU of your link
Overview
In the previous post, I talked about Network IP Fragmentation, what it is and why it’s needed (You are advised to read it before continuing). I also covered the so called PMTUD Black hole effect.
Fixing a PMTUD Black hole is a multistep process, and it starts with finding the correct MTU/MRU of your link.
Now as I’ve discussed, every path can have its own unique MTU/MRU value, but we are usually interested in the max value that is dictated by your ISP.
When you send a packet, it always routes through your ISP. Because of different protocols in place and their overheads (mostly layer 2 ones), it is common for your ISP to force MTU/MRU of less than 1500 bytes on your link.
If a packet exceeds these values, your ISP is required to send the appropriate ICMP messages either back to you (for the MTU), or to the server sending the data (for the MRU). These messages give the corresponding hosts a chance to adapt themselves to the link.
If your ISP decides to not send the required ICMP messages (or they get lost in transaction for some reason), all sorts of issues could arise. And Continue reading
Privacy Policy
Effective date: October 19, 2018
HAMY.IO (“us”, “we”, or “our”) operates the https://hamy.io website (hereinafter referred to as the “Service”).
This page informs you regarding our policies concerning the collection, use, and disclosure of personal data when you use our Service and the choices you have associated with that data.
We use your data to provide and improve the Service. By using the Service, you agree to the collection and use of information in accordance with this policy. Unless otherwise defined in this Privacy Policy, the terms used in this Privacy Policy have the same meanings as in our Terms and Conditions, accessible from https://hamy.io
At HAMY.IO, we recognize that privacy of your personal information is important. Here is information on what types of personal information we receive and collect when you use our Service, and how we safeguard your information.
Definitions
- Service: Service is the https://hamy.io website operated by HAMY.IO
- Personal Data: Personal Data means data about a living individual who can be identified from those data (or from those and other information either in our possession or likely to come into our possession).
- Usage Data: Usage Data is data Continue reading
Understanding Network IP Fragmentation
Overview
In this post, I’m going to talk about what IP fragmentation is, how it works and why it’s needed. And while learning that, we’re going to touch on subjects like OSI Layers / PDU / MTU / MRU and PMTUD.
Knowledge about them is required for truly understanding IP fragmentation process and troubleshooting network connection issues in general.
OSI model
This is basically a standardized model for network communications which breaks them into what’s called abstraction layers.
The original model consists of 7 layers: Physical, Data link, Network, Transport, Session, Presentation, and Application .
Going up the OSI model hierarchy, layers stack up on top of one another.
Example 1:
In the reverse order, loading a secure web page would consist of:
HTTP(Application layer)TLS(Presentation Layer)TCP(Transport Layer)IP(Network Layer)Ethernet(Data Link Layer)Ethernet physical layer(Physical Layer)
Each layer would add an overhead to the final size (Yes, even the physical layer!)1
More info can be found Here.
PDU
In the OSI model, each layer consists of units. They are called Protocol Data Units.
Any transmission between 2 entities on a layer, would be be done Continue reading
Windows XP OpenVPN TAP installation, “devcon.exe failed”
Although this article mainly targets OpenVPN TAP driver installation issue, The problem is likely not limited to that specific driver.
You may want to continue reading and give the very easy solution at the end of the article a try.
Recently I had to install OpenVPN on a system running Windows XP (Don’t ask). The installation went smoothly up until TAP driver installation and then suddenly things went haywire:

An error occurred installing the TAP device driver
The yellow marked status with the code of 28 in the device manager was not promising either:
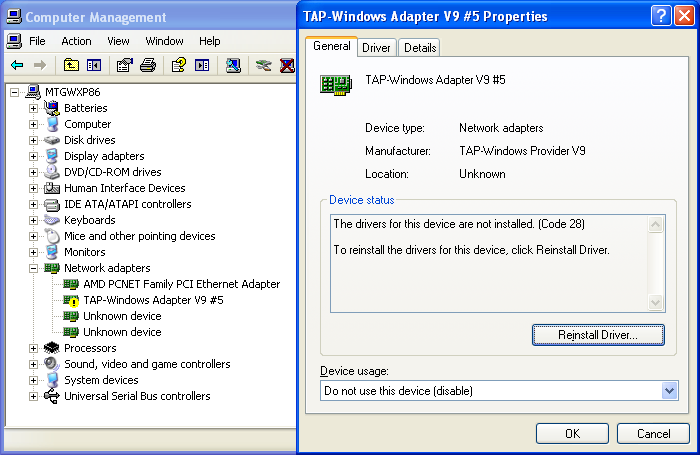
The drivers for this device are not installed. (Code 28)
In Windows XP, to install its inf file, TAP driver installation uses the built-in Windows Device Console (Devcon.exe). Pretty simple stuff, you just use devcon.exe with the install argument, supply the inf file and then provide the device’s Hardware ID.
This is the command being used to install each TAP NIC:
"C:\Program Files\TAP-Windows\bin\devcon.exe" install "C:\Program Files\TAP-Windows\driver\OemWin2k.inf" tap0901
Which gave a mundane error:
devcon.exe failed.
Devcon however, leaves a log file of its operation behind in %windir%\setupapi.log which included these lines:
#E122 Device install failed. Error 2: The system cannot find Continue reading
How to install LUKS encrypted Ubuntu 18.04.x Server and enable remote unlocking
Much has been changed since my last post about LUKS remote unlock workaround (Particularly, The bug is finally fixed in cryptsetup 2:2.0.2-1ubuntu1.1 and no more workaround is needed). This, is the updated version on how to set things up properly.
UPDATE: Well, it turned out that while the previous bug is fixed, another one still exists. You can find the required workaround for it at the end of this article
In this post, I’m going to show you the required steps and downfalls on running a LUKS encrypted Ubuntu Server setup and how it can be extended to allow remote unlocking.
Prerequisites
- A server to install on
- Static public IP address
- The so called Alternative Ubuntu Server installer1
- Some patience ?
Installing and Setting up encrypted LVM
It is assumed that you already know your way around ISO files and how to boot them on your server.
We will also use the simplest possible setup: A server with a single disk
These steps would completely remove any leftover partitions and their associated data on the drive without the possibility to recover. Consider yourself warned!
We are going to use LVM inside the LUKS container, it is Continue reading
How to Fully Uninstall Kaspersky’s NDIS Filter
I like Kaspersky anti-virus, and I use it regularly… (Not on my own PC mind you, but on the clients)
While I do believe they provide the best anti-virus in the market, I am not a fan of most of their other products. That goes for the Firewall, Safe Browsing, SSL Hijacking, and of course their newest addition, Secure Connection…

In a previous post, I talked about how to optimize OpenVPN by adjusting the MTU to your links. That however, is likely not going work on windows clients running Kaspersky products.
On these clients, once a packet reaches the MTU, further packets could be dropped. Furthermore, OpenVPN process and the whole tunnel could come to a halt.
Investigating further, it turned out the so called Kaspersky Anti-Virus NDIS 6 Filter is to blame. This NDIS driver seems to be incompatible with any MTU other than 1500.
The solution
The solution is to either disable the NDIS filter for the affecting interfaces (e.g. TAP interface), or completely uninstall it as a whole. Kaspersky’s support page seems to be against disabling the filter and recommends uninstalling it instead:
“It is not recommended to use Kaspersky Anti-Virus NDIS Filter by disabling Continue reading
OpenDKIM-OpenDMARC and a Chrooted Postfix Instance
No Postfix installation is complete without OpenDKIM and OpenDMARC.
While some people go for all-in-one solutions that does all of these for them with a single command or two (and then cry to their gods as soon as the system fails as they have no idea how to debug it), the rest of us rather to be our own boss and set things up manually and carefully based on our needs, so we can troubleshoot it if when things go wrong.
This however, is easier to be said than done. In this post, rather than trying to explain what they are and how they can be set up (which can be found everywhere on the web), I am mainly going to address the issues that you might encounter when running your Postfix and these Milters on the same system running Ubuntu.
Background
OpenDKIM and OpenDMARC are designed to be used as Milters. They are two different programs for two different -and yet related- tasks.
They show a lot of similarities in their configuration files and both suffer from the same limitations when running along with a chrooted Postfix instance.
While in a recent enough version of Postfix, daemons are Continue reading
The Tale of Windows UAC and Incompetent Programmers
The Tail of Windows UAC
Windows systems… I’m not particularly fond of them anymore. I do believe however that the introduction of UAC, while not perfect1, was a step in the right direction.
We’re all familiar with UAC by now; introduced in Windows Vista and got better by newer versions. While the technical details are complex, the basic concept is simple enough.
Microsoft realized that no matter how much they empathize on Principle of least privilege and advise against using administrator accounts for everyday tasks2, almost all users still do so anyway. On top of that, programmers not following any guidelines, use any location they deem to be fit for their application’s settings.
A solution was needed. One that would not break compatibility with older programs, while giving programmers time to adjust to the new security model. It was also needed to give the sensation of “Administrator privilege” to those users who are so damn eager to have it all the time.
So thanks to the windows users and programmers, we ended up with an overly complicated solution for an imaginary problem3.
From the very start, the new model managed to get a bad reputation. Continue reading
Remote unlocking of LUKS-encrypted root in Ubuntu/Debian
This Post is now outdated. Particularly the said bug is finally fixed.
Updated version is available HERE
Unfortunately the bug-fixed version of cryptsetup package, caused incompatibilities with the previous version of the workaround. If you see this message when remotely unlocking your server:
“/bin/cryptroot-unlock: line 192: 2: parameter not set“
Run this command instead to boot your system:
sed 's/print $1, $5/print $1, $3/' /bin/cryptroot-unlock > /tmp/cryptroot-unlock; ash /tmp/cryptroot-unlock
And then remove the workaround and rebuild initramfs:
sudo sh -c 'rm /etc/initramfs-tools/hooks/zz-busybox-initramfs-fix && update-initramfs -u'
Thanks to Gabriel Burkholder for reporting this
Not so long ago, remote unlocking of a LUKS-encrypted root partition was difficult to setup. While essential for headless servers, all required steps needed to be done manually and compatibility was a concern.
Luckily, it is much simpler to do so in recent versions of Ubuntu/Debian. Unlocking an encrypted root remotely should be as simple as installing a single package… We’ll see about that in a moment.
I am not going to cover the required steps for setting up LUKS/LVM here. That information is widely available on the net and is only a search a way. Instead, I’m going to do a quick review of the Continue reading
OpenVPN TAP adapter MTU in Windows
Recently I was in need of setting up some windows clients to connect to my OpenVPN server. This server running on Linux, uses a specific MTU value (let’s say 1400) to ensure maximum compatibility with different clients over different links.
In addition to the OpenVPN process itself, the kernel must also know about the correct MTU so packet size could be adjusted before reaching the tun/tap interface.
This is very easy to do in Linux. In fact you most likely do not need to do anything at all. OpenVPN will adjusted the MTU of the tun/tap interface while creating it. You can check the interfaces effective MTU by using ip link show or ifconfig command.
The same however can not be said about Windows. In a typical scenario, OpenVPN is not even directly responsible for creating the said interface. Instead, it requires the interface to be already in placed (which is achieved by calling tapinstall.exe during the initial setup) and then it would connect to it.
So even though you have specified your MTU settings in the OpenVPN profile, at least at the time of writing, this does not reflect the MTU of the interface that Windows kernel would Continue reading