Author Archives: oVirt
Author Archives: oVirt
In this post I will introduce how simple it is to integrate SAML with oVirt using Keycloak and LDAP user federation.
Prerequisites: I assume you have already setup the 389ds directory server, but the solution is very similar for any other LDAP provider.
As SAML is not integrated into oVirt directly, we use Apache to do the SAML authentication for us. The mod_auth_mellon module nicely covers all needed functionality.
First we need to configure oVirt's apache. SSH to the oVirt engine and create a directory where we'll store all SAML related certificates.
ssh root@engine
yum install -y mod_auth_mellon
mkdir -p /etc/httpd/saml2
When we install the mod_auth_mellon package, it will create /etc/httpd/conf.d/auth_mellon.conf.
We need to modify this file to our needs, as follows:
<Location />
    MellonEnable "info"
    MellonDecoder "none"
    MellonVariable "cookie"
    MellonSecureCookie On
    MellonSessionDump On
    MellonSamlResponseDump On
    MellonSessionLength 86400

    MellonUser "NAME_ID"
    MellonEndpointPath /saml2

    MellonSPCertFile /etc/httpd/saml2/ovirtsp-cert.cert
    MellonSPPrivateKeyFile /etc/httpd/saml2/ovirtsp-key.key
    MellonSPMetadataFile /etc/httpd/saml2/ovirtsp-metadata.xml
    MellonIdPMetadataFile /etc/httpd/saml2/idp-metadata.xml

    RewriteEngine On
    RewriteCond %{LA-U:REMOTE_USER} ^(.*)$
    RewriteRule ^(.*)$ - [L,NS,P,E=REMOTE_USER:%1]
    RequestHeader set X-Remote-User %{REMOTE_USER}s
</Location>

<LocationMatch ^/ovirt-engine/sso/(interactive-login-negotiate|oauth/token-http-auth)|^/ovirt-engine/api>
<If "req('Authorization') !~ /^(Bearer| Continue readingIn this post I will introduce how simple it is to integrate SAML with oVirt using Keycloak and LDAP user federation.
Prerequisites: I assume you have already setup the 389ds directory server, but the solution is very similar for any other LDAP provider.
As SAML is not integrated into oVirt directly, we use Apache to do the SAML authentication for us. The mod_auth_mellon module nicely covers all needed functionality.
First we need to configure oVirt's apache. SSH to the oVirt engine and create a directory where we'll store all SAML related certificates.
ssh root@engine
yum install -y mod_auth_mellon
mkdir -p /etc/httpd/saml2
When we install the mod_auth_mellon package, it will create /etc/httpd/conf.d/auth_mellon.conf.
We need to modify this file to our needs, as follows:
<Location />
    MellonEnable "info"
    MellonDecoder "none"
    MellonVariable "cookie"
    MellonSecureCookie On
    MellonSessionDump On
    MellonSamlResponseDump On
    MellonSessionLength 86400

    MellonUser "NAME_ID"
    MellonEndpointPath /saml2

    MellonSPCertFile /etc/httpd/saml2/ovirtsp-cert.cert
    MellonSPPrivateKeyFile /etc/httpd/saml2/ovirtsp-key.key
    MellonSPMetadataFile /etc/httpd/saml2/ovirtsp-metadata.xml
    MellonIdPMetadataFile /etc/httpd/saml2/idp-metadata.xml

    RewriteEngine On
    RewriteCond %{LA-U:REMOTE_USER} ^(.*)$
    RewriteRule ^(.*)$ - [L,NS,P,E=REMOTE_USER:%1]
    RequestHeader set X-Remote-User %{REMOTE_USER}s
</Location>

<LocationMatch ^/ovirt-engine/sso/(interactive-login-negotiate|oauth/token-http-auth)|^/ovirt-engine/api>
<If "req('Authorization') !~ /^(Bearer| Continue readingIn 4.2 release we have introduced a possibility to customize the host-deploy process by running the Ansible post-tasks after the host-deploy process successfully finishes.
Prior to oVirt 4.2 release administrators could customize host's firewall rules using engine-config option IPTablesConfigSiteCustom.
Unfortunately writing custom iptables rules into string value to be used in engine-config was very user unfriendly and using engine-config to provide custom
firewalld rules would be even much worse. Because of above we have introduced Ansible integration as a part of host deploy flow, which allows administrators to
add any custom actions executed on the host during host deploy flow.
As part of this role we also include additional tasks, which could be written by the user, to modify the host-deploy process for example to open some more FirewallD ports.
Those additional tasks can be added to following file:
/etc/ovirt-engine/ansible/ovirt-host-deploy-post-tasks.yml
This post-task file is executed as part of host-deploy process just before setup network invocation.
An example post-tasks file is provided by ovirt-engine installation, at following location:
/etc/ovirt-engine/ansible/ovirt-host-deploy-post-tasks.yml.example
This is just an example file, to add some task into host deploy flow, you need to create below mentioned file Continue reading
In 4.2 release we have splitted our oVirt Ansible roles into separate RPM packages and also separate git repositories, so it is possible for user to install specific role either from Ansible Galaxy or as RPM package.
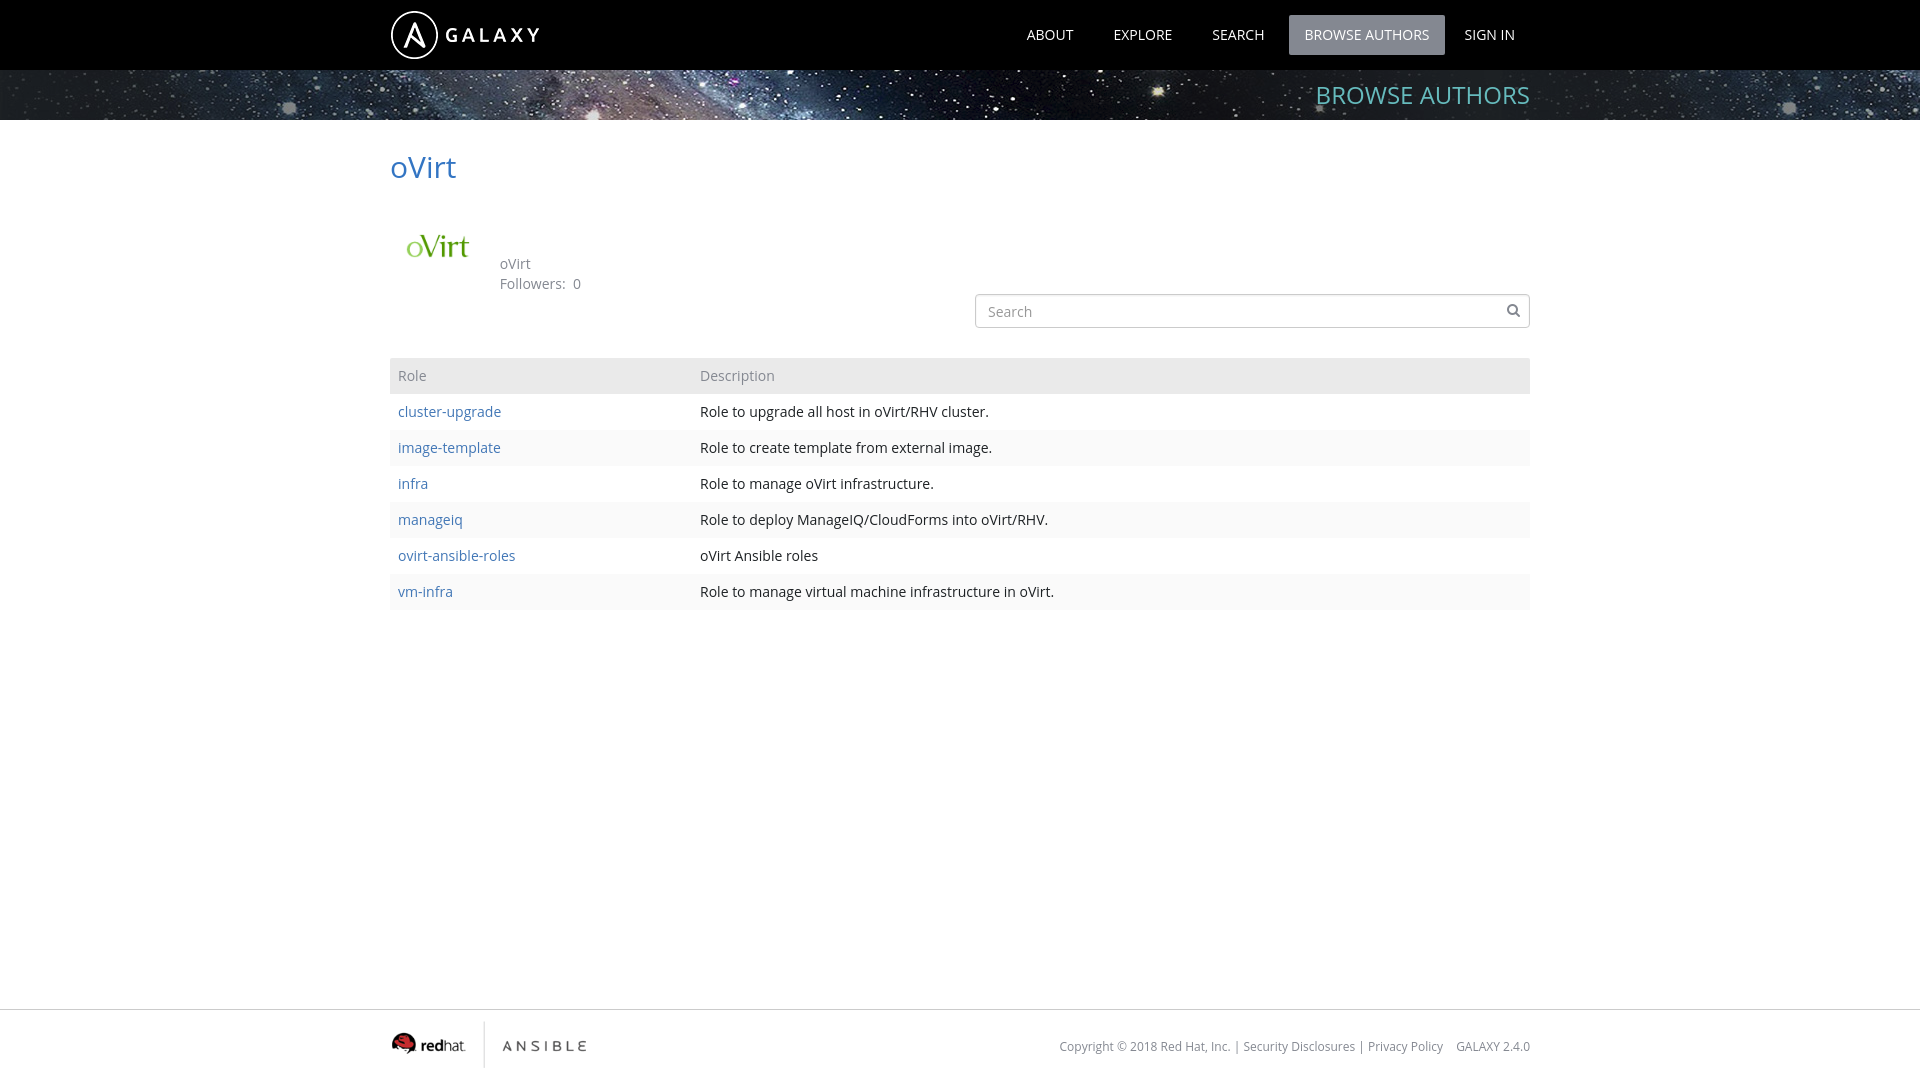
The reason to split the roles into separate packages and git repositories was mainly the usage from the AWX/Ansible Tower. Since Ansible Galaxy is only integrated with github you need to store your Ansible role in single git repostiory in order to have separate Ansible role in Galaxy. Previously we used one single repository where we have stored all the roles, but because of that manual configuration was required to make those roles usable in AWX/Ansible Tower. So as you can see on image below we now have many roles in Ansible Galaxy under oVirt user:
There are still two ways how to install the roles: either using Ansible Galaxy or using RPM package available from oVirt repositories.
You are now able to install just a single role and not necessarily all of them at once like in previous versions For example to install just oVirt cluster upgrade role, you have to run Continue reading
In 4.2 release we have splitted our oVirt Ansible roles into separate RPM packages and also separate git repositories, so it is possible for user to install specific role either from Ansible Galaxy or as RPM package.
The reason to split the roles into separate packages and git repositories was mainly the usage from the AWX/Ansible Tower. Since Ansible Galaxy is only integrated with github you need to store your Ansible role in single git repostiory in order to have separate Ansible role in Galaxy. Previously we used one single repository where we have stored all the roles, but because of that manual configuration was required to make those roles usable in AWX/Ansible Tower. So as you can see on image below we now have many roles in Ansible Galaxy under oVirt user:
There are still two ways how to install the roles: either using Ansible Galaxy or using RPM package available from oVirt repositories.
You are now able to install just a single role and not necessarily all of them at once like in previous versions For example to install just oVirt cluster upgrade role, you have to run Continue reading
The recent post, An Introduction to Ansible Roles, discussed the new roles that were introduced in the oVirt 4.1.6 release. This follow-up post will explain how to set up and use Ansible roles, using either Ansible Galaxy or oVirt Ansible Roles RPM.
To make life easier, Ansible Galaxy stores multiple Ansible roles, including oVirt Ansible roles. To install the roles, perform the next steps:
To install roles on your local machine, run the following command:
$ ansible-galaxy install ovirt.ovirt-ansible-roles
This will install your roles into directory /etc/ansible/roles/ovirt.ovirt-ansible-roles/.
By default, Ansible only searches for roles in /etc/ansible/roles/ directory and your current working directory.
To change the directories where Ansible looks for roles, modify the roles_path option of [defaults] section in ansible.cfg configuration file.
The default location of this file is in /etc/ansible/ansible.cfg.
$ sed -i 's|#roles_path = /etc/ansible/roles|roles_path = /etc/ansible/roles:/etc/ansible/roles/ovirt.ovirt-ansible-roles/roles|' /etc/ansible/ansible.cfg
For more information on changing the directories where Ansible searches for roles, see the Ansible documentation pages.
Copy one of the examples from the directory /etc/ansible/roles/ovirt.ovirt-ansible-roles/examples/ into your working directory, then modify the needed variables and run the playbook.
In the latest oVirt repositories Continue reading
Python SDK version 4.1.4 introduced support for sending asynchronous requests and HTTP pipelining.
This blog post explains those terms and will show you an example how to use the Python SDK in an asynchronous manner.
When using asynchronous requests, the client sends the request and defines a method (usually called callback), which should be called after the response is received but the client is not waiting for the response. In order for SDK to work in an asynchronous fashion, we introduced two new features to our SDK: multiple connections and HTTP pipelining.
These features provide significant value when the user wishes to fetch the inventory of the oVirt system. The time to fetch the inventory may be significantly decreased, too. A comparison of the synchronous and asynchronous requests folows.
Previously the SDK used only a single open connection that sequentially sent the requests according to user program and always waited for the server response for corresponding request.
In the new version of the SDK, the user can specify the number of connections the SDK should create to the server, and the specific requests created by user program uses those connections in parallel.