Security group support in OVN external networks
In this post I will introduce and showcase how security groups can be used to enable certain scenarios.
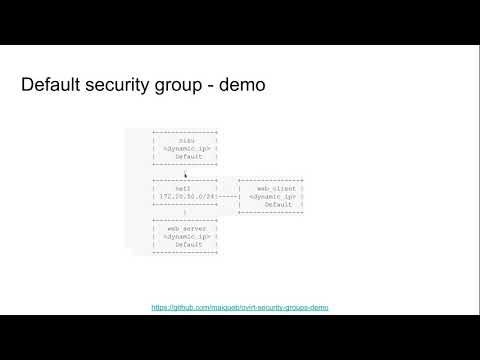
Security groups allow fine-grained access control to - and from - the oVirt VMs attached to external OVN networks.
The Networking API v2 defines security groups as a white list of rules - the user specifies in it which traffic is allowed. That means, that when the rule list is empty, neither incoming nor outgoing traffic is allowed (from the VMs perspective).
A demo recording of the security group feature can be found below.
 .
.
Provided tools
This repo adds tools, and information on how to use them, to help manage the security groups in oVirt, since currently there is no supported mechanism to provision security groups, other than the REST API, and ManageIQ. ManageIQ also doesn't fully support security groups, since it lacks a way to attach security groups to logical ports.
Demo scenarios
In the following links you can also find playbooks that can be built upon to reach different types of scenarios.
Federate oVirt engine authentication to OpenID Connect infrastructure
In this post I will introduce how to integrate OIDC with oVirt engine using Keycloak and LDAP user federation.
Prerequisites: I assume you have already setup the 389ds directory server, but the solution is very similar for any other LDAP provider.
As OIDC is not integrated into oVirt directly, we use Apache to do the OIDC authentication for us. The mod_auth_openidc module nicely covers all needed functionality.
Overview
Integrate with external OpenID Connect Identity Provider (IDP) to provide Single Sign-On (SSO) across products that use the IDP for authenticating users. We currently have oVirt SSO for providing unified authentication across Administrator and VM portals. The oVirt engine SSO also provides tokens for REST API clients and supports bearer authentication to reuse tokens to access oVirt engine RESTAPI. With external IDP integration the internal oVirt SSO is disabled and browser users will be redirected to the external IDP for authentication. After successful authentication users can access both Admin and VM portals as they normally do. REST API clients don't have to change, they can still obtain a token from engine SSO and use the token for bearer authentication to access oVirt engine RESTAPI. Engine SSO acts as a proxy obtaining the Continue reading
oVirt and OKD
This is a series of posts to demonstrate how to install OKD 3.11 on oVirt and what you can do with it. Part I - How to install OKD 3.11 on oVirt

How to install OKD 3.11 on oVirt (4.2 and up)
Installing OKD or Kubernetes on oVirt has many advantages, and it's also gotten a lot easier these days. Admins and users who want to take container platform management for a spin, on oVirt, will be encouraged by this.
Few of the advantages are:
- Virtualizing the control plane for Kubernetes - provide HA/backup/affinity capabilities to the controllers and allowing hardware maintenance cycles
- Providing persistent volume for containers via the IAAS, without the need for additional storage array dedicated to Kubernetes
- Allowing a quick method to build up/tear down Kubernetes clusters, providing hard tenancy model via VMs between clusters.
The installation uses openshift-ansible and, specifically the openshift_ovirt ansible-role. The integration between OpenShift and oVirt is tighter, and provides storage integration. If you need persistent volumes for your containers you can get that directly from oVirt using ovirt-volume-provisioner and ovirt-flexvolume-driver.
For the sake of simplicity, this example will cover an all-in-one OpenShift cluster, on a single VM.
Continue reading
oVirt SAML with keyloak using 389ds user federation
In this post I will introduce how simple it is to integrate SAML with oVirt using Keycloak and LDAP user federation.
Prerequisites: I assume you have already setup the 389ds directory server, but the solution is very similar for any other LDAP provider.
As SAML is not integrated into oVirt directly, we use Apache to do the SAML authentication for us. The mod_auth_mellon module nicely covers all needed functionality.
mod_auth_mellon configuration
First we need to configure oVirt's apache. SSH to the oVirt engine and create a directory where we'll store all SAML related certificates.
ssh root@engine
yum install -y mod_auth_mellon
mkdir -p /etc/httpd/saml2
When we install the mod_auth_mellon package, it will create /etc/httpd/conf.d/auth_mellon.conf.
We need to modify this file to our needs, as follows:
<Location />
    MellonEnable "info"
    MellonDecoder "none"
    MellonVariable "cookie"
    MellonSecureCookie On
    MellonSessionDump On
    MellonSamlResponseDump On
    MellonSessionLength 86400

    MellonUser "NAME_ID"
    MellonEndpointPath /saml2

    MellonSPCertFile /etc/httpd/saml2/ovirtsp-cert.cert
    MellonSPPrivateKeyFile /etc/httpd/saml2/ovirtsp-key.key
    MellonSPMetadataFile /etc/httpd/saml2/ovirtsp-metadata.xml
    MellonIdPMetadataFile /etc/httpd/saml2/idp-metadata.xml

    RewriteEngine On
    RewriteCond %{LA-U:REMOTE_USER} ^(.*)$
    RewriteRule ^(.*)$ - [L,NS,P,E=REMOTE_USER:%1]
    RequestHeader set X-Remote-User %{REMOTE_USER}s
</Location>

<LocationMatch ^/ovirt-engine/sso/(interactive-login-negotiate|oauth/token-http-auth)|^/ovirt-engine/api>
  <If "req('Authorization') !~ /^(Bearer| Continue reading
oVirt SAML with keyloak using 389ds user federation
In this post I will introduce how simple it is to integrate SAML with oVirt using Keycloak and LDAP user federation.
Prerequisites: I assume you have already setup the 389ds directory server, but the solution is very similar for any other LDAP provider.
As SAML is not integrated into oVirt directly, we use Apache to do the SAML authentication for us. The mod_auth_mellon module nicely covers all needed functionality.
mod_auth_mellon configuration
First we need to configure oVirt's apache. SSH to the oVirt engine and create a directory where we'll store all SAML related certificates.
ssh root@engine
yum install -y mod_auth_mellon
mkdir -p /etc/httpd/saml2
When we install the mod_auth_mellon package, it will create /etc/httpd/conf.d/auth_mellon.conf.
We need to modify this file to our needs, as follows:
<Location />
    MellonEnable "info"
    MellonDecoder "none"
    MellonVariable "cookie"
    MellonSecureCookie On
    MellonSessionDump On
    MellonSamlResponseDump On
    MellonSessionLength 86400

    MellonUser "NAME_ID"
    MellonEndpointPath /saml2

    MellonSPCertFile /etc/httpd/saml2/ovirtsp-cert.cert
    MellonSPPrivateKeyFile /etc/httpd/saml2/ovirtsp-key.key
    MellonSPMetadataFile /etc/httpd/saml2/ovirtsp-metadata.xml
    MellonIdPMetadataFile /etc/httpd/saml2/idp-metadata.xml

    RewriteEngine On
    RewriteCond %{LA-U:REMOTE_USER} ^(.*)$
    RewriteRule ^(.*)$ - [L,NS,P,E=REMOTE_USER:%1]
    RequestHeader set X-Remote-User %{REMOTE_USER}s
</Location>

<LocationMatch ^/ovirt-engine/sso/(interactive-login-negotiate|oauth/token-http-auth)|^/ovirt-engine/api>
<If "req('Authorization') !~ /^(Bearer| Continue readingSkydive With oVirt
Skydive network is an open source real-time network topology and protocols analyzer providing a comprehensive way of understanding what is happening in your network infrastructure. The common use cases will be, troubleshooting, monitoring, SDN integration and much more. It has features such as:
- Topology capturing - Captures network topology, interface, bridge and more
- Flow capture - Distributed probe, L2-L4 classifier, GRE, VXLAN, GENEVE, MPLS/GRE, MPLS/UDP tunnelling support
- Extendable - Support for external SDN Controllers or container based infrastructure, OpenStack. Supports extensions through API
Benefit to oVirt users
Skydive allows oVirt administrators to see the network configuration and topology of their oVirt cluster. Administrators can capture traffic from VM1 to VM2 or monitor the traffic between VMs or hosts. Skydive can generate traffic between 2 running VMs on different hosts and then analyze. Administrators can create alerts in Skydive UI to notify when traffic is disconnected or down.
Installation steps
git clone https://github.com/skydive-project/skydive.git-
Create inventory file
 [skydive:children]
 analyzers
 agents

 [skydive:vars]
 skydive_listen_ip=0.0.0.0
 skydive_fabric_default_interface=ovirtmgmt

 skydive_os_auth_url=https://<ovn_provider_FQDN>:35357/v2.0
 skydive_os_service_username=<ovn_provider_username>
 skydive_os_service_password=<ovn_provider_password>
 skydive_os_service_tenant_name=service
 skydive_os_service_domain_name=Default
 skydive_os_service_region_name=RegionOne

 [analyzers]
 <analyzer_FQDN> ansible_ssh_user=root ansible_ssh_pass=<ssh_password>

 [agents]
 <agent_FQDN> ansible_ssh_user=root  Continue reading
Skydive With oVirt
Skydive network is an open source real-time network topology and protocols analyzer providing a comprehensive way of understanding what is happening in your network infrastructure. The common use cases will be, troubleshooting, monitoring, SDN integration and much more. It has features such as:
- Topology capturing - Captures network topology, interface, bridge and more
- Flow capture - Distributed probe, L2-L4 classifier, GRE, VXLAN, GENEVE, MPLS/GRE, MPLS/UDP tunnelling support
- Extendable - Support for external SDN Controllers or container based infrastructure, OpenStack. Supports extensions through API
Benefit to oVirt users
Skydive allows oVirt administrators to see the network configuration and topology of their oVirt cluster. Administrators can capture traffic from VM1 to VM2 or monitor the traffic between VMs or hosts. Skydive can generate traffic between 2 running VMs on different hosts and then analyze. Administrators can create alerts in Skydive UI to notify when traffic is disconnected or down.
Installation steps
git clone https://github.com/skydive-project/skydive.git-
Create inventory file
 [skydive:children]
 analyzers
 agents

 [skydive:vars]
 skydive_listen_ip=0.0.0.0
 skydive_fabric_default_interface=ovirtmgmt

 skydive_os_auth_url=https://<ovn_provider_FQDN>:35357/v2.0
 skydive_os_service_username=<ovn_provider_username>
 skydive_os_service_password=<ovn_provider_password>
 skydive_os_service_tenant_name=service
 skydive_os_service_domain_name=Default
 skydive_os_service_region_name=RegionOne

 [analyzers]
 <analyzer_FQDN> ansible_ssh_user=root ansible_ssh_pass=<ssh_password>

 [agents]
 <agent_FQDN> ansible_ssh_user=root  Continue reading
Upgraded DPDK support in oVirt
DPDK (Data Plane Development Kit) is a set of open-source high-performance packet processing libraries and user space drivers.
oVirt support for DPDK was introduced in 2017, and is now enhanced in terms of deployment via Ansible and usage via Open Virtual Network.
While still experimental, OVN-DPDK in oVirt is now available in version 4.2.
What's new?
Ansible DPDK host setup
Host configuration for DPDK usage is now automated using Ansible. This primarly includes:
- Hugepages configuration – hugepage size and quantity in the kernel.
- CPU partitioning.
- Binding NICs to userspace drivers.
- OVS-DPDK related configuration (initialization, socket memory, pmd thread core binding, etc).
The role is installed via Ansible galaxy:
# ansible-galaxy install oVirt.dpdk-setup
An example playbook:
- hosts: dpdk_host_0
  vars:
    pci_drivers:
      "0000:02:00.1": "vfio-pci"
      "0000:02:00.2": "igb"
      "0000:02:00.3": ""
    configure_kernel: true
    bind_drivers: true
    set_ovs_dpdk: false
  roles:
    - ovirt-ansible-dpdk-setup
The role is controlled by 3 boolean variables (all set to true by default) and a dictionary of devices and their drivers:
configure_kernel– determines whether the kernel should be configured for DPDK usage (hugepages, CPU partitioning). WARNING: When set totrueit is very likely to trigger a reboot of the host, unless all required configuration is already Continue reading
Build oVirt Reports Using Grafana
Grafana, The open platform for beautiful analytics and monitoring, recently added support for PostgreSQL.
It in now possible to connect Grafana to oVirt DWH, in order to visualize and monitor the oVirt environment.
Grafana dashboard example

Adding a Read-Only User to the History Database
You may want to add a read only user to connect the history database :
Note: In oVirt 4.2 we ship postgres 9.5 through the Software Collection.
-
In order to run psql you will need to run:
# su - postgres $ scl enable rh-postgresql95 -- psql ovirt_engine_history -
Create the user to be granted read-only access to the history database:
ovirt_engine_history=# CREATE ROLE [user name] WITH LOGIN ENCRYPTED PASSWORD '[password]'; -
Grant the newly created user permission to connect to the history database:
ovirt_engine_history=# GRANT CONNECT ON DATABASE ovirt_engine_history TO [user name]; -
Grant the newly created user usage of the public schema:
ovirt_engine_history=# GRANT USAGE ON SCHEMA public TO [user name]; -
Exit the database
ovirt_engine_history=# \q -
Generate the rest of the permissions that will be granted to the newly created user and save them to a file:
$ scl enable rh-postgresql95 -- psql -U postgres -c "SELECT 'GRANT SELECT ON ' || relname Continue reading
Build oVirt Reports Using Grafana
Grafana, The open platform for beautiful analytics and monitoring, recently added support for PostgreSQL.
It in now possible to connect Grafana to oVirt DWH, in order to visualize and monitor the oVirt environment.
Grafana dashboard example
Adding a Read-Only User to the History Database
You may want to add a read only user to connect the history database :
Note: In oVirt 4.2 we ship postgres 9.5 through the Software Collection.
-
In order to run psql you will need to run:
# su - postgres $ scl enable rh-postgresql95 -- psql ovirt_engine_history -
Create the user to be granted read-only access to the history database:
ovirt_engine_history=# CREATE ROLE [user name] WITH LOGIN ENCRYPTED PASSWORD '[password]'; -
Grant the newly created user permission to connect to the history database:
ovirt_engine_history=# GRANT CONNECT ON DATABASE ovirt_engine_history TO [user name]; -
Grant the newly created user usage of the public schema:
ovirt_engine_history=# GRANT USAGE ON SCHEMA public TO [user name]; -
Exit the database
ovirt_engine_history=# \q -
Generate the rest of the permissions that will be granted to the newly created user and save them to a file:
$ scl enable rh-postgresql95 -- psql -U postgres -c "SELECT 'GRANT SELECT ON ' || relname Continue reading
Your Container Volumes Served By oVirt
Note: < 5 minutes read
When running a virtualization workload on oVirt, a VM disk is 'natively' a disk somewhere on your network-storage.
Entering containers world, on Kubernetes(k8s) or OpenShift, there are many options specifically because the workload can be totally stateless, i.e
they are stored on a host supplied disk and can be removed when the container is terminated. The more interesting case is stateful workloads i.e apps that persist data (think DBs, web servers/services, etc). k8s/OpenShift designed an API to dynamically provision the container storage (volume in k8s terminology).
See the resources section for more details.
In this post I want to cover how oVirt can provide volumes for containers running on k8s/OpenShift cluster.
Overview
Consider this: you want to deploy wikimedia as a container, with all its content served from /opt.
For that you will create a persistent volume for the container - when we have state to keep and server
creating a volume makes sense. It is persistent, it exists regardless the container state,
and you can choose which directory exactly you serve that volume, and that is the most important
part, k8s/OpenShift gives you an API to determine who will provide the volume Continue reading
Up and Running with oVirt 4.2 and Gluster Storage
In December, the oVirt Project shipped version 4.2 of its open source virtualization management system. With a new release comes an update to this howto for running oVirt together with Gluster storage using a trio of servers to provide for the system's virtualization and storage needs, in a configuration that allows you to take one of the three hosts down at a time without disrupting your running VMs.
If you're looking instead for a simpler, single-machine option for trying out oVirt, your best bet is the oVirt Live ISO page. This is a LiveCD image that you can burn onto a blank CD or copy onto a USB stick to boot from and run oVirt. This is probably the fastest way to get up and running, but once you're up, this is definitely a low-performance option, and not suitable for extended use or expansion.
Read on to learn about my favorite way of running oVirt.
oVirt, Glusterized
Prerequisites
Hardware: You’ll need three machines with 16GB or more of RAM and processors with hardware virtualization extensions. Physical machines are best, but you can test oVirt using nested KVM as well. I've written this howto using VMs running on my "real" Continue reading
oVirt 4.2.2 web admin UI browser bookmarks
oVirt web admin UI now allows the user to bookmark all entities and searches using their browser.
Synchronizing URL with application state
Whenever you select a detail view in the application, the browser URL is now updated to match the selected entity. For instance if you have a VM named MyVM and you click on the name to see the details, the URL of the browser will go to #vms-general;name=MyVM. If you switch to lets say the network interfaces tab the URL in your browser will switch to #vms-network_interfaces;name=MyVM. Changing entity or changing location will keep the browser URL synchronized. This allows you to use your browsers bookmark functionality to store a link to that VM.
Direct linking to entities
As a complementary functionality you can pass arguments to places that will execute some functionality based on the type of argument you have passed in. The following types are available:
- SEARCH, is for main views only, this allows you to pre populate the search string used in the search bar.
- NAME, most entities are uniquely named and you can use their name in a detail view to go directly to that named entity.
- DATACENTER, quota and networks are not uniquely Continue reading
Build oVirt Reports Using Grafana
Grafana, The open platform for beautiful analytics and monitoring, recently added support for PostgreSQL.
It in now possible to connect Grafana to oVirt DWH, in order to visualize and monitor the oVirt environment.
Grafana dashboard example
If you wish to create dashboards to monitor oVirt environment, you will need to install Grafana.
Grafana automatically creates an admin user and password.
You will need to add a PostgreSQL data source that connects to the DWH database.
For example:

You may want to add a read only user to connect the history database - Allowing read only access to the history database
Now you can start creating your dashboard widgets.
Go to Dashboards -> + New.
Graph panel example:
To add a Graph type panel, on the left side you have the Row controls menu.
Go to the + Add Panel, and pick Graph.
Query example for the - Five Most Utilized Hosts by Memory / CPU:
SELECT DISTINCT
    min(time) AS time,
    MEM_Usage,
    host_name || 'MEM_Usage' as metric
FROM (
    SELECT
        stats_hosts.host_id,
        CASE
            WHEN delete_date IS NULL
                THEN host_name
            ELSE
                host_name
                ||
                ' (Removed on '
                ||
                CAST ( CAST ( delete_date AS date ) AS varchar )
Continue readingoVirt 4.2 Is Now Generally Available
We are delighted to announce the general availability of oVirt 4.2, as of December 19, 2017, for Red Hat Enterprise Linux 7.4, CentOS Linux 7.4, or similar.
oVirt 4.2 is an altogether more powerful and flexible open source virtualization solution. The release is a major milestone for the project, encompassing over 1000 individual changes and a wide range of enhancements spanning storage, network, engine, user interface, and analytics.
What’s new in oVirt 4.2?
The big new features:
The Administration Portal has been redesigned using Patternfly, a widely adopted standard in web application design that promotes consistency and usability across IT applications. The result is a more intuitive and user-friendly user interface, featuring improved performance. Here is a screenshot of the Administration Portal dashboard:

A new VM Portal for non-admin users. Built with performance and ease of use in mind, the new VM portal delivers a more streamlined experience.
A High Performance VM type has been added to the existing "Server" and "Desktop" types. The new type enables administrators to easily optimize a VM for high performance workloads.
The oVirt Metrics Store is a real-time monitoring solution, providing complete infrastructure visibility for decision making Continue reading
oVirt 4.2 Is Now Generally Available
We are delighted to announce the general availability of oVirt 4.2, as of December 19, 2017, for Red Hat Enterprise Linux 7.4, CentOS Linux 7.4, or similar.
oVirt 4.2 is an altogether more powerful and flexible open source virtualization solution. The release is a major milestone for the project, encompassing over 1000 individual changes and a wide range of enhancements spanning storage, network, engine, user interface, and analytics.
What’s new in oVirt 4.2?
The big new features:
The Administration Portal has been redesigned using Patternfly, a widely adopted standard in web application design that promotes consistency and usability across IT applications. The result is a more intuitive and user-friendly user interface, featuring improved performance. Here is a screenshot of the Administration Portal dashboard:
A new VM Portal for non-admin users. Built with performance and ease of use in mind, the new VM portal delivers a more streamlined experience.
A High Performance VM type has been added to the existing "Server" and "Desktop" types. The new type enables administrators to easily optimize a VM for high performance workloads.
The oVirt Metrics Store is a real-time monitoring solution, providing complete infrastructure visibility for decision making Continue reading