Monitor Your oVirt Environment with oVirt Metrics Store
The oVirt project now includes a unified metrics and logs real-time monitoring solution for the oVirt environment.
Using Elasticsearch - a search and analytics engine - and its native visualization layer, Kibana, we now provide oVirt project users with a fully functional monitoring solution.
The solution includes self-service dashboards for creating your own dashboard, reports, and log analysis for both the engine and VDSM logs.
The Kibana dashboard
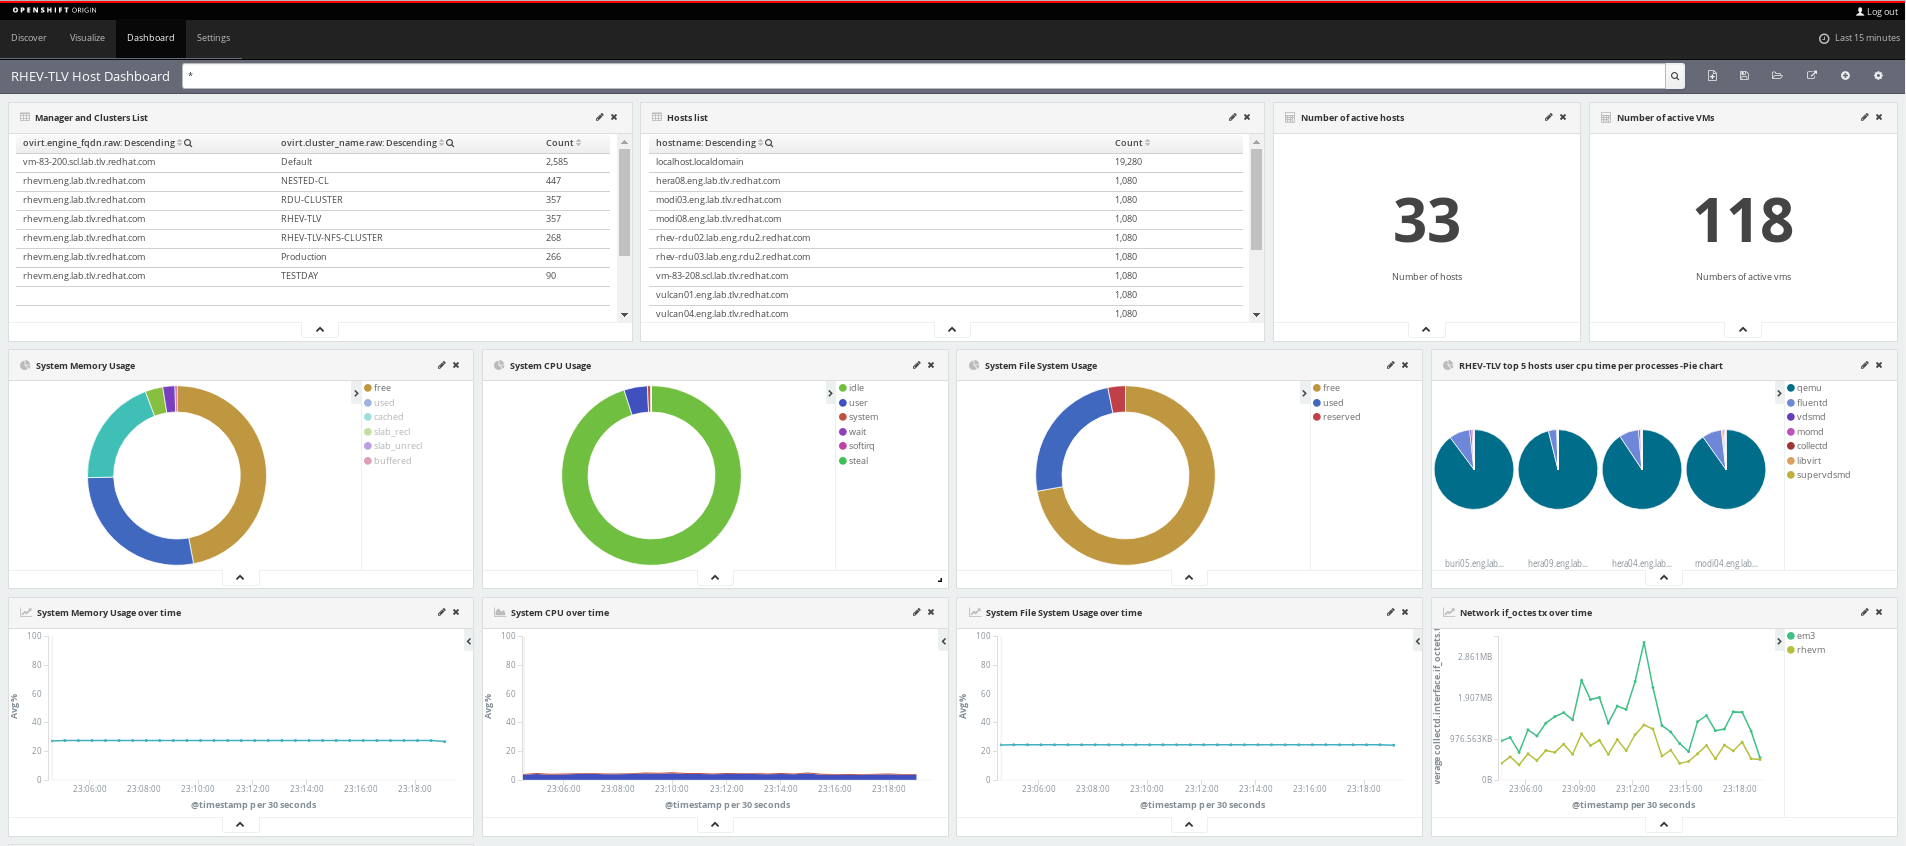
Combining Elasticsearch and kibana - both built on top of the OpenShift Container Platform (OCP) - with the collectd and fluentd client-side daemons, results in a powerful end-to-end solution.
For additional details, including how to set up the oVirt Metrics Store, please see the oVirt Metrics Store Feature page.
Monitor Your oVirt Environment with oVirt Metrics Store
The oVirt project now includes a unified metrics and logs real-time monitoring solution for the oVirt environment.
Using Elasticsearch - a search and analytics engine - and its native visualization layer, Kibana, we now provide oVirt project users with a fully functional monitoring solution.
The solution includes self-service dashboards for creating your own dashboard, reports, and log analysis for both the engine and VDSM logs.
The Kibana dashboard
Combining Elasticsearch and kibana - both built on top of the OpenShift Container Platform (OCP) - with the collectd and fluentd client-side daemons, results in a powerful end-to-end solution.
For additional details, including how to set up the oVirt Metrics Store, please see the oVirt Metrics Store Feature page.
oVirt roles Ansible Galaxy integration
In 4.2 release we have splitted our oVirt Ansible roles into separate RPM packages and also separate git repositories, so it is possible for user to install specific role either from Ansible Galaxy or as RPM package.
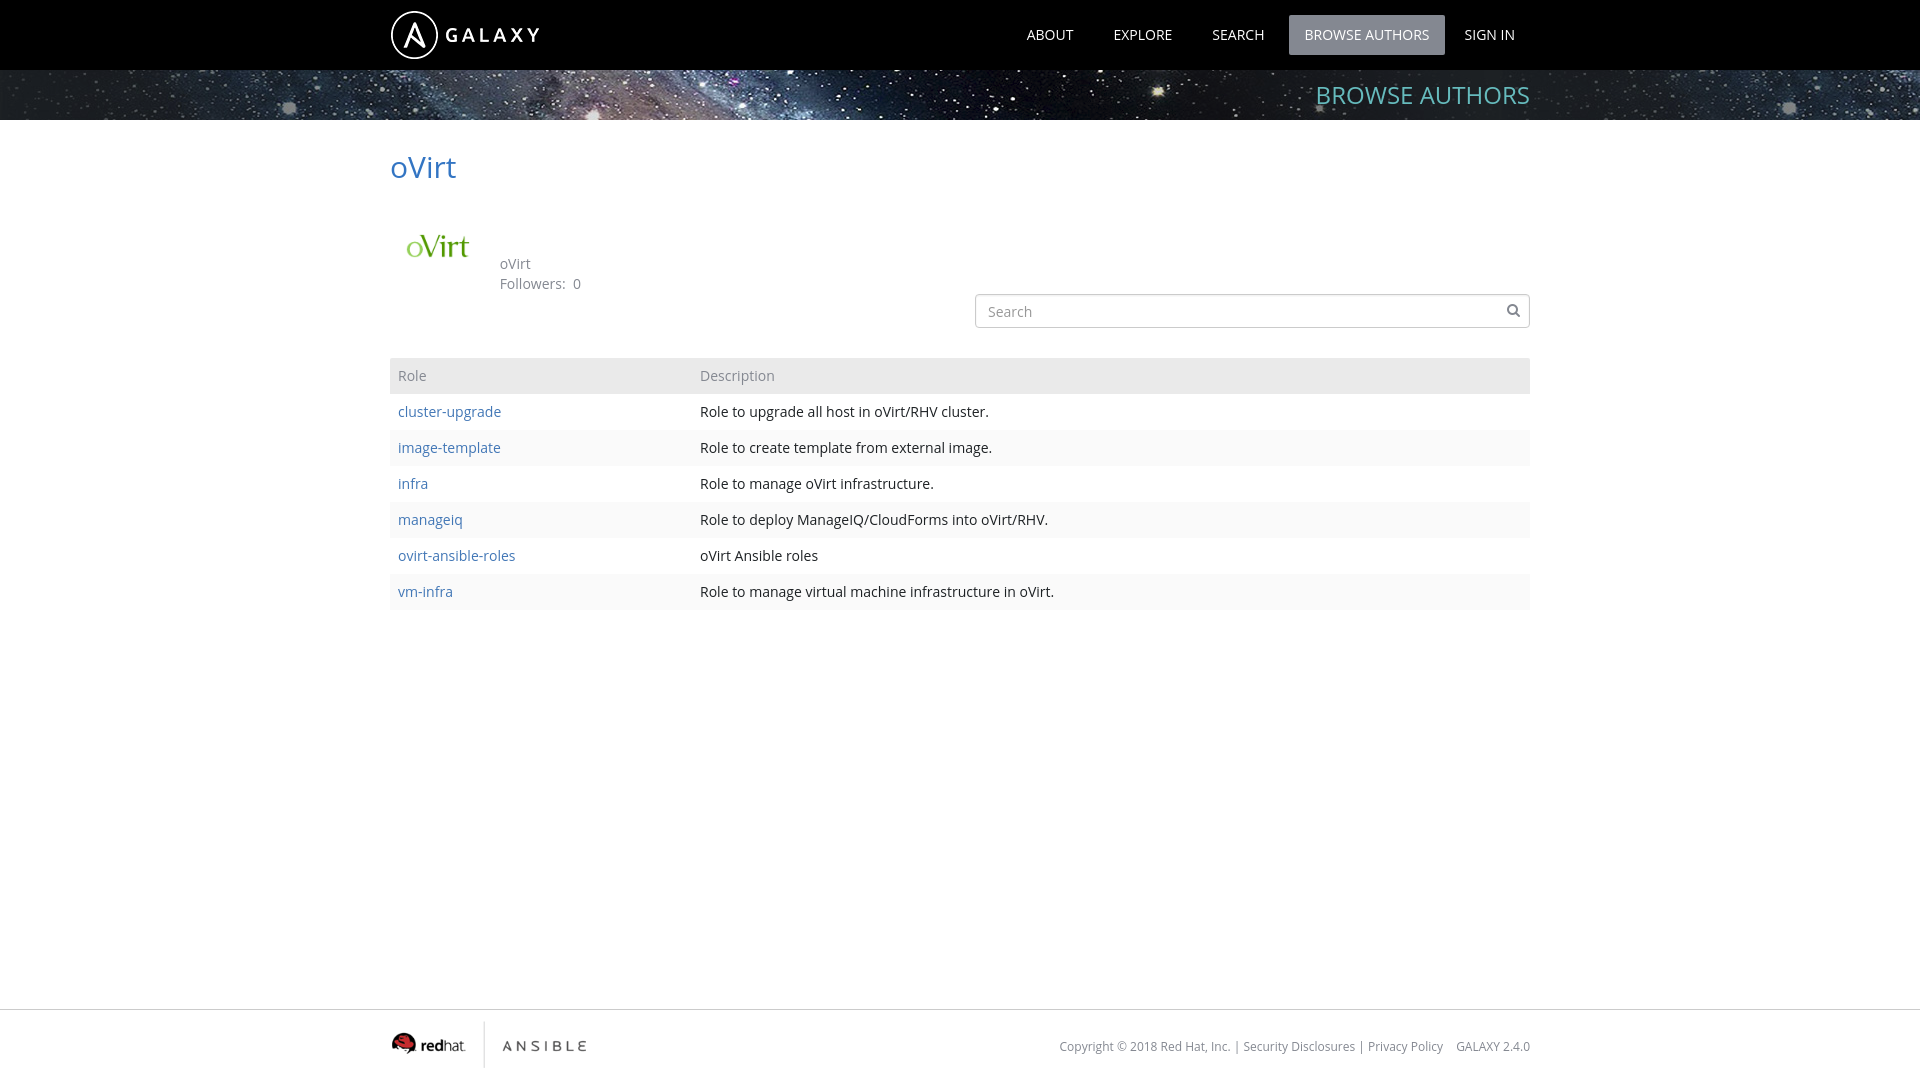
The reason
The reason to split the roles into separate packages and git repositories was mainly the usage from the AWX/Ansible Tower. Since Ansible Galaxy is only integrated with github you need to store your Ansible role in single git repostiory in order to have separate Ansible role in Galaxy. Previously we used one single repository where we have stored all the roles, but because of that manual configuration was required to make those roles usable in AWX/Ansible Tower. So as you can see on image below we now have many roles in Ansible Galaxy under oVirt user:
How to install the roles
There are still two ways how to install the roles: either using Ansible Galaxy or using RPM package available from oVirt repositories.
Ansible Galaxy
You are now able to install just a single role and not necessarily all of them at once like in previous versions For example to install just oVirt cluster upgrade role, you have to run Continue reading
oVirt roles Ansible Galaxy integration
In 4.2 release we have splitted our oVirt Ansible roles into separate RPM packages and also separate git repositories, so it is possible for user to install specific role either from Ansible Galaxy or as RPM package.
The reason
The reason to split the roles into separate packages and git repositories was mainly the usage from the AWX/Ansible Tower. Since Ansible Galaxy is only integrated with github you need to store your Ansible role in single git repostiory in order to have separate Ansible role in Galaxy. Previously we used one single repository where we have stored all the roles, but because of that manual configuration was required to make those roles usable in AWX/Ansible Tower. So as you can see on image below we now have many roles in Ansible Galaxy under oVirt user:
How to install the roles
There are still two ways how to install the roles: either using Ansible Galaxy or using RPM package available from oVirt repositories.
Ansible Galaxy
You are now able to install just a single role and not necessarily all of them at once like in previous versions For example to install just oVirt cluster upgrade role, you have to run Continue reading
Customizing the host deploy process
In 4.2 release we have introduced a possibility to customize the host-deploy process by running the Ansible post-tasks after the host-deploy process successfully finishes.
The reason
Prior to oVirt 4.2 release administrators could customize host's firewall rules using engine-config option IPTablesConfigSiteCustom.
Unfortunately writing custom iptables rules into string value to be used in engine-config was very user unfriendly and using engine-config to provide custom
firewalld rules would be even much worse. Because of above we have introduced Ansible integration as a part of host deploy flow, which allows administrators to
add any custom actions executed on the host during host deploy flow.
Special tasks file
As part of this role we also include additional tasks, which could be written by the user, to modify the host-deploy process for example to open some more FirewallD ports.
Those additional tasks can be added to following file:
/etc/ovirt-engine/ansible/ovirt-host-deploy-post-tasks.yml
This post-task file is executed as part of host-deploy process just before setup network invocation.
Example
An example post-tasks file is provided by ovirt-engine installation, at following location:
/etc/ovirt-engine/ansible/ovirt-host-deploy-post-tasks.yml.example
This is just an example file, to add some task into host deploy flow, you need to create below mentioned file Continue reading
LVM Configuration the Easy Way
Now oVirt features a simple way to prevent a host from scanning and then activating logical volumes that are not required directly by the host. In particular, the solution addresses logical volumes on shared storage managed by oVirt, and logical volumes created by a guest in oVirt raw volumes. Why is a solution required? Because scanning and activating other logical volumes may cause data corruption, slow boot, and other issues.
The solution is configuring an LVM filter on each host, which allows LVM on a host to scan only the logical volumes required directly by the host. To achieve this, we have introduced a vdsm-tool command, config-lvm-filter, that will configure the host for you.
The new command, vdsm-tool config-lvm-filter analyzes the current LVM configuration to decide
whether a filter should be configured. Then, if the LVM filter has yet to be configured, the command generates an LVM filter option for this host, and adds the option to the LVM configuration.
Scenario 1: An Unconfigured Host
On a host yet to be configured, the command automatically configures the LVM once the user confirms the operation:
# vdsm-tool config-lvm-filter
Analyzing host...
Found these mounted logical volumes on this host:

  logical volume:  /dev/mapper/vg0-lv_home
Continue readingLLDP Information Now Available via the Administration Portal
In oVirt 4.2 we have introduced support for the Link Layer Discovery Protocol (LLDP). It is used by network devices for advertising the identity and capabilities to neighbors on a LAN. The information gathered by the protocol can be used for better network configuration. Learn more about LLDP.
Why do you need LLDP?
When adding a host into oVirt cluster, the network administrator usually needs to attach various networks to it. However, a modern host can have multiple interfaces, each with its non-descriptive name.
Examples
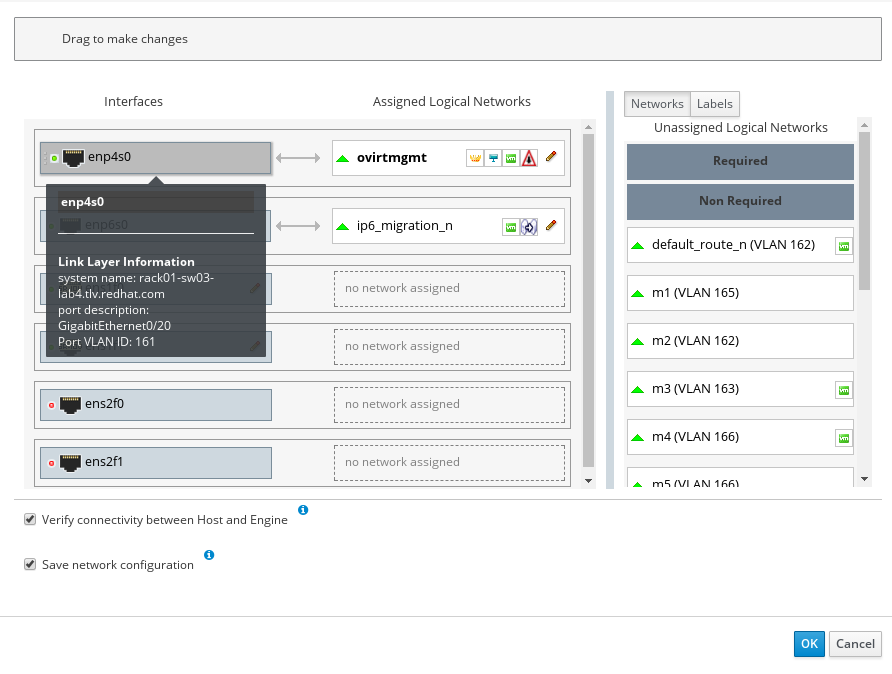
In the screenshot below, taken from the Administration Portal, a network administrator has to know
to which interface to attach the network named m2 with VLAN_ID 162. Should it be interface
enp4s0, ens2f0 or even ens2f1? With oVirt 4.2, the administrator can hover over enp4s0
and see that this interface is connected to peer switch rack01-sw03-lab4, and learn that this
peer switch does not support VLAN 162 on this interface. By looking at every interface, the
administrator can choose which interface is the right option for networkm2.
A similar situation arises with the configuration of mode 4 bonding (LACP). Configurating LACP usually starts with network administrator defining a port group Continue reading
Engine XML Brings a Smoother Flow of Data Into oVirt
on November 8, oVirt 4.2 saw the introduction of an important behind-the-scenes enhancement.
The change is associated with the exchange of information between the engine and the VDSM. It addresses the issue of multiple abstraction layers, with each layer needing to convert its input into a suitably readable format in order to report to the next layer.
This change improves data communication between the engine and Libvirt - the tool that manages platform virtualization.
Background
Previously, the configuration file for a newly created virtual machine (VM) originated in the engine as a map or dictionary. Then, in the VDSM, it was converted into an XML file that was readable by Libvirt. This process required a greater coding effort which in turn slowed down the development process.
What's changed?
Now, this map or dictionary has been replaced by engine XML, an XML configuration file that complies with the Libvirt API. VDSM now simply routes this Libvirt-readable file to/from Libvirt, in VM lifecycle (virt) related flows.
As an oVirt user, it’s business as usual.
However, if you are a developer dealing with debugging issues that involve running a VM, simply be aware that the Domain XML is now generated by ovirt-engine, Continue reading
Setting up multiple networks is going to be much faster in oVirt 4.2
Assume you have an oVirt cluster with hundreds of VM networks. Now you add a
new host to the cluster. In order for it to move to the Operational state,
it must have all required networks attached to it. The easiest way to do it is
to attach networks to a label, and then place that label on a NIC of the added
host. However, if there are too many networks, Engine could fail to setup them
all at once. This is caused by a slow VDSM setupNetworks call that is not able
to finish within the 180 seconds long vdsTimeout of Engine.
VDSM performance changes would be included in ovirt-4.2, currently in ovirt-master.
Initscripts performance patch is targeted for EL 7.5.
The following table shows maximal number of networks that can be handled within the vdsTimeout. The measured setupNetworks command handles one network with static IP and N VLAN+bridge networks with no IP. Edit covered a move of all networks from one NIC to another.
Please note that given numbers are for reference only.
| installed | N | add | edit | del |
|---|---|---|---|---|
| ovirt-4.2 | 190 | 180s | 127s | 67s |
| ovirt-4.2 and patched initscripts | 350 | 138s | 176s | 89s |
| ovirt-4.1 | 150 | Continue reading |
Introducing oVirt 4.2.0 Beta
On October 31st, the oVirt project released version 4.2.0 Beta, available for Red Hat Enterprise Linux 7.4, CentOS Linux 7.4, or similar.
Since the release of oVirt 4.2.0 Alpha a month ago, a substantial number of stabilization fixes have been introduced.
What's new in this release?
Support for LLDP, a protocol for network devices for advertising identity and capabilities to neighbors on a LAN. LLDP information can now be displayed in both the UI and via the API. The information gathered by the protocol can be used for better network configuration.
oVirt 4.2.0 Beta features Gluster 3.12.
oVirt's hyperconverged solution now enables a single replica Gluster deployment.
OVN (Open Virtual Network) is now fully supported and recommended for isolated overlay networks. OVN is automatically deployed on the the host, and made available for VM connectivity.
Snapshots can now be uploaded and downloaded via the REST API (and the SDKs).
An improvement has been introduced to the self-hosted engine. Now, the self-hosted-engine will connect to all IPs discovered, allowing both higher performance via multiple paths as well as high availability in the event that one of the targets fails.
A new Continue reading
LLDP Information Now Available via the Administration Portal
In oVirt 4.2 we have introduced support for the Link Layer Discovery Protocol (LLDP). It is used by network devices for advertising the identity and capabilities to neighbors on a LAN. The information gathered by the protocol can be used for better network configuration.Learn more about LLDP.
Why do you need LLDP?
When adding a host into oVirt cluster, the network administrator usually needs to attach various networks to it. However, a modern host can have multiple interfaces, each with its non-descriptive name.
Examples
In the screenshot below, taken from the Administration Portal, a network administrator has to know
to which interface to attach the network named m2 with VLAN_ID 162. Should it be interface
enp4s0, ens2f0 or even ens2f1? With oVirt 4.2, the administrator can hover over enp4s0
and see that this interface is connected to peer switch rack01-sw03-lab4, and learn that this
peer switch does not support VLAN 162 on this interface. By looking at every interface, the
administrator can choose which interface is the right option for networkm2.
A similar situation arises with the configuration of mode 4 bonding (LACP). Configurating LACP usually starts with network administrator defining a port group Continue reading
2018 FOSDEM & DEVCONF Events – Call for Proposals
On behalf of oVirt and the Xen Project, we are excited to announce that the call for proposals is now open for the Virtualization & IaaS devroom at the upcoming FOSDEM 2018.
This year will mark FOSDEM’s 18th anniversary as one of the longest-running free and open source software developer events, attracting thousands of developers and users from all over the world. FOSDEM will take place in Brussels, Belgium, February 3 & 4, 2018.
Also coming up is DEVCOM, The 10th annual, free community conference for developers, admins, and users of free and open source Linux, JBoss technologies. DEVCONF will take place in Brno, Czech Republic, January 26-28, 2018.
![]()
About FOSDEM
This Virtualization & IaaS devroom at FOSDEM is a collaborative effort, organized by dedicated folks from projects such as OpenStack, Xen Project,, oVirt, QEMU, and Foreman. Featured sessions will include topics such as open source hypervisors and virtual machine managers such as Xen Project, KVM,bhyve, and VirtualBox, and Infrastructure-as-a-Service projects such as Apache CloudStack, OpenStack, oVirt, QEMU, OpenNebula, and Ganeti.
This devroom will host presentations that focus on topics of shared interest, such as KVM; libvirt; shared storage; virtualized networking; cloud security; clustering and high availability; interfacing with Continue reading
Introducing High Performance Virtual Machines
Bringing high performance virtual machines to oVirt!
Introducing a new VM type in oVirt 4.2.0 Alpha. A newly added checkbox in the all-new Administration Portal delivers the highest possible virtual machine performance, very close to bare metal.
What does it do?
Some of the magic includes:
- Enable Pass-Through Host CPU
- Enable IO Threads, Num Of IO Threads = 1
- Set the IO and Emulator threads pinning topology
For the full feature set, see the very detailed High Performance VM feature page
Count me in! How do I set it up?
Simple. Go to the Administration Portal and from the vertical menu select Compute > Virtual machines. Click the New VM tab to open up the New Virtual Machine dialog box. In the General tab next to the Optimized for field, click the drop down menu and select High Performance. Click OK. Depending on your current configurations, a smart pop-up may open with a list of additional recommended manual configurations, specific to your setup. To address these recommended changes, click Cancel.
New Virtual Machine dialog box with the High Performance VM type highlighted

How VM is started
Starting up a virtual machine (VM) is not an easy task, there are a lot of things going on hidden from the plain sight and studying it alone is a challenging task. The goal of this post is to simplify the process of learning how the oVirt hypervisor works. The concept of the oVirt is illustrated in the process of starting up the VM, which covers everything from top to the bottom.
Disclaimer: I am an engineer working close to the host part of the oVirt, therefore my knowledge of the engine is limited.

Architecture
Let me start with explaining the main parts oVirt hypervisor architecture. It will help a lot in understanding the overall process of the VM startup flow. Following is the simplified architecture, where I omit auxiliary components and support scripts. This will allow me to focus on the core concept without distractions.
The architecture comprises of three main components: 1) web UI and engine, 2) VDSM, 3) guest agent.
The web UI is where the user makes the first contact with the oVirt hypervisor. The web UI is the main command center of the engine and allows a user to control all aspects and states of Continue reading
Introducing oVirt 4.2.0 Alpha
On September 28, the oVirt project released version 4.2.0 Alpha, available for Red Hat Enterprise Linux 7.4, CentOS Linux 7.4, or similar.
This pre-release version should not be used in production, and is not feature complete.
oVirt is the open source virtualization solution that provides an awesome KVM management interface for multi-node virtualization. This maintenance version is super stable and there are some nice new features.
what's new in oVirt 4.2.0?
Here's an overview of the new main features:
The Administration Portal has been redesigned from scratch using Patternfly, a widely adopted standard in web application design that promotes consistency and usability across IT applications, through UX patterns and widgets. The result is a cleaner, more intuitive and user-friendly user interface. The old horizontal menu has been replaced by a two-level vertical menu. The system tree is gone, and its functionality has been integrated into the vertical menus. Here are some screenshots:
Dashboard

Virtual Machines View

Adding a New Virtual Machine

Storage View

An all new VM Portal for non-admin users - designed with React-based UI and Patternfly principles - replaces the existing User Portal. Built with performance and ease of use in mind, Continue reading
oVirt Now Supports OVS-DPDK
DPDK (Data Plane Development Kit) provides high-performance packet processing libraries and user space drivers. Open vSwitch uses DPDK libraries to perform entirely within the user space. According to Intel ONP performance tests, using OVS with DPDK can provide a huge performance enhancement, increasing network packet throughput and reducing latency.
OVS-DPDK has been added to the oVirt Master branch as an experimental feature. The following post describes the OVS-DPDK installation and configuration procedures.
Please note: Accessing the OVS-DPDK feature requires installing the oVirt Master version. In addition, OVS-DPDK cannot access any features located within the Linux kernel. This includes Linux bridge, tun/tap devices, iptables, etc.
Requirements
In order to achieve the best performance, please follow the instructions at: http://dpdk.org/doc/guides-16.11/linux_gsg/nic_perf_intel_platform.html
The network card must be on the supported vendor matrix, located here: http://dpdk.org/doc/nics
Ensure that your system supports 1GB hugepages:
grep -q pdpe1gb /proc/cpuinfo && echo "1GB supported"
- Hardware support: Make sure VT-d / AMD-Vi is enabled in BIOS
- Kernel support: When adding a new host via the oVirt GUI, go to Hosts -> Edit > Kernel, and add the following parameters to the Kernel command line:
iommu=pt intel_iommu=on default_hugepagesz=1GB hugepagesz=1G hugepages=NIn the event that 1GB Continue reading
How to use oVirt Ansible roles
The recent post, An Introduction to Ansible Roles, discussed the new roles that were introduced in the oVirt 4.1.6 release. This follow-up post will explain how to set up and use Ansible roles, using either Ansible Galaxy or oVirt Ansible Roles RPM.
Ansible Galaxy
To make life easier, Ansible Galaxy stores multiple Ansible roles, including oVirt Ansible roles. To install the roles, perform the next steps:
To install roles on your local machine, run the following command:
$ ansible-galaxy install ovirt.ovirt-ansible-roles
This will install your roles into directory /etc/ansible/roles/ovirt.ovirt-ansible-roles/.
By default, Ansible only searches for roles in /etc/ansible/roles/ directory and your current working directory.
To change the directories where Ansible looks for roles, modify the roles_path option of [defaults] section in ansible.cfg configuration file.
The default location of this file is in /etc/ansible/ansible.cfg.
$ sed -i 's|#roles_path = /etc/ansible/roles|roles_path = /etc/ansible/roles:/etc/ansible/roles/ovirt.ovirt-ansible-roles/roles|' /etc/ansible/ansible.cfg
For more information on changing the directories where Ansible searches for roles, see the Ansible documentation pages.
Copy one of the examples from the directory /etc/ansible/roles/ovirt.ovirt-ansible-roles/examples/ into your working directory, then modify the needed variables and run the playbook.
oVirt Ansible Roles RPM
In the latest oVirt repositories Continue reading
oVirt Webadmin GWT Debug Quick Refresh
As a developer, one drawback of using Google Web Toolkit (GWT) for the oVirt Administration Portal (aka webadmin) is that the GWT compile process takes an exceptionally long time. If you make a change in some code and rebuild the ovirt-engine project using make install-dev ..., you'll be waiting several minutes to test your change. In practice, such a long delay in the usual code-compile-refresh-test cycle would be unbearable.
Luckily, we can use GWT Super Dev Mode ("SDM") to start up a quick refresh-capable instance of the application. With SDM running, you can make a change in GWT and test the refreshed change within seconds.
If you want to step through code and use the Chrome debugger, oVirt and SDM don't work well together for debugging due to the oVirt Administration Portal's code and source map size. Therefore, below we demonstrate how to disable source maps.
Demo (40 seconds)
Steps
-
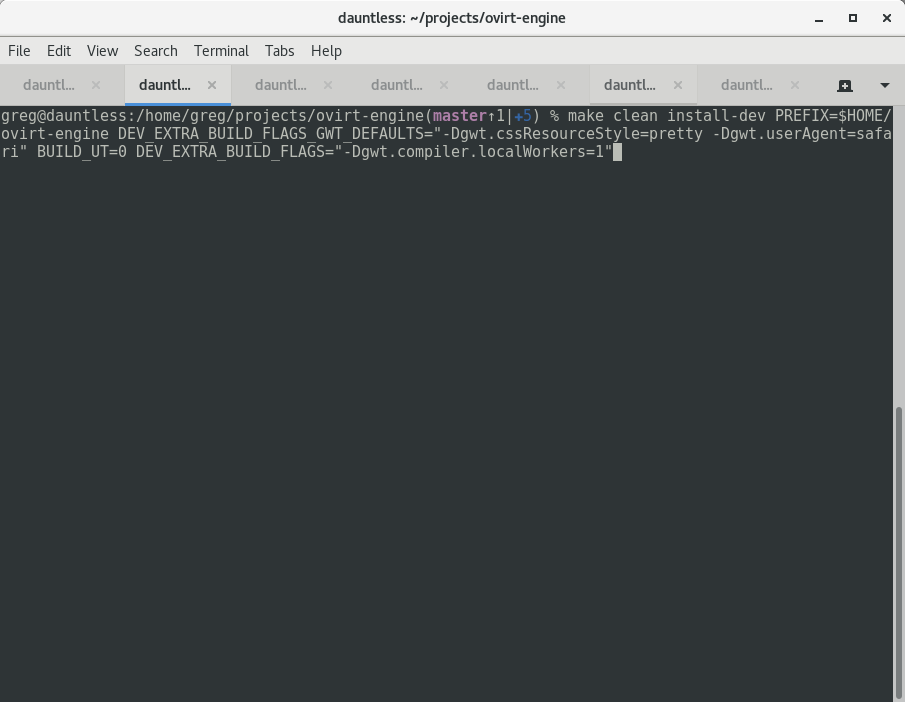
Open a terminal, build the engine normally, and start it.
``` make clean install-dev PREFIX=$HOME/ovirt-engine DEV_EXTRA_BUILD_FLAGS_GWT_DEFAULTS="-Dgwt.cssResourceStyle=pretty -Dgwt.userAgent=safari" BUILD_UT=0 DEV_EXTRA_BUILD_FLAGS="-Dgwt.compiler.localWorkers=1"
…
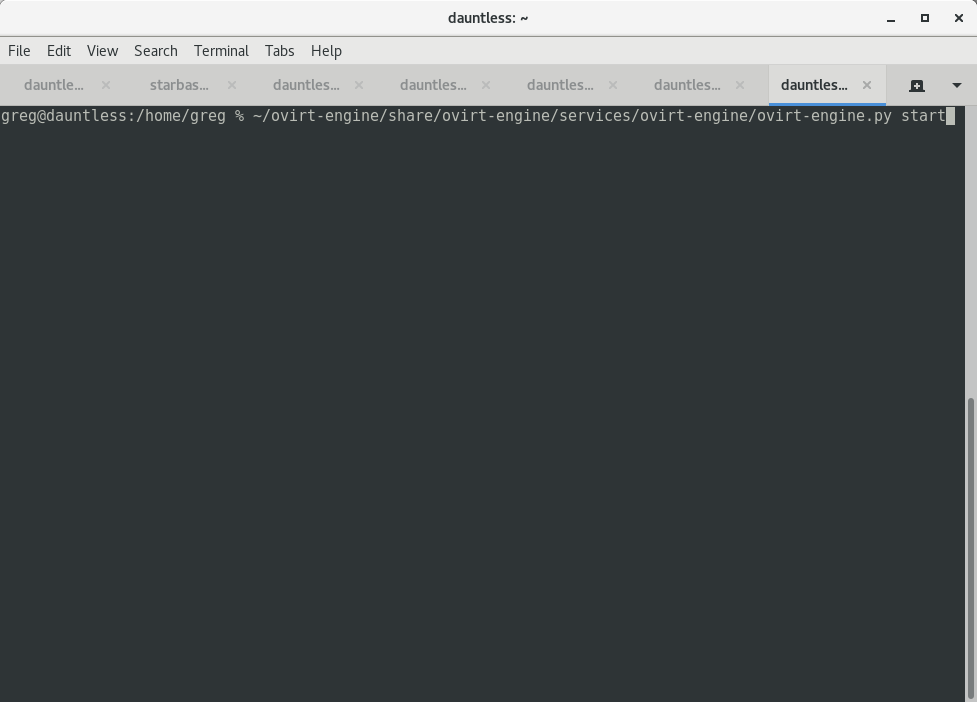
$HOME/ovirt-engine/share/ovirt-engine/services/ovirt-engine/ovirt-engine.py start
```
-
In a second terminal, run:
Chrome:
make gwt-debug DEV_BUILD_GWT_SUPER_DEV_MODE=1 DEV_EXTRA_BUILD_FLAGS_GWT_DEFAULTS="-Dgwt.userAgent=safari"or
Firefox:
make gwt-debug DEV_BUILD_GWT_SUPER_DEV_MODE=1 DEV_EXTRA_BUILD_FLAGS_GWT_DEFAULTS="-Dgwt.userAgent=gecko1_8"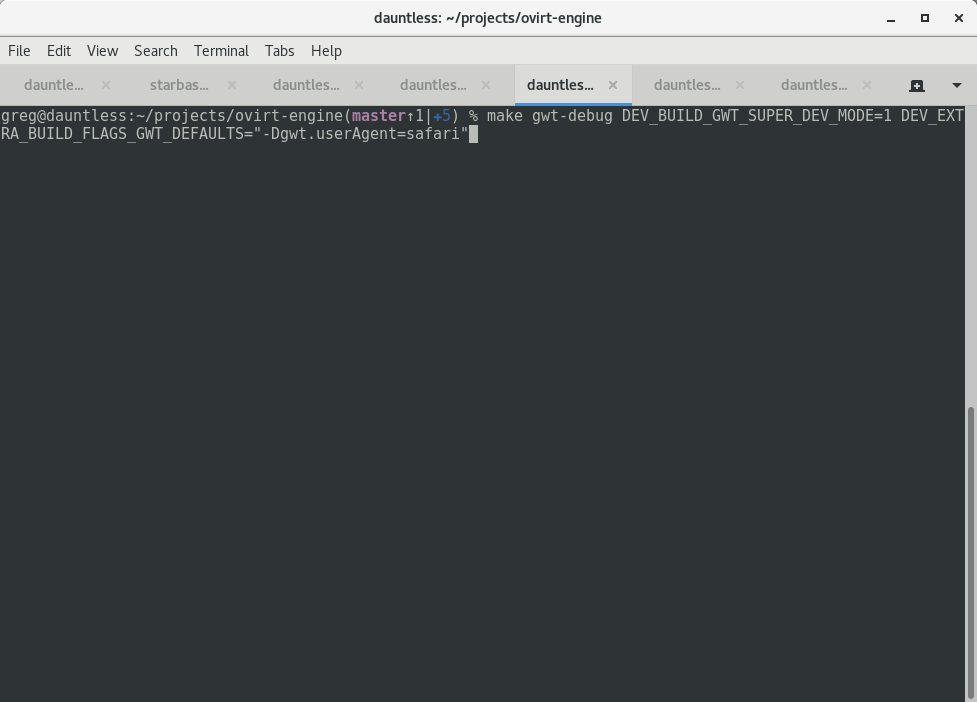
Wait about two minutes Continue reading


An Introduction to oVirt Ansible Roles
Today I would like to share with you some of the integration work with Ansible 2.3 that was done in the latest oVirt 4.1 release. The Ansible integration work was quite extensive and included Ansible modules that can be utilized for automating a wide range of oVirt tasks, including tiered application deployment and virtualization infrastructure management.
While Ansible has multiple levels of integrations, I would like to focus this article on oVirt Ansible roles. As stated in the Ansible documentation: “Roles in Ansible build on the idea of include files and combine them to form clean, reusable abstractions – they allow you to focus more on the big picture and only dive into the details when needed.”
We used the above logic as a guideline for developing the oVirt Ansible roles. We will cover three of the many Ansible roles available for oVirt:
For each example, I will describe the role's purpose and how it is used.
oVirt Infra
The purpose of this role is to automatically configure and manage an oVirt datacenter. It will take a newly deployed- but not yet configured- oVirt engine (RHV-M for RHV users), hosts, and storage and Continue reading
Higher performance for oVirt Python SDK
Python SDK version 4.1.4 introduced support for sending asynchronous requests and HTTP pipelining.
This blog post explains those terms and will show you an example how to use the Python SDK in an asynchronous manner.
Asynchronous Requests
When using asynchronous requests, the client sends the request and defines a method (usually called callback), which should be called after the response is received but the client is not waiting for the response. In order for SDK to work in an asynchronous fashion, we introduced two new features to our SDK: multiple connections and HTTP pipelining.
These features provide significant value when the user wishes to fetch the inventory of the oVirt system. The time to fetch the inventory may be significantly decreased, too. A comparison of the synchronous and asynchronous requests folows.
Multiple Connections
Previously the SDK used only a single open connection that sequentially sent the requests according to user program and always waited for the server response for corresponding request.
In the new version of the SDK, the user can specify the number of connections the SDK should create to the server, and the specific requests created by user program uses those connections in parallel.