Ericsson CEO Says Cisco Partnership Isn’t Dead Yet
 The companies are looking for new areas to work together.
Your Container Volumes Served By oVirt
Note: < 5 minutes read
When running a virtualization workload on oVirt, a VM disk is 'natively' a disk somewhere on your network-storage.
Entering containers world, on Kubernetes(k8s) or OpenShift, there are many options specifically because the workload can be totally stateless, i.e
they are stored on a host supplied disk and can be removed when the container is terminated. The more interesting case is stateful workloads i.e apps that persist data (think DBs, web servers/services, etc). k8s/OpenShift designed an API to dynamically provision the container storage (volume in k8s terminology).
See the resources section for more details.
In this post I want to cover how oVirt can provide volumes for containers running on k8s/OpenShift cluster.
Overview
Consider this: you want to deploy wikimedia as a container, with all its content served from /opt.
For that you will create a persistent volume for the container - when we have state to keep and server
creating a volume makes sense. It is persistent, it exists regardless the container state,
and you can choose which directory exactly you serve that volume, and that is the most important
part, k8s/OpenShift gives you an API to determine who will provide the volume Continue reading
Home network traffic analysis with a Raspberry Pi 3, a NetGear Switch and Ntop
I had the Raspberry Pi laying around for some time without doing any major function and so was a the NetGear switch [1]. So, I decided to do a weekend project to implement traffic analysis on my home network. I have a PPPoE connection to my ISP that connects to my home router [2]. The … Continue reading Home network traffic analysis with a Raspberry Pi 3, a NetGear Switch and NtopVideo: What Is PowerNSX?
One of the beauties of VMware NSX is that it’s fully API-based – you can automate any aspect of it by writing a script (or using any of the network automation tools) that executes a series of well-defined (and well-documented) API calls.
To make that task even easier, VMware released PowerNSX, an open-source library of PowerShell commandlets that abstract the internal details of NSX API and give you an easy-to-use interface (assuming you use PowerShell as your automation tool).
Read more ...Want to Learn More about Docker and Containers?
One of my readers wanted to know more about containers and wondered how ipSpace.net materials could help him. Here’s a short step-by-step guide:
I published this blog post to help ipSpace.net subscribers navigate through Docker- and containers-related material. You might want to skip it if you’re not one of them.
Read more ...Up and Running with oVirt 4.2 and Gluster Storage
In December, the oVirt Project shipped version 4.2 of its open source virtualization management system. With a new release comes an update to this howto for running oVirt together with Gluster storage using a trio of servers to provide for the system's virtualization and storage needs, in a configuration that allows you to take one of the three hosts down at a time without disrupting your running VMs.
If you're looking instead for a simpler, single-machine option for trying out oVirt, your best bet is the oVirt Live ISO page. This is a LiveCD image that you can burn onto a blank CD or copy onto a USB stick to boot from and run oVirt. This is probably the fastest way to get up and running, but once you're up, this is definitely a low-performance option, and not suitable for extended use or expansion.
Read on to learn about my favorite way of running oVirt.
oVirt, Glusterized
Prerequisites
Hardware: You’ll need three machines with 16GB or more of RAM and processors with hardware virtualization extensions. Physical machines are best, but you can test oVirt using nested KVM as well. I've written this howto using VMs running on my "real" Continue reading
Up and Running with oVirt 4.2 and Gluster Storage
In December, the oVirt Project shipped version 4.2 of its open source virtualization management system. With a new release comes an update to this howto for running oVirt together with Gluster storage using a trio of servers to provide for the system's virtualization and storage needs, in a configuration that allows you to take one of the three hosts down at a time without disrupting your running VMs.
If you're looking instead for a simpler, single-machine option for trying out oVirt, your best bet is the oVirt Live ISO page. This is a LiveCD image that you can burn onto a blank CD or copy onto a USB stick to boot from and run oVirt. This is probably the fastest way to get up and running, but once you're up, this is definitely a low-performance option, and not suitable for extended use or expansion.
Read on to learn about my favorite way of running oVirt.
oVirt, Glusterized
Prerequisites
Hardware: You’ll need three machines with 16GB or more of RAM and processors with hardware virtualization extensions. Physical machines are best, but you can test oVirt using nested KVM as well. I've written this howto using VMs running on my "real" Continue reading
OVN and Red Hat Virtualization: Provisioning OVN
Hi folks, in this final post on RHV and OVN I’m going to show you how to utilize everything we’ve learned and installed up to this point. We’ve installed the packages, now it’s just a matter of deploying some virtual machines and attaching them to the new OVN provided SDN. As before my colleague, Tony James walks us through the process. Let’s get started.
Like any other integration in Red Hat Virtualization, we access OVN by way of the External Provider feature. In short, the External Provider allows RHV to take advantage of resources managed by external sources, in this case SDN.
Let’s post the video first, the walk through follows:
Add an External Network Provider
The External Provider dialog is launched from the “tree” menu on the far left of the dashboard. We give the network a name and because the OVN controller was deployed on the RHV-M host, the external provider simply points at the local host and port 9696. The external provider type is “External Network Provider”, and the “Read Only” box is unchecked.
Add a Network
Under the “Network” tab, click “New” and enter a name for the new SDN. Check the “Create on external provider” Continue reading
Understanding the Container Network Interface (CNI)

The CNI"nterface" is composed of two components - NetPlugin and the IPAM plugin. While NetPlugin is responsible for setting up network plumbing i.e. conduit between the container & the host, the IPAM plugin is responsible for IP address allocation. Since these two are designed to be pluggable, we can pick-and-choose plugins from different sources/vendors for each of them. CNI takes in a JSON configuration file from the container runtime or from an orchestrator like Kubernetes, that specifies the choice for each Continue reading
oVirt 4.2.2 web admin UI browser bookmarks
oVirt web admin UI now allows the user to bookmark all entities and searches using their browser.
Synchronizing URL with application state
Whenever you select a detail view in the application, the browser URL is now updated to match the selected entity. For instance if you have a VM named MyVM and you click on the name to see the details, the URL of the browser will go to #vms-general;name=MyVM. If you switch to lets say the network interfaces tab the URL in your browser will switch to #vms-network_interfaces;name=MyVM. Changing entity or changing location will keep the browser URL synchronized. This allows you to use your browsers bookmark functionality to store a link to that VM.
Direct linking to entities
As a complementary functionality you can pass arguments to places that will execute some functionality based on the type of argument you have passed in. The following types are available:
- SEARCH, is for main views only, this allows you to pre populate the search string used in the search bar.
- NAME, most entities are uniquely named and you can use their name in a detail view to go directly to that named entity.
- DATACENTER, quota and networks are not uniquely Continue reading
Build oVirt Reports Using Grafana
Grafana, The open platform for beautiful analytics and monitoring, recently added support for PostgreSQL.
It in now possible to connect Grafana to oVirt DWH, in order to visualize and monitor the oVirt environment.
Grafana dashboard example

If you wish to create dashboards to monitor oVirt environment, you will need to install Grafana.
Grafana automatically creates an admin user and password.
You will need to add a PostgreSQL data source that connects to the DWH database.
For example:

You may want to add a read only user to connect the history database - Allowing read only access to the history database
Now you can start creating your dashboard widgets.
Go to Dashboards -> + New.
Graph panel example:
To add a Graph type panel, on the left side you have the Row controls menu.
Go to the + Add Panel, and pick Graph.
Query example for the - Five Most Utilized Hosts by Memory / CPU:
SELECT DISTINCT
    min(time) AS time,
    MEM_Usage,
    host_name || 'MEM_Usage' as metric
FROM (
    SELECT
        stats_hosts.host_id,
        CASE
            WHEN delete_date IS NULL
                THEN host_name
            ELSE
                host_name
                ||
                ' (Removed on '
                ||
                CAST ( CAST ( delete_date AS date ) AS varchar )
Continue readingVMware Cloud on AWS with NSX: Communicating with Native AWS Resources
If you haven’t already, please read my prior two blogs on VMware Cloud on AWS: VMware SDDC with NSX Expands to AWS and VMware Cloud on AWS with NSX – Connecting SDDCs Across Different AWS Regions; also posted on my personal blog at humairahmed.com. The prior blogs provide a good intro and information of some of the functionality and advantages of the service. In this blog post I expand the discussion to the advantages of VMware Cloud on AWS being able to communicate with native AWS resources. This is something that would be desired if you have native AWS EC2 instances you want VMware Cloud on AWS workloads to communicate with or if you want to leverage other native AWS services like AWS S3 VPC Endpoint or RDS. Continue reading
OVN and Red Hat Virtualization: Installing OVN
Hi folks, in the last article I provided an overview and introduction to OVN. This time around, I’ll provide a walkthrough on how to actually install it in your RHV environment. My colleague Tony created an Ansible playbook to automate the installation, and I’ll share the link to that at the end. Let’s get started.
Necessary Channels and Subscriptions
One of the first thing that Tony covers in the demo is that he used the standard channels for both RHV-M (engine) and Hosts (hypervisors) – nothing special is needed from a subscription standpoint as all of the packages are now included in RHV 4.1. Using the `ovs-vsctl show` command, we see that even though the openvswitch package is pulled in as part of the host install, nothing is configured by default.
Automate the Installation with Ansible
Next, we see Tony’s Ansible playbook. It covers 2 plays, one for the engine (RHV-M) and one for the hosts. Not only does it install the packages, but it configures firewalld. Specifically, the playbook does the following:
On the Engine:
It installs “ovirt-provider-ovn” package then it starts/restarts multiple services, north and southbound connections are set.
On the Hosts:
It installs the “ovirt-provider-ovn-driver” package. Continue reading
VMware Cloud on AWS with NSX: Connecting SDDCs Across Different AWS Regions
I prior shared this post on the LinkedIN publishing platform and my personal blog at HumairAhmed.com. In my prior blog post, I discussed how with VMware Cloud on AWS (VMC on AWS) customers get the best of both worlds for their move to a Software Defined Data Center (SDDC) – the leading compute, storage, and network virtualization stack for enterprises deployed on dedicated, elastic, bare-metal, and highly available AWS infrastructure. Another benefit of VMC on AWS, and the focus of this post, is that you can easily have a global footprint by deploying multiple VMC SDDCs in different regions. Continue reading
oVirt 4.2 Is Now Generally Available
We are delighted to announce the general availability of oVirt 4.2, as of December 19, 2017, for Red Hat Enterprise Linux 7.4, CentOS Linux 7.4, or similar.
oVirt 4.2 is an altogether more powerful and flexible open source virtualization solution. The release is a major milestone for the project, encompassing over 1000 individual changes and a wide range of enhancements spanning storage, network, engine, user interface, and analytics.
What’s new in oVirt 4.2?
The big new features:
The Administration Portal has been redesigned using Patternfly, a widely adopted standard in web application design that promotes consistency and usability across IT applications. The result is a more intuitive and user-friendly user interface, featuring improved performance. Here is a screenshot of the Administration Portal dashboard:

A new VM Portal for non-admin users. Built with performance and ease of use in mind, the new VM portal delivers a more streamlined experience.
A High Performance VM type has been added to the existing "Server" and "Desktop" types. The new type enables administrators to easily optimize a VM for high performance workloads.
The oVirt Metrics Store is a real-time monitoring solution, providing complete infrastructure visibility for decision making Continue reading
oVirt 4.2 Is Now Generally Available
We are delighted to announce the general availability of oVirt 4.2, as of December 19, 2017, for Red Hat Enterprise Linux 7.4, CentOS Linux 7.4, or similar.
oVirt 4.2 is an altogether more powerful and flexible open source virtualization solution. The release is a major milestone for the project, encompassing over 1000 individual changes and a wide range of enhancements spanning storage, network, engine, user interface, and analytics.
What’s new in oVirt 4.2?
The big new features:
The Administration Portal has been redesigned using Patternfly, a widely adopted standard in web application design that promotes consistency and usability across IT applications. The result is a more intuitive and user-friendly user interface, featuring improved performance. Here is a screenshot of the Administration Portal dashboard:
A new VM Portal for non-admin users. Built with performance and ease of use in mind, the new VM portal delivers a more streamlined experience.
A High Performance VM type has been added to the existing "Server" and "Desktop" types. The new type enables administrators to easily optimize a VM for high performance workloads.
The oVirt Metrics Store is a real-time monitoring solution, providing complete infrastructure visibility for decision making Continue reading
Monitor Your oVirt Environment with oVirt Metrics Store
The oVirt project now includes a unified metrics and logs real-time monitoring solution for the oVirt environment.
Using Elasticsearch - a search and analytics engine - and its native visualization layer, Kibana, we now provide oVirt project users with a fully functional monitoring solution.
The solution includes self-service dashboards for creating your own dashboard, reports, and log analysis for both the engine and VDSM logs.
The Kibana dashboard
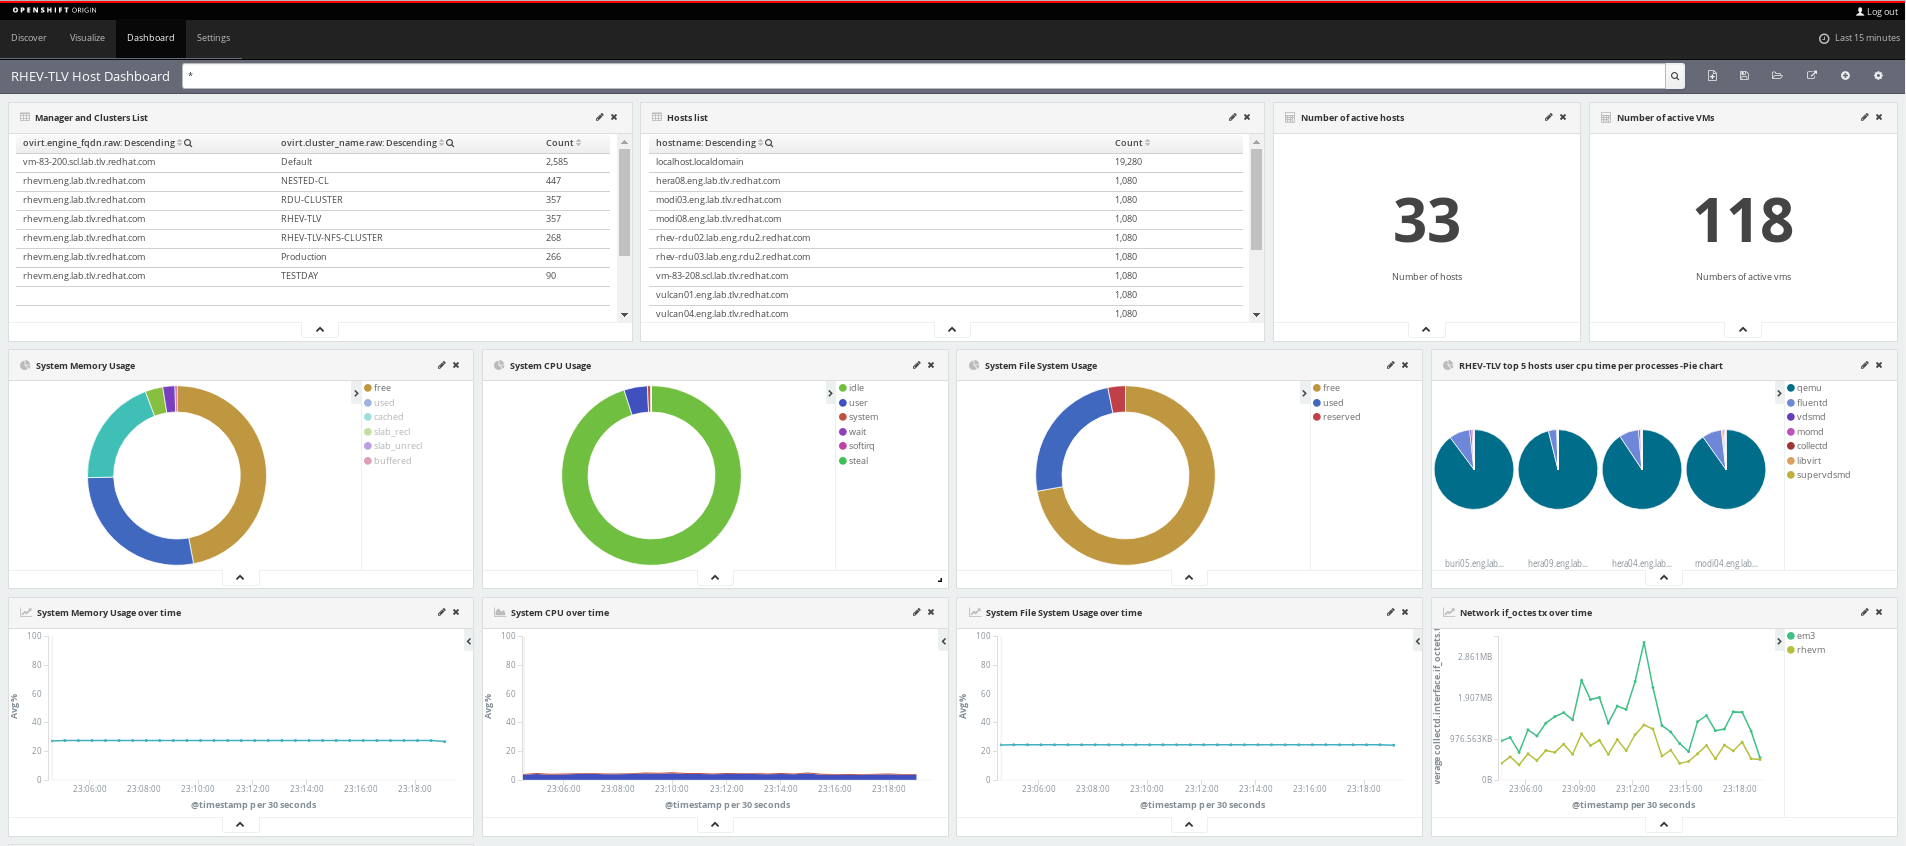
Combining Elasticsearch and kibana - both built on top of the OpenShift Container Platform (OCP) - with the collectd and fluentd client-side daemons, results in a powerful end-to-end solution.
For additional details, including how to set up the oVirt Metrics Store, please see the oVirt Metrics Store Feature page.
Monitor Your oVirt Environment with oVirt Metrics Store
The oVirt project now includes a unified metrics and logs real-time monitoring solution for the oVirt environment.
Using Elasticsearch - a search and analytics engine - and its native visualization layer, Kibana, we now provide oVirt project users with a fully functional monitoring solution.
The solution includes self-service dashboards for creating your own dashboard, reports, and log analysis for both the engine and VDSM logs.
The Kibana dashboard
Combining Elasticsearch and kibana - both built on top of the OpenShift Container Platform (OCP) - with the collectd and fluentd client-side daemons, results in a powerful end-to-end solution.
For additional details, including how to set up the oVirt Metrics Store, please see the oVirt Metrics Store Feature page.